This is the multi-page printable view of this section. Click here to print.
Operating
- 1: Setup
- 1.1: Installation
- 1.2: Configuration
- 1.3: OpenShift
- 1.4: Rancher
- 1.5: Managed Kubernetes
- 2: Admission Policies
- 3: Architecture
- 4: Best Practices
- 4.1: Workloads
- 4.2: Networking
- 4.3: Container Images
- 5: Authentication
- 6: Monitoring
- 7: Backup & Restore
- 8: Known Metadata
- 9: Templating
- 10: Troubleshooting
1 - Setup
1.1 - Installation
Requirements
- Helm 3 is required when installing the Capsule Operator chart. Follow Helm’s official documentation for installing Helm on your operating system.
- A Kubernetes cluster (v1.16+) with the following Admission Controllers enabled:
- PodNodeSelector
- LimitRanger
- ResourceQuota
- MutatingAdmissionWebhook
- ValidatingAdmissionWebhook
- A Kubeconfig file accessing the Kubernetes cluster with cluster admin permissions.
- Cert-Manager is required by default but can be disabled. It is used to manage the TLS certificates for the Capsule Admission Webhooks.
Installation
We officially only support the installation of Capsule using the Helm chart. The chart itself handles the installation/upgrade of the required CustomResourceDefinitions. The following Artifact Hub repositories are official:
Perform the following steps to install the Capsule operator:
Add repository:
helm repo add projectcapsule https://projectcapsule.github.io/chartsInstall Capsule:
helm install capsule projectcapsule/capsule --version 0.13.9 -n capsule-system --create-namespaceor (OCI)
helm install capsule oci://ghcr.io/projectcapsule/charts/capsule --version 0.13.9 -n capsule-system --create-namespaceShow the status:
helm status capsule -n capsule-systemUpgrade the Chart
helm upgrade capsule projectcapsule/capsule -n capsule-systemor (OCI)
helm upgrade capsule oci://ghcr.io/projectcapsule/charts/capsule --version 0.13.9Uninstall the Chart
helm uninstall capsule -n capsule-system
Production
Here are some key considerations to keep in mind when installing Capsule. Also check out the Best Practices for more information.
Scalability
For large clusters you might need to consider adjusting values for the Capsule controller.
QPS/Burst
In order to handle a large number of tenants and resources, you may need to increase the QPS and Burst values for the Capsule controller. This avoids the controller being throttled by the Kubernetes API server (Client Rate limited). You can set the following values in the Helm chart:
manager:
  options:
    clientConnectionQPS: 400
    clientConnectionBurst: 200
Workers
Define the number of workers for the Capsule controller, which translates into the number of concurrent reconciles:
manager:
  options:
    workers: 4
Cache Synchronisation
The more resources you have in your cluster, the longer it will take for the Capsule controller to sync its cache. You can adjust the cache sync period to a higher value to reduce the load on the API server:
manager:
  options:
    cacheSyncTimeout: "10m"
Leader Election Timeout
In high pressure environments leader election may fail due to the default timeout values. You can adjust the leader election timeout values to avoid this issue:
E0707 08:38:18.319041       1 leaderelection.go:452] "Error retrieving lease lock"
  err="Get \"https://10.96.0.1:443/apis/coordination.k8s.io/v1/namespaces/capsule-
  system/leases/42c733ea.clastix.capsule.io?timeout=5s\": net/http: request canceled
  (Client.Timeout exceeded while awaiting headers)" lock="capsule-
  system/42c733ea.clastix.capsule.io"
  I0707 08:38:18.442700       1 leaderelection.go:299] "Failed to renew lease"
Tune leader election with manager.options.leaderElection.leaseDuration, manager.options.leaderElection.renewDeadline, and manager.options.leaderElection.retryPeriod. Increasing these values makes Capsule more tolerant of slow or overloaded Kubernetes API servers; for example, raising renewDeadline also raises the leader-election client request timeout because controller-runtime uses roughly half of that value. The tradeoff is slower failover: if the active controller really dies, standby replicas will wait longer before taking leadership. Keep the ordering valid: leaseDuration should be greater than renewDeadline, and renewDeadline should be greater than retryPeriod.
manager:
  options:
    leaderElection:
      leaseDuration: "60s"
      renewDeadline: "40s"
      retryPeriod: "5s"
Worst-case leader failover is slower, around 60s, if the active pod really dies. Keep manager.options.leaderElection.leaseDuration > manager.options.leaderElection.renewDeadline > manager.options.leaderElection.retryPeriod.
API Priority and Fairness (APF)
With APF enabled, the Capsule controller will be subject to the APF configuration of the cluster. If you are running a large cluster with many tenants, you may need to adjust the APF configuration to ensure that the Capsule controller has sufficient resources to operate effectively. For more information on APF, see Kubernetes API Priority and Fairness.
We provide a built-in APF configuration for the Capsule controller, which provides API priority for all resources managed by Capsule. This configuration is applied automatically when you install Capsule. To enable the built-in APF configuration, set the following value in the Helm chart:
# Manager Options
manager:
  apiPriorityAndFairness:
    # -- Change to `true` if you want to insulate the API calls made by Capsule admission controller activities.
    # This will help ensure Capsule stability in busy clusters.
    # Ref: https://kubernetes.io/docs/concepts/cluster-administration/flow-control/
    enabled: true

    # -- Only the first matching FlowSchema for a given request matters. If multiple FlowSchemas match a single inbound request, it will be assigned based on the one with the highest matchingPrecedence.
    # Ref: https://kubernetes.io/docs/concepts/cluster-administration/flow-control/#flowschema
    matchingPrecedence: 900

    # -- Priority level configuration.
    # The block is directly forwarded into the priorityLevelConfiguration, so you can use whatever specification you want.
    # ref: https://kubernetes.io/docs/concepts/cluster-administration/flow-control/#prioritylevelconfiguration
    priorityLevelConfigurationSpec:
      type: Limited
      limited:
          nominalConcurrencyShares: 100
          limitResponse:
            type: Queue
            queuing:
              queues: 64
              handSize: 6
              queueLengthLimit: 100
Strict RBAC
Attention
Ensure to first upgrade to version0.13.0 of capsule before enabling strict mode. As it requires fields which are newly added with version 0.13.0.By default, the Capsule controller runs with the ClusterRole cluster-admin, which provides full access to the cluster. This is because the controller itself must grant RoleBindings on a per-namespace basis that by default reference the ClusterRole admin, which needs to at least match the permissions of the controller itself. However, for production environments we recommend configuring stricter RBAC permissions for the Capsule controller. You can enable the minimal required permissions by setting the following value in the Helm chart:
manager:
  rbac:
    strict: true
This grants the controller the minimal permissions required for its own operation. However, that alone is not sufficient for it to function properly. The ClusterRole for the controller allows aggregating further permissions to it via the following labels:
projectcapsule.dev/aggregate-to-controller: "true"projectcapsule.dev/aggregate-to-controller-instance: {{ .Release.Name }}
In other words, you must aggregate all ClusterRoles that are assigned to Tenant owners or used for additional RoleBindings. This applies only to ClusterRoles that are not managed by Capsule (see Configuration). By default, the only such ClusterRole granted to owners is admin (not managed by Capsule).
kubectl label clusterrole admin projectcapsule.dev/aggregate-to-controller=true
Verify that the label has been applied:
kind: ClusterRole
apiVersion: rbac.authorization.k8s.io/v1
metadata:
  name: admin
  labels:
    projectcapsule.dev/aggregate-to-controller: "true"
rules:
...
Alternatively you can directly grant more permissions via Helm values:
manager:
  rbac:
    strict: true
    clusterRole:
      extraResources:
        - apiGroups: ["storage.k8s.io"]
          resources: ["storageclasses"]
          verbs: ["get", "list", "watch", "update", "patch"]
If you are missing permissions you will see an error status for the respective tenants reflecting
kubectl get tnt
NAME    STATE    NAMESPACE QUOTA   NAMESPACE COUNT   NODE SELECTOR   READY   STATUS                                                                                                                                                                                                                                                                                                                                          AGE
green   Active                     2                                 False   cannot sync rolebindings items: rolebindings.rbac.authorization.k8s.io "capsule:managed:658936e7f2a30e35" is forbidden: user "system:serviceaccount:capsule-system:capsule" (groups=["system:serviceaccounts" "system:serviceaccounts:capsule-system" "system:authenticated"]) is attempting to grant RBAC permissions not currently held:...   5s
Alternatively, you can enable only the minimal required permissions by setting the following value in the Helm chart:
manager:
  rbac:
    minimal: true
Before you enable this option, you must implement the required permissions for your use case. Depending on which features you are using, you may need to take manual action, for example:
- Migrate additional RoleBindings
- Migrate
TenantResourcesto use impersonation - Migrate
GlobalTenantResourcesto use impersonation
Admission Policies
While Capsule provides a robust framework for managing multi-tenancy in Kubernetes, it does not include built-in admission policies for enforcing specific security or operational standards for all possible aspects of a Kubernetes cluster. We provide additional policy recommendations here.
Certificate Management
By default, Capsule delegates its certificate management to cert-manager. This is the recommended way to manage the TLS certificates for Capsule. However, you can also use Capsule’s built-in TLS reconciler to manage the certificates. This is not recommended for production environments. To enable the TLS reconciler, use the following values:
certManager:
  generateCertificates: false
tls:
  enableController: true
  create: true
Webhooks
Capsule makes use of webhooks for admission control. Ensure that your cluster supports webhooks and that they are properly configured. The webhooks are automatically created by Capsule during installation. However, some of these webhooks will cause problems when Capsule is not running (this is especially problematic in single-node clusters). Here are the webhooks you need to watch out for.
Generally, we recommend using matchConditions for all webhooks to avoid problems when Capsule is not running. You should exclude your system-critical components from the Capsule webhooks. For namespaced resources (pods, services, etc.) the webhooks select only namespaces that are part of a Capsule Tenant. If your system-critical components are not part of a Capsule Tenant, they will not be affected by the webhooks. However, if you have system-critical components that are part of a Capsule Tenant, you should exclude them from the Capsule webhooks by using matchConditions as well, or add more specific namespaceSelectors/objectSelectors to exclude them. This can also improve performance.
The Webhooks below are the most important ones to consider.
Nodes
There is a webhook which catches interactions with the Node resource. This webhook is mainly relevant when you make use of Node metadata. In most other cases, it will only cause problems. By default, the webhook is disabled, but you can enable it by setting the following value:
webhooks:
  hooks:
    nodes:
      enabled: true
Or you could at least consider to set the failure policy to Ignore, if you don’t want to disrupt critical nodes:
webhooks:
  hooks:
    nodes:
      failurePolicy: Ignore
If you still want to use the feature, you could exclude the kube-system namespace (or any other namespace you want to exclude) from the webhook by setting the following value:
webhooks:
  hooks:
    nodes:
      matchConditions:
      - name: 'exclude-kubelet-requests'
        expression: '!("system:nodes" in request.userInfo.groups)'
      - name: 'exclude-kube-system'
        expression: '!("system:serviceaccounts:kube-system" in request.userInfo.groups)'
Namespaces
Namespaces are the most important resource in Capsule. The Namespace webhook is responsible for enforcing the Capsule Tenant boundaries. It is enabled by default and should not be disabled. However, you may change the matchConditions to exclude certain namespaces from the Capsule Tenant boundaries. For example, you can exclude the kube-system namespace by setting the following value:
webhooks:
  hooks:
    namespaces:
      matchConditions:
      - name: 'exclude-kube-system'
        expression: '!("system:serviceaccounts:kube-system" in request.userInfo.groups)'
Protected
By default resources with the following values are protected by a webhook to be changed by [Capsule Users]:
webhooks:
  hooks:
    managed:
      objectSelector:
        matchExpressions:
          - key: "projectcapsule.dev/created-by"
            operator: In
            values:
            - "controller"
            - "resources"
          - key: "projectcapsule.dev/managed-by"
            operator: In
            values:
            - "controller"
GitOps
There are no specific requirements for using Capsule with GitOps tools like ArgoCD or FluxCD. You can manage Capsule resources as you would with any other Kubernetes resource.
ArgoCD
Visit the ArgoCD Integration for more options to integrate Capsule with ArgoCD.
Manifests to get you started with ArgoCD. For ArgoCD you might need to skip the validation of the CapsuleConfiguration resources, otherwise there might be errors on the first install:
Information
TheValidate=false option is required for the CapsuleConfiguration resource, because ArgoCD tries to validate the resource before the Capsule CRDs are installed via our CRD Lifecycle hook. Upstream Issue. This has mainly been observed in ArgoCD Applications using Service-Side Diff/Apply.manager:
options:
annotations:
argocd.argoproj.io/sync-options: "Validate=false,SkipDryRunOnMissingResource=true"
---
apiVersion: argoproj.io/v1alpha1
kind: Application
metadata:
name: capsule
namespace: argocd
finalizers:
- resources-finalizer.argocd.argoproj.io
spec:
project: system
source:
repoURL: ghcr.io/projectcapsule/charts
targetRevision: 0.13.9
chart: capsule
helm:
valuesObject:
crds:
install: true
manager:
  options:
    annotations:
      argocd.argoproj.io/sync-options: "Validate=false,SkipDryRunOnMissingResource=true"
capsuleConfiguration: default
ignoreUserGroups:
- oidc:administators
users:
- kind: Group
name: oidc:kubernetes-users
- kind: Group
name: system:serviceaccounts:tenants-system
monitoring:
dashboards:
enabled: true
serviceMonitor:
enabled: true
annotations:
argocd.argoproj.io/sync-options: SkipDryRunOnMissingResource=true
destination:
server: https://kubernetes.default.svc
namespace: capsule-system
syncPolicy:
automated:
prune: true
selfHeal: true
syncOptions:
- ServerSideApply=true
- CreateNamespace=true
- PrunePropagationPolicy=foreground
- PruneLast=true
- RespectIgnoreDifferences=true
retry:
limit: 5
backoff:
duration: 5s
factor: 2
maxDuration: 3m
---
apiVersion: v1
kind: Secret
metadata:
name: capsule-repo
namespace: argocd
labels:
argocd.argoproj.io/secret-type: repository
stringData:
url: ghcr.io/projectcapsule/charts
name: capsule
project: system
type: helm
enableOCI: "true"
FluxCD
apiVersion: helm.toolkit.fluxcd.io/v2
kind: HelmRelease
metadata:
  name: capsule
  namespace: flux-system
spec:
  serviceAccountName: kustomize-controller
  targetNamespace: "capsule-system"
  interval: 10m
  releaseName: "capsule"
  chart:
    spec:
      chart: capsule
      version: "0.13.9"
      sourceRef:
        kind: HelmRepository
        name: capsule
      interval: 24h
  install:
    createNamespace: true
  upgrade:
    remediation:
      remediateLastFailure: true
  driftDetection:
    mode: enabled
  values:
    crds:
      install: true
    manager:
      options:
        capsuleConfiguration: default
        ignoreUserGroups:
          - oidc:administators
        users:
          - kind: Group
            name: oidc:kubernetes-users
          - kind: Group
            name: system:serviceaccounts:tenants-system
    monitoring:
      dashboards:
        enabled: true
      serviceMonitor:
        enabled: true
---
apiVersion: source.toolkit.fluxcd.io/v1
kind: HelmRepository
metadata:
  name: capsule
  namespace: flux-system
spec:
  type: "oci"
  interval: 12h0m0s
  url: oci://ghcr.io/projectcapsule/charts
Security
Signature
To verify artifacts you need to have cosign installed. This guide assumes you are using v2.x of cosign. All of the signatures are created using keyless signing. You can set the environment variable COSIGN_REPOSITORY to point to this repository. For example:
# Docker Image
export COSIGN_REPOSITORY=ghcr.io/projectcapsule/capsule

# Helm Chart
export COSIGN_REPOSITORY=ghcr.io/projectcapsule/charts/capsule
To verify the signature of the docker image, run the following command.
COSIGN_REPOSITORY=ghcr.io/projectcapsule/charts/capsule cosign verify ghcr.io/projectcapsule/capsule:<release_tag> \
  --certificate-identity-regexp="https://github.com/projectcapsule/capsule/.github/workflows/docker-publish.yml@refs/tags/*" \
  --certificate-oidc-issuer="https://token.actions.githubusercontent.com" | jq
To verify the signature of the helm image, run the following command.
COSIGN_REPOSITORY=ghcr.io/projectcapsule/charts/capsule cosign verify ghcr.io/projectcapsule/charts/capsule:<release_tag> \
  --certificate-identity-regexp="https://github.com/projectcapsule/capsule/.github/workflows/helm-publish.yml@refs/tags/*" \
  --certificate-oidc-issuer="https://token.actions.githubusercontent.com" | jq
Provenance
Capsule creates and attests to the provenance of its builds using the SLSA standard and meets the SLSA Level 3 specification. The attested provenance may be verified using the cosign tool.
Verify the provenance of the docker image.
cosign verify-attestation --type slsaprovenance \
  --certificate-identity-regexp="https://github.com/slsa-framework/slsa-github-generator/.github/workflows/generator_container_slsa3.yml@refs/tags/*" \
  --certificate-oidc-issuer="https://token.actions.githubusercontent.com" \
  ghcr.io/projectcapsule/capsule:0.13.9 | jq .payload -r | base64 --decode | jq
cosign verify-attestation --type slsaprovenance \
  --certificate-identity-regexp="https://github.com/slsa-framework/slsa-github-generator/.github/workflows/generator_container_slsa3.yml@refs/tags/*" \
  --certificate-oidc-issuer="https://token.actions.githubusercontent.com" \
  ghcr.io/projectcapsule/charts/capsule:0.13.9 | jq .payload -r | base64 --decode | jq
Software Bill of Materials (SBOM)
An SBOM (Software Bill of Materials) in CycloneDX JSON format is published for each release, including pre-releases. You can set the environment variable COSIGN_REPOSITORY to point to this repository. For example:
# Docker Image
export COSIGN_REPOSITORY=ghcr.io/projectcapsule/capsule

# Helm Chart
export COSIGN_REPOSITORY=ghcr.io/projectcapsule/charts/capsule
To inspect the SBOM of the docker image, run the following command.
COSIGN_REPOSITORY=ghcr.io/projectcapsule/capsule cosign download sbom ghcr.io/projectcapsule/capsule:0.13.9
To inspect the SBOM of the helm image, run the following command.
COSIGN_REPOSITORY=ghcr.io/projectcapsule/charts/capsule cosign download sbom ghcr.io/projectcapsule/charts/capsule:0.13.9
Compatibility
The Kubernetes compatibility is announced for each Release. Generally we are up to date with the latest upstream Kubernetes Version. Note that the Capsule project offers support only for the latest minor version of Kubernetes. Backwards compatibility with older versions of Kubernetes and OpenShift is offered by vendors.
1.2 - Configuration
The configuration for the capsule controller is done via its dedicated configuration Custom Resource. You can explain the configuration options and how to use them:
CapsuleConfiguration
The configuration for Capsule is done via its dedicated configuration Custom Resource. You can explain the configuration options and how to use them:
kubectl explain capsuleConfiguration.spec
administrators
These entities are automatically owners for all existing tenants. Meaning they can add namespaces to any tenant. However they must be specific by using the capsule label for interacting with namespaces. Because if that label is not defined, it’s assumed that namespace interaction was not targeted towards a tenant and will therefore be ignored by capsule. May also be handy in GitOps scenarios where certain service accounts need to be able to manage namespaces for all tenants.
manager:
  options:
    administrators:
      - kind: User
        name: admin-user
users
These entities are automatically owners for all existing tenants. Meaning they can add namespaces to any tenant. However they must be specific by using the capsule label for interacting with namespaces. Because if that label is not defined, it’s assumed that namespace interaction was not targeted towards a tenant and will therefore be ignored by capsule. May also be handy in GitOps scenarios where certain service accounts need to be able to manage namespaces for all tenants.
manager:
  options:
    users:
      - kind: User
        name: owner-user
      - kind: Group
        name: projectcapsule.dev
ignoreUserWithGroups
Define groups which when found in the request of a user will be ignored by the Capsule. This might be useful if you have one group where all the users are in, but you want to separate administrators from normal users with additional groups.
manager:
  options:
    ignoreUserWithGroups:
      - company:org:administrators
enableTLSReconciler
Toggles the TLS reconciler, the controller that is able to generate CA and certificates for the webhooks when not using an already provided CA and certificate, or when these are managed externally with Vault, or cert-manager.
tls:
  enableController: true
forceTenantPrefix
Enforces the Tenant owner, during Namespace creation, to name it using the selected Tenant name as prefix, separated by a dash. This is useful to avoid Namespace name collision in a public CaaS environment.
manager:
  options:
    forceTenantPrefix: true
nodeMetadata
Allows to set the forbidden metadata for the worker nodes that could be patched by a Tenant. This applies only if the Tenant has an active NodeSelector, and the Owner have right to patch their nodes.
manager:
  options:
    nodeMetadata:
      forbiddenLabels:
        denied:
          - "node-role.kubernetes.io/*"
        deniedRegex: ""
      forbiddenAnnotations:
        denied:
          - "node.alpha.kubernetes.io/*"
        deniedRegex: ""
overrides
Allows to set different name rather than the canonical one for the Capsule configuration objects, such as webhook secret or configurations.
protectedNamespaceRegex
Disallow creation of namespaces, whose name matches this regexp
manager:
  options:
    protectedNamespaceRegex: "^(kube|default|capsule|admin|system|com|org|local|localhost|io)$"
allowServiceAccountPromotion
ServiceAccounts within tenant namespaces can be promoted to owners of the given tenant this can be achieved by labeling the serviceaccount and then they are considered owners. This can only be done by other owners of the tenant. However ServiceAccounts which have been promoted to owner can not promote further serviceAccounts.
manager:
  options:
    allowServiceAccountPromotion: true
cacheInvalidation
The reconcile periode caches are invalidated. Invalidation is already attempted when resources change, however in certain scenarios it might be necessary to do out of order cache invalidations to ensure proper garbage collection of resources.
manager:
  options:
    cacheInvalidation: 0h30m0s
rbac
Define configurations for the RBAC which is being managed and applied by Capsule.
manager:
  options:
    rbac:
      # -- The ClusterRoles applied for Administrators
      administrationClusterRoles:
        - capsule-namespace-deleter

      # -- The ClusterRoles applied for ServiceAccounts which had owner Promotion
      promotionClusterRoles:
        - capsule-namespace-provisioner
        - capsule-namespace-deleter

      # -- Name for the ClusterRole required to grant Namespace Deletion permissions.
      deleter: capsule-namespace-deleter

      # -- Name for the ClusterRole required to grant Namespace Provision permissions.
      provisioner: capsule-namespace-provisioner
impersonation
For Replications by default the controller ServiceAccount is used to perform the operations. However it is possible to define a dedicated ServiceAccount to be used for that purpose. Within this configuration you can define properties such as the endpoint of the kube-apiserver and if service account promotion should be allowed for this client. Also declare default service account to be used for replication operations. By default the https://kubernetes.default.svc endpoint is used.
manager:
  options:
    impersonation:
      # Kubernetes API Endpoint to use for the operations
      endpoint: "https://capsule-proxy.capsule-system.svc:8081"

      # Toggles if TLS verification for the endpoint is performed or not
      skipTlsVerify: false

      # Key in the secret that holds the CA certificate (e.g., "ca.crt")
      caSecretKey: "ca.crt"

      # Name of the secret containing the CA certificate
      caSecretName: "capsule-proxy-tls"

      # Namespace where the CA certificate secret is located
      caSecretNamespace: "capsule-system"

      # Default ServiceAccount for global resources (GlobalTenantResource) [Cluster Scope]
      # When defined, users are required to use this ServiceAccount anywhere in the cluster
      # unless they explicitly provide their own. Once this is set, Capsule will add this ServiceAccount
      # for all GlobalTenantResources, if they don't already have a ServiceAccount defined.
      globalDefaultServiceAccount: "capsule-global-sa"

      # Namespace of the for the ServiceAccount provided by the globalDefaultServiceAccount property
      globalDefaultServiceAccountNamespace: "tenant-system"

      # Default ServiceAccount for tenant resources (TenantResource) [Namespaced Scope]
      # When defined, users are required to use this ServiceAccount anywhere in the cluster
      # unless they explicitly provide their own. Once this is set, Capsule will add this ServiceAccount
      # for all GlobalTenantResources, if they don't already have a ServiceAccount defined.
      tenantDefaultServiceAccount: "default"
admission
Configuration for the dynamic admission webhooks used by Capsule for mutating and validating requests. The settings are used from the static webhook configurations created during installation of Capsule and abstracted by the helm chart
manager:
  options:
    admission:
      mutating:
        client:
          caBundle: cert
          url: https://172.24.52.212:9443
        name: capsule-dynamic
      validating:
        client:
          caBundle: cert
          url: https://172.24.52.212:9443
        name: capsule-dynamic
Controller Options
Depending on the version of the Capsule Controller, the configuration options may vary. You can view the options for the latest version of the Capsule Controller or by executing the controller locally:
$ go run ./cmd/controller/ --zap-log-level 7 -h
      --cache-sync-timeout duration       The timeout used when waiting for controller cache synchronization. If unset or 0, the controller-runtime default is used.
      --client-connection-burst int32     Burst to use for interacting with kubernetes apiserver. (default 30)
      --client-connection-qps float32     QPS to use for interacting with kubernetes apiserver. (default 20)
      --configuration-name string         The CapsuleConfiguration resource name to use (default "default")
      --enable-http2                      If set, HTTP/2 will be enabled for the metrics and webhook servers
      --enable-leader-election            Enable leader election for controller manager. Enabling this will ensure there is only one active controller manager.
      --enable-pprof                      Enables Pprof endpoint for profiling (not recommend in production)
      --metrics-addr string               The address the metric endpoint binds to. (default ":8080")
      --metrics-cert-key string           The name of the metrics server key file. (default "tls.key")
      --metrics-cert-name string          The name of the metrics server certificate file. (default "tls.crt")
      --metrics-cert-path string          The directory that contains the metrics server certificate.
      --metrics-secure                    If set, the metrics endpoint is served securely via HTTPS. Use --metrics-secure=false to use HTTP instead.
      --version                           Print the Capsule version and exit
      --webhook-cert-key string           The name of the webhook key file. (default "tls.key")
      --webhook-cert-name string          The name of the webhook certificate file. (default "tls.crt")
      --webhook-cert-path string          The directory that contains the webhook certificate. (default "/tmp/k8s-webhook-server/serving-certs")
      --webhook-port int                  The port the webhook server binds to. (default 9443)
      --workers int                       MaxConcurrentReconciles is the maximum number of concurrent Reconciles which can be run. (default 1)
      --zap-devel                         Development Mode defaults(encoder=consoleEncoder,logLevel=Debug,stackTraceLevel=Warn). Production Mode defaults(encoder=jsonEncoder,logLevel=Info,stackTraceLevel=Error)
      --zap-encoder encoder               Zap log encoding (one of 'json' or 'console')
      --zap-log-level level               Zap Level to configure the verbosity of logging. Can be one of 'debug', 'info', 'error', 'panic'or any integer value > 0 which corresponds to custom debug levels of increasing verbosity
      --zap-stacktrace-level level        Zap Level at and above which stacktraces are captured (one of 'info', 'error', 'panic').
      --zap-time-encoding time-encoding   Zap time encoding (one of 'epoch', 'millis', 'nano', 'iso8601', 'rfc3339' or 'rfc3339nano'). Defaults to 'epoch'.
Define additional options in the values.yaml when installing via Helm:
manager:
  extraArgs:
  - "--enable-leader-election=true"
1.3 - OpenShift
Introduction
Capsule is a Kubernetes multi-tenancy operator that enables secure namespace-as-a-service in Kubernetes clusters. When combined with OpenShift’s robust security model, it provides an excellent platform for multi-tenant environments.
This guide demonstrates how to deploy Capsule and Capsule Proxy on OpenShift using the nonroot-v2 and restricted-v2 SecurityContextConstraint (SCC), ensuring tenant owners operate within OpenShift’s security boundaries.
Why Capsule on OpenShift
While OpenShift can already be configured for multi-tenancy (for example with Kyverno), Capsule takes it a step further and makes it easier to manage.
When people think of a multi-tenant Kubernetes cluster, they often expect one or two namespaces with few privileges. Capsule, however, is different. As a tenant owner, you can create as many namespaces as you want. RBAC is much easier because Capsule handles it, making it less error-prone. Resource quotas are not set per namespace but are spread across the whole tenant, simplifying management. Capsule Proxy also solves RBAC issues when listing cluster-wide resources. Furthermore, some operators can be installed inside a tenant by using the Capsule Proxy: add the service account as a tenant owner and set the KUBERNETES_SERVICE_HOST environment variable of the operator deployment to the Capsule Proxy URL. The operator then behaves as if it has cluster-admin access, while remaining fully confined to the tenant.
Prerequisites
Before starting, ensure you have:
- OpenShift cluster with cluster-admin privileges
kubectlCLI configured- Helm 3.x installed
- cert-manager installed
Limitations
The following limitations are known when using OpenShift with Capsule:
- A tenant owner cannot create a namespace/project in the OpenShift GUI. This must be done with
kubectl. - When copying the
login tokenfrom the OpenShift GUI, the server address will always point to the Kubernetes API instead of the Capsule Proxy. An RFE has been filed with Red Hat to make this URL configurable (RFE-7592). If you have a support contract with Red Hat, consider opening a support request (SR) asking for this feature. The more requests there are, the higher the priority.
Capsule Installation
Remove the self-provisioners ClusterRoleBinding
By default, OpenShift includes a self-provisioner role and ClusterRoleBinding that allows all users to create namespaces. Capsule requires this to be removed. See the Red Hat documentation for details.
Remove the subjects from the ClusterRoleBinding:
kubectl patch clusterrolebinding.rbac self-provisioners -p '{"subjects": null}'
Also set autoupdate to false so the ClusterRoleBinding is not reverted by OpenShift.
kubectl patch clusterrolebinding.rbac self-provisioners -p '{ "metadata": { "annotations": { "rbac.authorization.kubernetes.io/autoupdate": "false" } } }'
Extend the admin role
This example extends the default Kubernetes admin role so tenant owners gain admin privileges on all namespaces within their tenant. The extension adds:
- The finalizers required to create/edit resources managed by Capsule
- The SCCs that tenant owners can use — in this example,
restricted-v2andnonroot-v2
kind: ClusterRole
apiVersion: rbac.authorization.k8s.io/v1
metadata:
  name: extend-admin-role
  labels:
    rbac.authorization.k8s.io/aggregate-to-admin: 'true'
rules:
  - verbs:
      - update
    apiGroups:
      - capsule.clastix.io
    resources:
      - '*/finalizers'
  - apiGroups:
      - security.openshift.io
    resources:
      - securitycontextconstraints
    resourceNames:
      - restricted-v2
      - nonroot-v2
    verbs:
      - 'use'
Helm Chart Values
The jobs that Capsule uses can be run with the restricted-v2 SCC, so their securityContext and podSecurityContext must be disabled. For Capsule itself, they are left enabled because Capsule runs as nonroot-v2, which is still a very secure SCC. Always set pullPolicy: Always on a multi-tenant cluster to ensure the intended images are used.
The following chart values can be used:
  podSecurityContext:
    enabled: true
  securityContext:
    enabled: true
  jobs:
    podSecurityContext:
      enabled: false
    securityContext:
      enabled: false
    image:
      pullPolicy: Always
  manager:
    image:
      pullPolicy: Always
Deploy the Capsule Helm chart with (at least) these values.
Example Tenant and TenantOwners
A minimal example tenant looks like the following:
apiVersion: capsule.clastix.io/v1beta2
kind: Tenant
metadata:
  name: sun
spec:
  imagePullPolicies:
    - Always
  permissions:
    matchOwners:
      - matchLabels:
          team: devops
  priorityClasses:
    allowed:
      - openshift-user-critical
Combined with a TenantOwner resource to grant access to the tenant:
apiVersion: capsule.clastix.io/v1beta2
kind: TenantOwner
metadata:
  labels:
    team: devops
  name: devops
spec:
  kind: Group
  name: "oidc:org:devops:a"
More information about tenants and tenant owners can be found in the chapter Tenants.
Capsule Proxy
For Capsule Proxy, all (pod)SecurityContexts can be disabled. By disabling these, the proxy and its jobs run under the nonroot-v2 SCC.
This example also enables the ProxyAllNamespaced feature, which is one of the Proxy’s most powerful capabilities.
The following helm values can be used as a template:
  global:
    jobs:
      kubectl:
        securityContext:
          enabled: false
  securityContext:
    enabled: false
  podSecurityContext:
    enabled: false
  options:
    generateCertificates: false #set to false, since we are using cert-manager in .Values.certManager.generateCertificates
    enableSSL: true
    extraArgs:
      - '--feature-gates=ProxyAllNamespaced=true'
  image:
    pullPolicy: Always
  webhooks:
    enabled: true
  certManager:
    generateCertificates: true
  ingress:
    enabled: true
    annotations:
      route.openshift.io/termination: "reencrypt"
      route.openshift.io/destination-ca-certificate-secret: capsule-proxy-root-secret
    hosts:
      - host: "capsule-proxy.example.com"
        paths: ["/"]
That is all the configuration needed for Capsule Proxy.
Console Customization
The OpenShift console can be customized. For example, the capsule-proxy can be added as a shortcut on the top right application menu with the ConsoleLink CR:
apiVersion: console.openshift.io/v1
kind: ConsoleLink
metadata:
  name: capsule-proxy-consolelink
spec:
  applicationMenu:
    imageURL: 'https://github.com/projectcapsule/capsule/raw/main/assets/logo/capsule.svg'
    section: 'Capsule'
  href: 'https://capsule-proxy.example.com'
  location: ApplicationMenu
  text: 'Capsule Proxy Kubernetes API'
It’s also possible to add links specific for certain namespaces, which are shown on the Namespace/Project overview. These can also be tenant specific by adding a NamespaceSelector:
apiVersion: console.openshift.io/v1
kind: ConsoleLink
metadata:
  name: namespaced-consolelink-sun
spec:
  text: "Sun Docs"
  href: "https://linktothesundocs.com"
  location: "NamespaceDashboard"
  namespaceDashboard:
    namespaceSelector:
      matchExpressions:
        - key: capsule.clastix.io/tenant
          operator: In
          values:
            - sun
Also a custom logo can be provided, for example by adding the Capsule logo.
Add these config lines to the existing cluster CR Console.
kubectl create configmap console-capsule-logo --from-file capsule-logo.png -n openshift-config
apiVersion: operator.openshift.io/v1
kind: Console
metadata:
  name: cluster
spec:
  customization:
    customLogoFile:
      key: capsule-logo.png
      name: console-capsule-logo
    customProductName: Capsule OpenShift Cluster
Conclusion
You now have a fully configured Capsule and Capsule Proxy installation on OpenShift, including console customizations, and the environment is ready to hand off to development teams.
1.4 - Rancher
The integration between Rancher and Capsule, aims to provide a multi-tenant Kubernetes service to users, enabling:
- a self-service approach
- access to cluster-wide resources
to end-users.
Tenant users will have the ability to access Kubernetes resources through:
- Rancher UI
- Rancher Shell
- Kubernetes CLI
On the other side, administrators need to manage the Kubernetes clusters through Rancher.
Rancher provides a feature called Projects to segregate resources inside a common domain. At the same time Projects doesn’t provide way to segregate Kubernetes cluster-scope resources.
Capsule as a project born for creating a framework for multi-tenant platforms, integrates with Rancher Projects enhancing the experience with Tenants.
Capsule allows tenants isolation and resources control in a declarative way, while enabling a self-service experience to tenants. With Capsule Proxy users can also access cluster-wide resources, as configured by administrators at Tenant custom resource-level.
You can read in detail how the integration works and how to configure it, in the following guides.
- How to integrate Rancher Projects with Capsule Tenants How to enable cluster-wide resources and Rancher shell access.
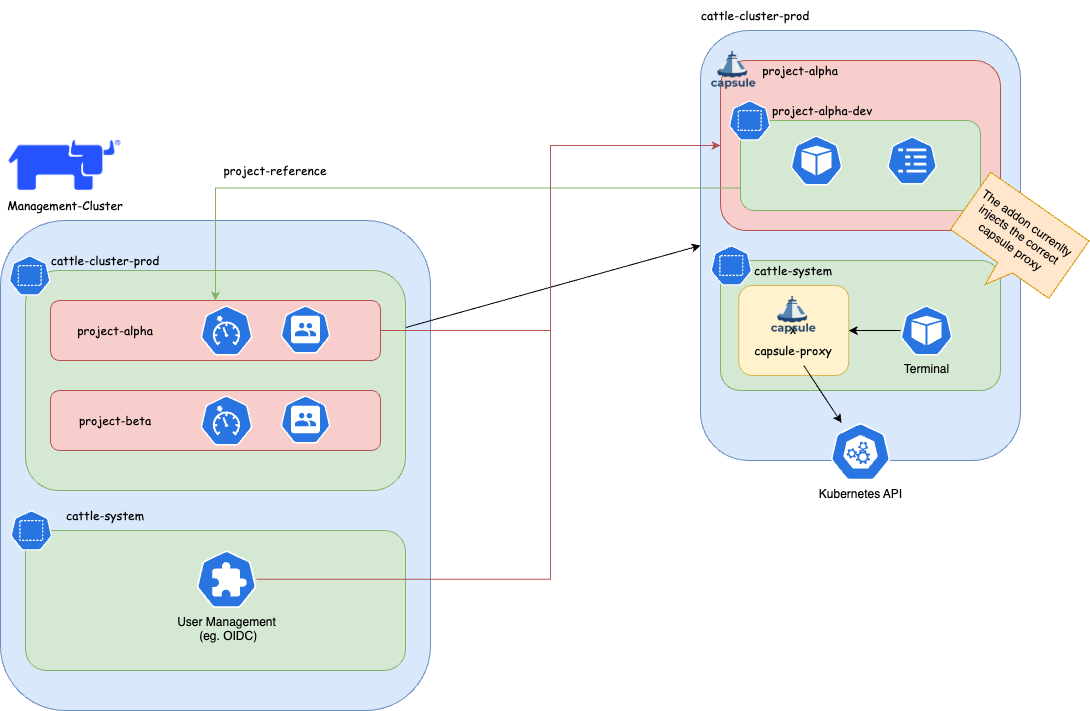
Tenants and Projects
This guide explains how to setup the integration between Capsule and Rancher Projects.
It then explains how for the tenant user, the access to Kubernetes resources is transparent.
Pre-requisites
- An authentication provider in Rancher, e.g. an OIDC identity provider
- A Tenant Member
Cluster Rolein Rancher
Configure an identity provider for Kubernetes
You can follow this general guide to configure an OIDC authentication for Kubernetes.
For a Keycloak specific setup yon can check this resources list.
Known issues
Keycloak new URLs without /auth makes Rancher crash
Create the Tenant Member Cluster Role
A custom Rancher Cluster Role is needed to allow Tenant users, to read cluster-scope resources and Rancher doesn’t provide e built-in Cluster Role with this tailored set of privileges.
When logged-in to the Rancher UI as administrator, from the Users & Authentication page, create a Cluster Role named Tenant Member with the following privileges:
get,list,watchoperations overIngressClassesresources.get,list,watchoperations overStorageClassesresources.get,list,watchoperations overPriorityClassesresources.get,list,watchoperations overNodesresources.get,list,watchoperations overRuntimeClassesresources.
Configuration (administration)
Tenant onboarding
When onboarding tenants, the administrator needs to create the following, in order to bind the Project with the Tenant:
In Rancher, create a
Project.In the target Kubernetes cluster, create a
Tenant, with the following specification:kind: Tenant ... spec: namespaceOptions: additionalMetadata: annotations: field.cattle.io/projectId: ${CLUSTER_ID}:${PROJECT_ID} labels: field.cattle.io/projectId: ${PROJECT_ID}where
$CLUSTER_IDand$PROEJCT_IDcan be retrieved, assuming a valid$CLUSTER_NAME, as:CLUSTER_NAME=foo CLUSTER_ID=$(kubectl get cluster -n fleet-default ${CLUSTER_NAME} -o jsonpath='{.status.clusterName}') PROJECT_IDS=$(kubectl get projects -n $CLUSTER_ID -o jsonpath="{.items[*].metadata.name}") for project_id in $PROJECT_IDS; do echo "${project_id}"; doneMore on declarative
Projects here.In the identity provider, create a user with correct OIDC claim of the Tenant.
In Rancher, add the new user to the
Projectwith the Read-onlyRole.In Rancher, add the new user to the
Clusterwith the Tenant MemberCluster Role.
Create the Tenant Member Project Role
A custom Project Role is needed to allow Tenant users, with minimum set of privileges and create and delete Namespaces.
Create a Project Role named Tenant Member that inherits the privileges from the following Roles:
- read-only
- create-ns
Usage
When the configuration administrative tasks have been completed, the tenant users are ready to use the Kubernetes cluster transparently.
For example can create Namespaces in a self-service mode, that would be otherwise impossible with the sole use of Rancher Projects.
Namespace creation
From the tenant user perspective both CLI and the UI are valid interfaces to communicate with.
From CLI
- Tenants
kubectl-logs in to the OIDC provider - Tenant creates a Namespace, as a valid OIDC-discoverable user.
the Namespace is now part of both the Tenant and the Project.
As administrator, you can verify with:
kubectl get tenant ${TENANT_NAME} -o jsonpath='{.status}'
kubectl get namespace -l field.cattle.io/projectId=${PROJECT_ID}
From UI
- Tenants logs in to Rancher, with a valid OIDC-discoverable user (in a valid Tenant group).
- Tenant user create a valid Namespace
the Namespace is now part of both the Tenant and the Project.
As administrator, you can verify with:
kubectl get tenant ${TENANT_NAME} -o jsonpath='{.status}'
kubectl get namespace -l field.cattle.io/projectId=${PROJECT_ID}
Additional administration
Project monitoring
Before proceeding is recommended to read the official Rancher documentation about Project Monitors.
In summary, the setup is composed by a cluster-level Prometheus, Prometheus Federator via which single Project-level Prometheus federate to.
Network isolation
Before proceeding is recommended to read the official Capsule documentation about NetworkPolicy at Tenant-level`.
Network isolation and Project Monitor
As Rancher’s Project Monitor deploys the Prometheus stack in a Namespace that is not part of neither the Project nor the Tenant Namespaces, is important to apply the label selectors in the NetworkPolicy ingress rules to the Namespace created by Project Monitor.
That Project monitoring Namespace will be named as cattle-project-<PROJECT_ID>-monitoring.
For example, if the NetworkPolicy is configured to allow all ingress traffic from Namespace with label capsule.clastix.io/tenant=foo, this label is to be applied to the Project monitoring Namespace too.
Then, a NetworkPolicy can be applied at Tenant-level with Capsule GlobalTenantResources. For example it can be applied a minimal policy for the oil Tenant:
apiVersion: capsule.clastix.io/v1beta2
kind: GlobalTenantResource
metadata:
  name: oil-networkpolicies
spec:
  tenantSelector:
    matchLabels:
      capsule.clastix.io/tenant: oil
  resyncPeriod: 360s
  pruningOnDelete: true
  resources:
    - namespaceSelector:
        matchLabels:
          capsule.clastix.io/tenant: oil
      rawItems:
      - apiVersion: networking.k8s.io/v1
        kind: NetworkPolicy
        metadata:
          name: oil-minimal
        spec:
          podSelector: {}
          policyTypes:
            - Ingress
            - Egress
          ingress:
            # Intra-Tenant
            - from:
              - namespaceSelector:
                  matchLabels:
                    capsule.clastix.io/tenant: oil
            # Rancher Project Monitor stack
            - from:
              - namespaceSelector:
                  matchLabels:
                    role: monitoring
            # Kubernetes nodes
            - from:
              - ipBlock:
                  cidr: 192.168.1.0/24
          egress:
            # Kubernetes DNS server
            - to:
              - namespaceSelector: {}
                podSelector:
                  matchLabels:
                    k8s-app: kube-dns
                ports:
                  - port: 53
                    protocol: UDP
            # Intra-Tenant
            - to:
              - namespaceSelector:
                  matchLabels:
                    capsule.clastix.io/tenant: oil
            # Kubernetes API server
            - to:
              - ipBlock:
                  cidr: 10.43.0.1/32
                ports:
                  - port: 443
Capsule Proxy and Rancher Projects
This guide explains how to setup the integration between Capsule Proxy and Rancher Projects.
It then explains how for the tenant user, the access to Kubernetes cluster-wide resources is transparent.
Rancher Shell and Capsule
In order to integrate the Rancher Shell with Capsule it’s needed to route the Kubernetes API requests made from the shell, via Capsule Proxy.
The capsule-rancher-addon allows the integration transparently.
Install the Capsule addon
Add the Clastix Helm repository https://clastix.github.io/charts.
By updating the cache with Clastix’s Helm repository a Helm chart named capsule-rancher-addon is available.
Install keeping attention to the following Helm values:
proxy.caSecretKey: theSecretkey that contains the CA certificate used to sign the Capsule Proxy TLS certificate (it should be"ca.crt"when Capsule Proxy has been configured with certificates generated with Cert Manager).proxy.servicePort: the port configured for the Capsule Proxy KubernetesService(443in this setup).proxy.serviceURL: the name of the Capsule ProxyService(by default"capsule-proxy.capsule-system.svc"hen installed in the capsule-systemNamespace).
Rancher Cluster Agent
In both CLI and dashboard use cases, the Cluster Agent is responsible for the two-way communication between Rancher and the downstream cluster.
In a standard setup, the Cluster Agents communicates to the API server. In this setup it will communicate with Capsule Proxy to ensure filtering of cluster-scope resources, for Tenants.
Cluster Agents accepts as arguments:
KUBERNETES_SERVICE_HOSTenvironment variableKUBERNETES_SERVICE_PORTenvironment variable
which will be set, at cluster import-time, to the values of the Capsule Proxy Service. For example:
KUBERNETES_SERVICE_HOST=capsule-proxy.capsule-system.svc- (optional)
KUBERNETES_SERVICE_PORT=9001. You can skip it by installing Capsule Proxy with Helm valueservice.port=443.
The expected CA is the one for which the certificate is inside the kube-root-ca ConfigMap in the same Namespace of the Cluster Agent (cattle-system).
Capsule Proxy
Capsule Proxy needs to provide a x509 certificate for which the root CA is trusted by the Cluster Agent. The goal can be achieved by, either using the Kubernetes CA to sign its certificate, or by using a dedicated root CA.
With the Kubernetes root CA
Note: this can be achieved when the Kubernetes root CA keypair is accessible. For example is likely to be possibile with on-premise setup, but not with managed Kubernetes services.
With this approach Cert Manager will sign certificates with the Kubernetes root CA for which it’s needed to be provided a Secret.
kubectl create secret tls -n capsule-system kubernetes-ca-key-pair --cert=/path/to/ca.crt --key=/path/to/ca.key
When installing Capsule Proxy with Helm chart, it’s needed to specify to generate Capsule Proxy Certificates with Cert Manager with an external ClusterIssuer:
certManager.externalCA.enabled=truecertManager.externalCA.secretName=kubernetes-ca-key-paircertManager.generateCertificates=true
and disable the job for generating the certificates without Cert Manager:
options.generateCertificates=false
Enable tenant users access cluster resources
In order to allow tenant users to list cluster-scope resources, like Nodes, Tenants need to be configured with proper proxySettings, for example:
apiVersion: capsule.clastix.io/v1beta2
kind: Tenant
metadata:
  name: oil
spec:
  owners:
  - kind: User
    name: alice
    proxySettings:
    - kind: Nodes
      operations:
      - List
[...]
Also, in order to assign or filter nodes per Tenant, it’s needed labels on node in order to be selected:
kubectl label node worker-01 capsule.clastix.io/tenant=oil
and a node selector at Tenant level:
apiVersion: capsule.clastix.io/v1beta2
kind: Tenant
metadata:
  name: oil
spec:
  nodeSelector:
    capsule.clastix.io/tenant: oil
[...]
The final manifest is:
apiVersion: capsule.clastix.io/v1beta2
kind: Tenant
metadata:
  name: oil
spec:
  owners:
  - kind: User
    name: alice
    proxySettings:
    - kind: Node
      operations:
      - List
  nodeSelector:
    capsule.clastix.io/tenant: oil
The same appplies for:
NodesStorageClassesIngressClassesPriorityClasses
More on this in the official documentation.
Configure OIDC authentication with Keycloak
Pre-requisites
- Keycloak realm for Rancher
- Rancher OIDC authentication provider
Keycloak realm for Rancher
These instructions is specific to a setup made with Keycloak as an OIDC identity provider.
Mappers
- Add to userinfo Group Membership type, claim name
groups - Add to userinfo Audience type, claim name
client audience - Add to userinfo, full group path, Group Membership type, claim name
full_group_path
More on this on the official guide.
Rancher OIDC authentication provider
Configure an OIDC authentication provider, with Client with issuer, return URLs specific to the Keycloak setup.
Use old and Rancher-standard paths with
/authsubpath (see issues below).Add custom paths, remove
/authsubpath in return and issuer URLs.
Configuration
Configure Tenant users
- In Rancher, configure OIDC authentication with Keycloak to use with Rancher.
- In Keycloak, Create a Group in the rancher Realm: capsule.clastix.io.
- In Keycloak, Create a User in the rancher Realm, member of capsule.clastix.io Group.
- In the Kubernetes target cluster, update the
CapsuleConfigurationby adding the"keycloakoidc_group://capsule.clastix.io"KubernetesGroup. - Login to Rancher with Keycloak with the new user.
- In Rancher as an administrator, set the user custom role with
getof Cluster. - In Rancher as an administrator, add the Rancher user ID of the just-logged in user as Owner of a
Tenant. - (optional) configure
proxySettingsfor theTenantto enable tenant users to access cluster-wide resources.
1.5 - Managed Kubernetes
Capsule Operator can be easily installed on a Managed Kubernetes Service. Since you do not have access to the Kubernetes APIs Server, you should check with the provider of the service:
the default cluster-admin ClusterRole is accessible the following Admission Webhooks are enabled on the APIs Server:
PodNodeSelectorLimitRangerResourceQuotaMutatingAdmissionWebhookValidatingAdmissionWebhook
AWS EKS
This is an example of how to install AWS EKS cluster and one user manged by Capsule. It is based on Using IAM Groups to manage Kubernetes access
Create EKS cluster:
export AWS_DEFAULT_REGION="eu-west-1"
export AWS_ACCESS_KEY_ID="xxxxx"
export AWS_SECRET_ACCESS_KEY="xxxxx"

eksctl create cluster \
--name=test-k8s \
--managed \
--node-type=t3.small \
--node-volume-size=20 \
--kubeconfig=kubeconfig.conf
Create AWS User alice using CloudFormation, create AWS access files and kubeconfig for such user:
cat > cf.yml << EOF
Parameters:
  ClusterName:
    Type: String
Resources:
  UserAlice:
    Type: AWS::IAM::User
    Properties:
      UserName: !Sub "alice-${ClusterName}"
      Policies:
      - PolicyName: !Sub "alice-${ClusterName}-policy"
        PolicyDocument:
          Version: "2012-10-17"
          Statement:
          - Sid: AllowAssumeOrganizationAccountRole
            Effect: Allow
            Action: sts:AssumeRole
            Resource: !GetAtt RoleAlice.Arn
  AccessKeyAlice:
    Type: AWS::IAM::AccessKey
    Properties:
      UserName: !Ref UserAlice
  RoleAlice:
    Type: AWS::IAM::Role
    Properties:
      Description: !Sub "IAM role for the alice-${ClusterName} user"
      RoleName: !Sub "alice-${ClusterName}"
      AssumeRolePolicyDocument:
        Version: 2012-10-17
        Statement:
        - Effect: Allow
          Principal:
            AWS: !Sub "arn:aws:iam::${AWS::AccountId}:root"
          Action: sts:AssumeRole
Outputs:
  RoleAliceArn:
    Description: The ARN of the Alice IAM Role
    Value: !GetAtt RoleAlice.Arn
    Export:
      Name:
        Fn::Sub: "${AWS::StackName}-RoleAliceArn"
  AccessKeyAlice:
    Description: The AccessKey for Alice user
    Value: !Ref AccessKeyAlice
    Export:
      Name:
        Fn::Sub: "${AWS::StackName}-AccessKeyAlice"
  SecretAccessKeyAlice:
    Description: The SecretAccessKey for Alice user
    Value: !GetAtt AccessKeyAlice.SecretAccessKey
    Export:
      Name:
        Fn::Sub: "${AWS::StackName}-SecretAccessKeyAlice"
EOF

eval aws cloudformation deploy --capabilities CAPABILITY_NAMED_IAM \
  --parameter-overrides "ClusterName=test-k8s" \
  --stack-name "test-k8s-users" --template-file cf.yml

AWS_CLOUDFORMATION_DETAILS=$(aws cloudformation describe-stacks --stack-name "test-k8s-users")
ALICE_ROLE_ARN=$(echo "${AWS_CLOUDFORMATION_DETAILS}" | jq -r ".Stacks[0].Outputs[] | select(.OutputKey==\"RoleAliceArn\") .OutputValue")
ALICE_USER_ACCESSKEY=$(echo "${AWS_CLOUDFORMATION_DETAILS}" | jq -r ".Stacks[0].Outputs[] | select(.OutputKey==\"AccessKeyAlice\") .OutputValue")
ALICE_USER_SECRETACCESSKEY=$(echo "${AWS_CLOUDFORMATION_DETAILS}" | jq -r ".Stacks[0].Outputs[] | select(.OutputKey==\"SecretAccessKeyAlice\") .OutputValue")

eksctl create iamidentitymapping --cluster="test-k8s" --arn="${ALICE_ROLE_ARN}" --username alice --group capsule.clastix.io

cat > aws_config << EOF
[profile alice]
role_arn=${ALICE_ROLE_ARN}
source_profile=alice
EOF

cat > aws_credentials << EOF
[alice]
aws_access_key_id=${ALICE_USER_ACCESSKEY}
aws_secret_access_key=${ALICE_USER_SECRETACCESSKEY}
EOF

eksctl utils write-kubeconfig --cluster=test-k8s --kubeconfig="kubeconfig-alice.conf"
cat >> kubeconfig-alice.conf << EOF
      - name: AWS_PROFILE
        value: alice
      - name: AWS_CONFIG_FILE
        value: aws_config
      - name: AWS_SHARED_CREDENTIALS_FILE
        value: aws_credentials
EOF
Export “admin” kubeconfig to be able to install Capsule:
export KUBECONFIG=kubeconfig.conf
Install Capsule and create a tenant where alice has ownership. Use the default Tenant example:
kubectl apply -f https://raw.githubusercontent.com/clastix/capsule/master/config/samples/capsule_v1beta1_tenant.yaml
Based on the tenant configuration above the user alice should be able to create namespace. Switch to a new terminal and try to create a namespace as user alice:
# Unset AWS_ACCESS_KEY_ID and AWS_SECRET_ACCESS_KEY if defined
unset AWS_ACCESS_KEY_ID
unset AWS_SECRET_ACCESS_KEY
kubectl create namespace test --kubeconfig="kubeconfig-alice.conf"
Azure AKS
This reference implementation introduces the recommended starting (baseline) infrastructure architecture for implementing a multi-tenancy Azure AKS cluster using Capsule. See CoAKS.
Charmed Kubernetes
Canonical Charmed Kubernetes is a Kubernetes distribution coming with out-of-the-box tools that support deployments and operational management and make microservice development easier. Combined with Capsule, Charmed Kubernetes allows users to further reduce the operational overhead of Kubernetes setup and management.
The Charm package for Capsule is available to Charmed Kubernetes users via Charmhub.io.
2 - Admission Policies
As Capsule we try to provide a secure multi-tenant environment out of the box, there are however some additional Admission Policies you should consider to enforce best practices in your cluster. Since Capsule only covers the core multi-tenancy features, such as Namespaces, Resource Quotas, Network Policies, and Container Registries, Classes, you should consider using an additional Admission Controller to enforce best practices on workloads and other resources.
Custom
Create custom Policies and reuse data provided via Tenant Status to enforce your own rules.
Owner Validation
Class Validation
Let’s say we have the following namespaced ObjectBucketClaim resource:
apiVersion: objectbucket.io/v1alpha1
kind: ObjectBucketClaim
metadata:
  name: admission-class
  namespace: solar-production
  finalizers:
    - objectbucket.io/finalizer
  labels:
    bucket-provisioner: openshift-storage.ceph.rook.io-bucket
spec:
  additionalConfig:
    maxSize: 2G
  bucketName: test-some-uid
  generateBucketName: test
  objectBucketName: obc-test-test
  storageClassName: ocs-storagecluster-ceph-rgw
However since we are allowing Tenant Users to create these ObjectBucketClaims we might want to consider validating the storageClassName field to ensure that only allowed StorageClasses are used.
---
apiVersion: kyverno.io/v1
kind: ClusterPolicy
metadata:
  name: restrict-tenant-class
spec:
  validationFailureAction: Enforce
  rules:
  - name: restrict-storage-class
    context:
      - name: classes
        apiCall:
          urlPath: "/apis/capsule.clastix.io/v1beta2/tenants"
          jmesPath: "items[?contains(status.namespaces, '{{ request.namespace }}')].status.classes | [0]"

      - name: storageClass
        variable:
          jmesPath: "request.object.spec.storageClassName || 'NONE'"
    match:
      resources:
        kinds:
        - ObjectBucketClaim
        namespaceSelector:
          matchExpressions:
          - key: capsule.clastix.io/tenant
            operator: Exists
    validate:
      message: "storageclass {{ storageClass }} is not allowed in tenant ({{classes.storage}})"
      deny:
        conditions:
          - key:   "{{classes.storage}}"
            operator: AnyNotIn
            value:  "{{ storageClass }}"
Workloads
Policies to harden workloads running in a multi-tenant environment.
Disallow Scheduling on Control Planes
If a Pods are not scoped to specific nodes, they could be scheduled on control plane nodes. You should disallow this by enforcing that Pods do not use tolerations for control plane nodes.
---
apiVersion: capsule.clastix.io/v1beta2
kind: Tenant
metadata:
  name: solar
spec:
  owners:
  - name: alice
    kind: User
  nodeSelector:
    node-role.kubernetes.io/worker: ''
---
apiVersion: admissionregistration.k8s.io/v1
kind: ValidatingAdmissionPolicy
metadata:
name: disallow-controlplane-scheduling
spec:
failurePolicy: Fail
matchConstraints:
resourceRules:
- apiGroups: [""]
apiVersions: ["v1"]
resources: ["pods"]
operations: ["CREATE","UPDATE"]
scope: "Namespaced"
validations:
- expression: >
// deny if any toleration targets control-plane taints
!has(object.spec.tolerations) ||
!object.spec.tolerations.exists(t,
t.key in ['node-role.kubernetes.io/master','node-role.kubernetes.io/control-plane']
)
message: "Pods may not use tolerations which schedule on control-plane nodes."
---
apiVersion: admissionregistration.k8s.io/v1
kind: ValidatingAdmissionPolicyBinding
metadata:
name: disallow-controlplane-scheduling
spec:
policyName: disallow-controlplane-scheduling
validationActions: ["Deny"]
matchResources:
namespaceSelector:
matchExpressions:
- key: capsule.clastix.io/tenant
operator: Exists---
apiVersion: kyverno.io/v1
kind: ClusterPolicy
metadata:
name: disallow-controlplane-scheduling
spec:
validationFailureAction: Enforce
rules:
- name: restrict-controlplane-scheduling-master
match:
resources:
kinds:
- Pod
namespaceSelector:
matchExpressions:
- key: capsule.clastix.io/tenant
operator: Exists
validate:
message: Pods may not use tolerations which schedule on control plane nodes.
pattern:
spec:
=(tolerations):
- key: "!node-role.kubernetes.io/master"
- name: restrict-controlplane-scheduling-control-plane
match:
resources:
kinds:
- Pod
namespaceSelector:
matchExpressions:
- key: capsule.clastix.io/tenant
operator: Exists
validate:
message: Pods may not use tolerations which schedule on control plane nodes.
pattern:
spec:
=(tolerations):
- key: "!node-role.kubernetes.io/control-plane"Pod Disruption Budgets
Pod Disruption Budgets (PDBs) are a way to limit the number of concurrent disruptions to your Pods. In multi-tenant environments, it is recommended to enforce the usage of PDBs to ensure that tenants do not accidentally or maliciously block cluster operations.
MaxUnavailable
A PodDisruptionBudget which sets its maxUnavailable value to zero prevents all voluntary evictions including Node drains which may impact maintenance tasks. This policy enforces that if a PodDisruptionBudget specifies the maxUnavailable field it must be greater than zero.
---
# Source: https://kyverno.io/policies/other/pdb-maxunavailable/pdb-maxunavailable/
apiVersion: kyverno.io/v1
kind: ClusterPolicy
metadata:
  name: pdb-maxunavailable
  annotations:
    policies.kyverno.io/title: PodDisruptionBudget maxUnavailable Non-Zero
    policies.kyverno.io/category: Other
    kyverno.io/kyverno-version: 1.9.0
    kyverno.io/kubernetes-version: "1.24"
    policies.kyverno.io/subject: PodDisruptionBudget
    policies.kyverno.io/description: >-
      A PodDisruptionBudget which sets its maxUnavailable value to zero prevents
      all voluntary evictions including Node drains which may impact maintenance tasks.
      This policy enforces that if a PodDisruptionBudget specifies the maxUnavailable field
      it must be greater than zero.
spec:
  validationFailureAction: Enforce
  background: false
  rules:
    - name: pdb-maxunavailable
      match:
        any:
          - resources:
              kinds:
                - PodDisruptionBudget
              namespaceSelector:
                matchExpressions:
                - key: capsule.clastix.io/tenant
                  operator: Exists
      validate:
        message: "The value of maxUnavailable must be greater than zero."
        pattern:
          spec:
=(maxUnavailable): ">0"apiVersion: admissionregistration.k8s.io/v1
kind: ValidatingAdmissionPolicy
metadata:
name: pdb-maxunavailable
spec:
failurePolicy: Fail
matchConstraints:
resourceRules:
- apiGroups: ["policy"]
apiVersions: ["v1"]
operations: ["CREATE", "UPDATE"]
resources: ["poddisruptionbudgets"]
namespaceSelector:
matchExpressions:
- key: capsule.clastix.io/tenant
operator: Exists
validations:
- expression: |
!has(object.spec.maxUnavailable) ||
string(object.spec.maxUnavailable).contains('%') ||
object.spec.maxUnavailable > 0
message: "The value of maxUnavailable must be greater than zero or a percentage."
reason: Invalid
---
apiVersion: admissionregistration.k8s.io/v1
kind: ValidatingAdmissionPolicyBinding
metadata:
name: pdb-maxunavailable-binding
spec:
policyName: pdb-maxunavailable
validationActions: ["Deny"]MinAvailable
When a Pod controller which can run multiple replicas is subject to an active PodDisruptionBudget, if the replicas field has a value equal to the minAvailable value of the PodDisruptionBudget it may prevent voluntary disruptions including Node drains which may impact routine maintenance tasks and disrupt operations. This policy checks incoming Deployments and StatefulSets which have a matching PodDisruptionBudget to ensure these two values do not match.
---
# Source: https://kyverno.io/policies/other/pdb-minavailable/pdb-minavailable/
apiVersion: kyverno.io/v1
kind: ClusterPolicy
metadata:
  name: pdb-minavailable-check
  annotations:
    policies.kyverno.io/title: Check PodDisruptionBudget minAvailable
    policies.kyverno.io/category: Other
    kyverno.io/kyverno-version: 1.9.0
    kyverno.io/kubernetes-version: "1.24"
    policies.kyverno.io/subject: PodDisruptionBudget, Deployment, StatefulSet
    policies.kyverno.io/description: >-
      When a Pod controller which can run multiple replicas is subject to an active PodDisruptionBudget,
      if the replicas field has a value equal to the minAvailable value of the PodDisruptionBudget
      it may prevent voluntary disruptions including Node drains which may impact routine maintenance
      tasks and disrupt operations. This policy checks incoming Deployments and StatefulSets which have
      a matching PodDisruptionBudget to ensure these two values do not match.
spec:
  validationFailureAction: Enforce
  background: false
  rules:
    - name: pdb-minavailable
      match:
        any:
          - resources:
              kinds:
                - Deployment
                - StatefulSet
              namespaceSelector:
                matchExpressions:
                - key: capsule.clastix.io/tenant
                  operator: Exists
      preconditions:
        all:
        - key: "{{`{{ request.operation | 'BACKGROUND' }}`}}"
          operator: AnyIn
          value:
          - CREATE
          - UPDATE
        - key: "{{`{{ request.object.spec.replicas | '1' }}`}}"
          operator: GreaterThan
          value: 0
      context:
        - name: minavailable
          apiCall:
            urlPath: "/apis/policy/v1/namespaces/{{`{{ request.namespace }}`}}/poddisruptionbudgets"
            jmesPath: "items[?label_match(spec.selector.matchLabels, `{{`{{ request.object.spec.template.metadata.labels }}`}}`)] | [0].spec.minAvailable | default(`0`)"
      validate:
        message: >-
          The matching PodDisruptionBudget for this resource has its minAvailable value equal to the replica count
          which is not permitted.
        deny:
          conditions:
            any:
              - key: "{{`{{ request.object.spec.replicas }}`}}"
                operator: Equals
                value: "{{`{{ minavailable }}`}}"
Deployment Replicas higher than PDB
PodDisruptionBudget resources are useful to ensuring minimum availability is maintained at all times.Introducing a PDB where there are already matching Pod controllers may pose a problem if the author is unaware of the existing replica count. This policy ensures that the minAvailable value is not greater or equal to the replica count of any matching existing Deployment. If other Pod controllers should also be included in this check, additional rules may be added to the policy which match those controllers.
---
# Source: https://kyverno.io/policies/other/deployment-replicas-higher-than-pdb/deployment-replicas-higher-than-pdb/
apiVersion: kyverno.io/v1
kind: ClusterPolicy
metadata:
  name: deployment-replicas-higher-than-pdb
  annotations:
    policies.kyverno.io/title: Ensure Deployment Replicas Higher Than PodDisruptionBudget
    policies.kyverno.io/category: Other
    policies.kyverno.io/subject: PodDisruptionBudget, Deployment
    kyverno.io/kyverno-version: 1.11.4
    kyverno.io/kubernetes-version: "1.27"
    policies.kyverno.io/description: >-
      PodDisruptionBudget resources are useful to ensuring minimum availability is maintained at all times.
      Introducing a PDB where there are already matching Pod controllers may pose a problem if the author
      is unaware of the existing replica count. This policy ensures that the minAvailable value is not
      greater or equal to the replica count of any matching existing Deployment. If other Pod controllers
      should also be included in this check, additional rules may be added to the policy which match those
      controllers.
spec:
  validationFailureAction: Enforce
  background: true
  rules:
  - name: deployment-replicas-greater-minAvailable
    match:
      any:
      - resources:
          kinds:
          - PodDisruptionBudget
          operations:
          - CREATE
          - UPDATE
          namespaceSelector:
            matchExpressions:
            - key: capsule.clastix.io/tenant
              operator: Exists
    context:
    - name: deploymentreplicas
      apiCall:
        jmesPath: items[?label_match(`{{`{{ request.object.spec.selector.matchLabels }}`}}`, spec.template.metadata.labels)] || `[]`
        urlPath: /apis/apps/v1/namespaces/{{`{{request.namespace}}`}}/deployments
    preconditions:
      all:
      - key: '{{`{{ length(deploymentreplicas) }}`}}'
        operator: GreaterThan
        value: 0
      - key: '{{`{{ request.object.spec.minAvailable || "" }}`}}'
        operator: NotEquals
        value: ''
    validate:
      message: >-
        PodDisruption budget minAvailable ({{`{{ request.object.spec.minAvailable }}`}}) cannot be
        greater than or equal to the replica count of any matching existing Deployment.
        There are {{`{{ length(deploymentreplicas) }}`}} Deployments which match this labelSelector
        having {{`{{ deploymentreplicas[*].spec.replicas }}`}} replicas.
      foreach:
        - list: deploymentreplicas
          deny:
            conditions:
              all:
              - key: "{{`{{ request.object.spec.minAvailable }}`}}"
                operator: GreaterThanOrEquals
                value: "{{`{{ element.spec.replicas }}`}}"
CNPG Cluster
When a Pod controller which can run multiple replicas is subject to an active PodDisruptionBudget, if the replicas field has a value equal to the minAvailable value of the PodDisruptionBudget it may prevent voluntary disruptions including Node drains which may impact routine maintenance tasks and disrupt operations. This policy checks incoming CNPG Clusters and their .spec.enablePDB setting.
---
apiVersion: kyverno.io/v1
kind: ClusterPolicy
metadata:
  name: pdb-cnpg-cluster-validation
  annotations:
    policies.kyverno.io/title: Check PodDisruptionBudget minAvailable for cnpgCluster
    policies.kyverno.io/category: Other
    kyverno.io/kyverno-version: 1.9.0
    kyverno.io/kubernetes-version: "1.24"
    policies.kyverno.io/subject: PodDisruptionBudget, Cluster
    policies.kyverno.io/description: >-
      When a Pod controller which can run multiple replicas is subject to an active PodDisruptionBudget,
      if the replicas field has a value equal to the minAvailable value of the PodDisruptionBudget
      it may prevent voluntary disruptions including Node drains which may impact routine maintenance
      tasks and disrupt operations. This policy checks incoming CNPG Clusters and their .spec.enablePDB setting.
spec:
  validationFailureAction: Enforce
  background: false
  rules:
    - name: pdb-cnpg-cluster-validation
      match:
        any:
          - resources:
              kinds:
                - postgresql.cnpg.io/v1/Cluster
              namespaceSelector:
                matchExpressions:
                - key: capsule.clastix.io/tenant
                  operator: Exists
      preconditions:
        any:
        - key: "{{request.operation || 'BACKGROUND'}}"
          operator: AnyIn
          value:
          - CREATE
          - UPDATE
      validate:
        message: >-
          Set `.spec.enablePDB` to `false` for CNPG Clusters when the number of instances is lower than 2.
        deny:
          conditions:
            all:
              - key: "{{request.object.spec.enablePDB }}"
                operator: Equals
                value: true
              - key: "{{request.object.spec.instances }}"
                operator: LessThan
value: 2apiVersion: admissionregistration.k8s.io/v1
kind: ValidatingAdmissionPolicy
metadata:
name: pdb-cnpg-cluster-validation
spec:
failurePolicy: Fail
matchConstraints:
resourceRules:
- apiGroups: ["postgresql.cnpg.io"]
apiVersions: ["v1"]
operations: ["CREATE", "UPDATE"]
resources: ["clusters"]
namespaceSelector:
matchExpressions:
- key: capsule.clastix.io/tenant
operator: Exists
validations:
- expression: |
!has(object.spec.enablePDB) ||
object.spec.enablePDB == false ||
(has(object.spec.instances) && object.spec.instances >= 2)
message: "Set `.spec.enablePDB` to `false` for CNPG Clusters when the number of instances is lower than 2."
messageExpression: |
'Set `.spec.enablePDB` to `false` for CNPG Clusters when the number of instances is lower than 2. Current instances: ' +
string(has(object.spec.instances) ? object.spec.instances : 1)
reason: Invalid
---
apiVersion: admissionregistration.k8s.io/v1
kind: ValidatingAdmissionPolicyBinding
metadata:
name: pdb-cnpg-cluster-validation-binding
spec:
policyName: pdb-cnpg-cluster-validation
validationActions: ["Deny"]Mutate User Namespace
You should enforce the usage of User Namespaces. Most Helm-Charts currently don’t support this out of the box. With Kyverno you can enforce this on Pod level.
---
apiVersion: kyverno.io/v1
kind: ClusterPolicy
metadata:
  name: tenants-user-namespace
spec:
  rules:
    - name: enforce-no-host-users
      match:
        any:
        - resources:
            kinds:
            - Pod
            namespaceSelector:
              matchExpressions:
              - key: capsule.clastix.io/tenant
                operator: Exists
            # selector:
            #   matchExpressions:
            #     - key: company.com/allow-host-users
            #       operator: NotIn
            #       values:
            #         - "true"
      preconditions:
        all:
        - key: "{{request.operation || 'BACKGROUND'}}"
          operator: AnyIn
          value:
            - CREATE
            - UPDATE
      skipBackgroundRequests: true
      mutate:
        patchStrategicMerge:
          spec:
            hostUsers: false
Note that users still can override this setting by adding the label company.com/allow-host-users=true to their namespace. You can change the label to your needs. This is because NFS does not support user namespaces and you might want to allow this for specific tenants.
Disallow Daemonsets
Tenant’s should not be allowed to create Daemonsets, unless they have dedicated nodes.
---
apiVersion: admissionregistration.k8s.io/v1
kind: ValidatingAdmissionPolicy
metadata:
  name: deny-daemonset-create
spec:
  failurePolicy: Fail
  matchConstraints:
    resourceRules:
      - apiGroups: ["apps"]
        apiVersions: ["v1"]
        resources: ["daemonsets"]
        operations: ["CREATE"]
        scope: "Namespaced"
  validations:
    - expression: "false"
      message: "Creating DaemonSets is not allowed in this cluster."
---
apiVersion: admissionregistration.k8s.io/v1
kind: ValidatingAdmissionPolicyBinding
metadata:
  name: deny-daemonset-create-binding
spec:
  policyName: deny-daemonset-create
  validationActions: ["Deny"]
  matchResources:
    namespaceSelector:
      matchExpressions:
        - key: capsule.clastix.io/tenant
          operator: Exists
---
apiVersion: kyverno.io/v1
kind: ClusterPolicy
metadata:
name: tenant-workload-restrictions
spec:
validationFailureAction: Enforce
rules:
- name: block-daemonset-create
match:
any:
- resources:
kinds:
- DaemonSet
namespaceSelector:
matchExpressions:
- key: capsule.clastix.io/tenant
operator: Exists
preconditions:
all:
- key: "{{ request.operation || 'BACKGROUND' }}"
operator: Equals
value: CREATE
validate:
message: "Creating DaemonSets is not allowed in this cluster."
deny:
conditions:
any:
- key: "true"
operator: Equals
value: "true"Enforce EmptDir Requests/Limits
By Defaults emptyDir Volumes do not have any limits. This could lead to a situation, where a tenant fills up the node disk. To avoid this, you can enforce limits on emptyDir volumes. You may also consider restricting the usage of emptyDir with the medium: Memory option, as this could lead to memory exhaustion on the node.
---
apiVersion: kyverno.io/v1
kind: ClusterPolicy
metadata:
  name: tenant-workload-restrictions
spec:
  rules:
    - name: default-emptydir-sizelimit
      match:
        any:
        - resources:
            kinds:
            - Pod
            namespaceSelector:
              matchExpressions:
              - key: capsule.clastix.io/tenant
                operator: Exists
      mutate:
        foreach:
        - list: "request.object.spec.volumes[]"
          preconditions:
            all:
            - key: "{{element.keys(@)}}"
              operator: AnyIn
              value: emptyDir
            - key: "{{element.emptyDir.sizeLimit || ''}}"
              operator: Equals
              value: ''
          patchesJson6902: |-
            - path: "/spec/volumes/{{elementIndex}}/emptyDir/sizeLimit"
              op: add
              value: 250Mi
Block Ephemeral Containers
Ephemeral containers, enabled by default in Kubernetes 1.23, allow users to use the kubectl debug functionality and attach a temporary container to an existing Pod. This may potentially be used to gain access to unauthorized information executing inside one or more containers in that Pod. This policy blocks the use of ephemeral containers.
---
apiVersion: admissionregistration.k8s.io/v1
kind: ValidatingAdmissionPolicy
metadata:
  name: block-ephemeral-containers
spec:
  failurePolicy: Fail
  matchConstraints:
    resourceRules:
      # 1) Regular Pods (ensure spec doesn't carry ephemeralContainers)
      - apiGroups: [""]
        apiVersions: ["v1"]
        resources: ["pods"]
        operations: ["CREATE","UPDATE"]
        scope: "Namespaced"
      # 2) Subresource used by `kubectl debug` to inject ephemeral containers
      - apiGroups: [""]
        apiVersions: ["v1"]
        resources: ["pods/ephemeralcontainers"]
        operations: ["UPDATE","CREATE"]  # UPDATE is typical, CREATE included for future-proofing
        scope: "Namespaced"
  validations:
    # Deny any request that targets the pods/ephemeralcontainers subresource
    - expression: request.subResource != "ephemeralcontainers"
      message: "Ephemeral (debug) containers are not permitted (subresource)."
    # For direct Pod create/update, allow only if the field is absent or empty
    - expression: >
        !has(object.spec.ephemeralContainers) ||
        size(object.spec.ephemeralContainers) == 0
      message: "Ephemeral (debug) containers are not permitted in Pod specs."
---
apiVersion: admissionregistration.k8s.io/v1
kind: ValidatingAdmissionPolicyBinding
metadata:
  name: block-ephemeral-containers-binding
spec:
  policyName: block-ephemeral-containers
  validationActions: ["Deny"]
  matchResources:
    namespaceSelector:
      matchExpressions:
        - key: capsule.clastix.io/tenant
          operator: Exists
# Source: https://kyverno.io/policies/other/block-ephemeral-containers/block-ephemeral-containers/
---
apiVersion: kyverno.io/v1
kind: ClusterPolicy
metadata:
name: block-ephemeral-containers
annotations:
policies.kyverno.io/title: Block Ephemeral Containers
policies.kyverno.io/category: Other
policies.kyverno.io/severity: medium
kyverno.io/kyverno-version: 1.6.0
policies.kyverno.io/minversion: 1.6.0
kyverno.io/kubernetes-version: "1.23"
policies.kyverno.io/subject: Pod
policies.kyverno.io/description: >-
Ephemeral containers, enabled by default in Kubernetes 1.23, allow users to use the
`kubectl debug` functionality and attach a temporary container to an existing Pod.
This may potentially be used to gain access to unauthorized information executing inside
one or more containers in that Pod. This policy blocks the use of ephemeral containers.
spec:
validationFailureAction: Enforce
background: true
rules:
- name: block-ephemeral-containers
match:
any:
- resources:
kinds:
- Pod
namespaceSelector:
matchExpressions:
- key: capsule.clastix.io/tenant
operator: Exists
validate:
message: "Ephemeral (debug) containers are not permitted."
pattern:
spec:
X(ephemeralContainers): "null"QOS Classes
You may consider the upstream policies, depending on your needs:
Certificates
Deny ClusterIssuer in Certificates
Often when working in multi-tenant environments, you want to ensure that tenants are not using ClusterIssuers to issue certificates, but rather use namespaced Issuers within their own namespace. This policy enforces that cert-manager.io/v1/Certificate resources do not reference ClusterIssuers and that the Issuer referenced is in the same namespace as the Certificate.
---
apiVersion: kyverno.io/v1
kind: ClusterPolicy
metadata:
  name: certificates-only-local-issuer
spec:
  validationFailureAction: Enforce
  background: true
  rules:
    - name: deny-clusterissuer-in-certificates
      match:
        any:
          - resources:
              kinds:
                - cert-manager.io/v1/Certificate
              namespaceSelector:
                matchExpressions:
                - key: capsule.clastix.io/tenant
                  operator: Exists
      validate:
        message: "Certificates must not reference ClusterIssuers; use a namespaced Issuer in the same namespace."
        deny:
          conditions:
            any:
              - key: "{{ request.object.spec.issuerRef.kind || 'Issuer' }}"
                operator: Equals
                value: "ClusterIssuer"

    - name: deny-cross-namespace-issuerref-in-certificates
      match:
        any:
          - resources:
              kinds:
                - cert-manager.io/v1/Certificate
      validate:
        message: "Certificates must reference an Issuer in the same namespace (spec.issuerRef.namespace must be empty or equal to the Certificate namespace)."
        deny:
          conditions:
            any:
              # If issuerRef.namespace is set and differs from the Certificate namespace -> deny
              - key: "{{request.object.spec.issuerRef.namespace || '' }}"
                operator: NotEquals
                value: ""
                # AND also not equal to request namespace
              - key: "{{ request.object.spec.issuerRef.namespace || request.namespace  }}"
                operator: NotEquals
                value: "{{ request.namespace }}"
Deny ClusterIssuer in Gateways
Deny to usage of ClusterIssuers in Gateways by checking for the cert-manager.io/cluster-issuer annotation. This ensures that tenants use namespaced issuer mechanisms instead.
This requires extra permissions to allow Kyverno to read Gateway resources:
admissionController:
  rbac:
    clusterRole:
      extraResources:
       - apiGroups: ["gateway.networking.k8s.io"]
         resources: ["*"]
         verbs: ["get", "list", "watch"]
---
apiVersion: kyverno.io/v1
kind: ClusterPolicy
metadata:
  name: gateways-deny-cluster-issuer-annotation
spec:
  validationFailureAction: Enforce
  background: false
  rules:
    - name: deny-cert-manager-cluster-issuer-annotation
      match:
        any:
          - resources:
              kinds:
                - gateway.networking.k8s.io/v1/Gateway
              namespaceSelector:
                matchExpressions:
                - key: capsule.clastix.io/tenant
                  operator: Exists
      validate:
        message: "Gateways must not use cert-manager.io/cluster-issuer; use namespaced issuer mechanisms instead."
        deny:
          conditions:
            any:
              - key: "{{ request.object.metadata.annotations.\"cert-manager.io/cluster-issuer\" || '' }}"
                operator: NotEquals
                value: ""
Images
Allowed Registries
---
apiVersion: capsule.clastix.io/v1beta2
kind: Tenant
metadata:
  name: solar
spec:
  containerRegistries:
    allowed:
    - "docker.io"
    - "public.ecr.aws"
    - "quay.io"
    - "mcr.microsoft.com"
# Or with a Kyverno Policy. Here the default registry is `docker.io`, when no registry prefix is specified:
---
apiVersion: kyverno.io/v1
kind: ClusterPolicy
metadata:
name: restrict-image-registries
annotations:
policies.kyverno.io/title: Restrict Image Registries
policies.kyverno.io/category: Best Practices, EKS Best Practices
policies.kyverno.io/severity: medium
spec:
validationFailureAction: Audit
background: true
rules:
- name: validate-registries
match:
any:
- resources:
kinds:
- Pod
validate:
message: "Using unknown image registry."
foreach:
- list: "request.object.spec.initContainers"
deny:
conditions:
- key: '{{images.initContainers."{{element.name}}".registry }}'
operator: NotIn
value:
- "docker.io"
- "public.ecr.aws"
- "quay.io"
- "mcr.microsoft.com"
- list: "request.object.spec.ephemeralContainers"
deny:
conditions:
- key: '{{images.ephemeralContainers."{{element.name}}".registry }}'
operator: NotIn
value:
- "docker.io"
- "public.ecr.aws"
- "quay.io"
- "mcr.microsoft.com"
- list: "request.object.spec.containers"
deny:
conditions:
- key: '{{images.containers."{{element.name}}".registry }}'
operator: NotIn
value:
- "docker.io"
- "public.ecr.aws"
- "quay.io"
- "mcr.microsoft.com"Allowed PullPolicy
---
apiVersion: capsule.clastix.io/v1beta2
kind: Tenant
metadata:
  name: solar
spec:
  owners:
  - name: alice
    kind: User
  imagePullPolicies:
  - Always
---
apiVersion: kyverno.io/v1
kind: ClusterPolicy
metadata:
name: always-pull-images
annotations:
policies.kyverno.io/title: Always Pull Images
policies.kyverno.io/category: Sample
policies.kyverno.io/severity: medium
policies.kyverno.io/subject: Pod
policies.kyverno.io/minversion: 1.6.0
policies.kyverno.io/description: >-
By default, images that have already been pulled can be accessed by other
Pods without re-pulling them if the name and tag are known. In multi-tenant scenarios,
this may be undesirable. This policy mutates all incoming Pods to set their
imagePullPolicy to Always. An alternative to the Kubernetes admission controller
AlwaysPullImages.
spec:
rules:
- name: always-pull-images
match:
any:
- resources:
kinds:
- Pod
namespaceSelector:
matchExpressions:
- key: capsule.clastix.io/tenant
operator: Exists
mutate:
patchStrategicMerge:
spec:
initContainers:
- (name): "?*"
imagePullPolicy: Always
containers:
- (name): "?*"
imagePullPolicy: Always
ephemeralContainers:
- (name): "?*"
imagePullPolicy: AlwaysCertificate Management
Selective ClusterIssuers
Allow certain ClusterIssuers within Tenants:
---
apiVersion: kyverno.io/v1
kind: ClusterPolicy
metadata:
  name: certificates-restrict-clusterissuer-by-tenant-label
spec:
  validationFailureAction: Enforce
  background: true
  rules:
    - name: allow-clusterissuer-only-when-managed-by-matches
      match:
        any:
          - resources:
              kinds:
                - cert-manager.io/v1/Certificate
              namespaceSelector:
                matchExpressions:
                  - key: capsule.clastix.io/tenant
                    operator: Exists
      context:
        - name: certManagedBy
          variable:
            jmesPath: request.object.metadata.labels."capsule.clastix.io/managed-by" || ''
        - name: clusterIssuerManagedBy
          apiCall:
            urlPath: /apis/cert-manager.io/v1/clusterissuers/{{ request.object.spec.issuerRef.name }}
            jmesPath: metadata.labels."company.com/tenant" || ''
            default: ""
      preconditions:
        all:
          - key: "{{ request.object.spec.issuerRef.kind || 'Issuer' }}"
            operator: Equals
            value: ClusterIssuer
          - key: "{{request.operation || 'BACKGROUND'}}"
            operator: AnyIn
            value:
            - CREATE
            - UPDATE
      validate:
        message: >-
          ClusterIssuer is only allowed when the Certificate label
          capsule.clastix.io/managed-by ({{certManagedBy}}) matches the referenced ClusterIssuer label
          company.com/tenant ({{clusterIssuerManagedBy}}).
        deny:
          conditions:
            any:
              - key: "{{certManagedBy}}"
                operator: Equals
                value: ""
              - key: "{{clusterIssuerManagedBy}}"
                operator: Equals
                value: ""
              - key: "{{certManagedBy}}"
                operator: NotEquals
                value: "{{clusterIssuerManagedBy}}"
3 - Architecture
Key Decisions
Introducing a new separation of duties can lead to a significant paradigm shift. This has technical implications and may also impact your organizational structure. Therefore, when designing a multi-tenant platform pattern, carefully consider the following aspects. As Cluster Administrator, ask yourself:
- 🔑 How much ownership can be delegated to Tenant Owners (Platform Users)?
The answer to this question may be influenced by the following aspects:
Are the Cluster Administrators willing to grant permissions to Tenant Owners?
- You might have a problem with know-how and probably your organisation is not yet pushing Kubernetes itself enough as a key strategic platform. The key here is enabling Platform Users through good UX and know-how transfers
Who is responsible for the deployed workloads within the Tenants?
- If Platform Administrators are still handling this, a true “shift left” has not yet been achieved.
Who gets paged during a production outage within a Tenant’s application?
- You’ll need robust monitoring that enables Tenant Owners to clearly understand and manage what’s happening inside their own tenant.
Are your customers technically capable of working directly with the Kubernetes API?
- If not, you may need to build a more user-friendly platform with better UX — for example, a multi-tenant ArgoCD setup, or UI layers like Headlamp.
Personas
In Capsule, we introduce a new persona called the Tenant Owner. The goal is to enable Cluster Administrators to delegate tenant management responsibilities to Tenant Owners. Here’s how it works:
Capsule Administrators
Configure Capsule Administrators. The ClusterRoles assigned to Administrators can be configured in the CapsuleConfiguration as well.
They are promoted to Tenant-Owners for all available tenants. Effectively granting them the ability to manage all namespaces within the cluster, across all tenants.
Note: Granting Capsule Administrator rights should be done with caution, as it provides extensive control over the cluster’s multi-tenant environment. When granting Capsule Administrator rights, the entity gets the privileges to create any namespace (also not part of capsule tenants) and the privileges to delete any tenant namespaces.
Capsule Administrators can:
- Create and manage namespaces via labels in any tenant.
- Create namespaces outside of tenants.
- Delete namespaces in any tenant.
Administrators come in handy in bootstrap scenarios or GitOps scenarios where certain users/serviceaccounts need to be able to manage namespaces for all tenants.
Capsule Users
Any entity which needs to interact with tenants and their namespaces must be defined as a Capsule User. This is where the flexibility of Capsule comes into play. You can define users or groups as Capsule Users, allowing them to create and manage namespaces within any tenant they have access to. If they are not defined as Capsule Users, any interactions will be ignored by Capsule. Often a best practice is to define a single group which identifies all your tenant users. This way you can have one generic group for all your users and then use additional groups to separate responsibilities (e.g. administrators vs normal users).
Only one entry is needed to identify a Capsule User. This is only important for Namespace Admission..
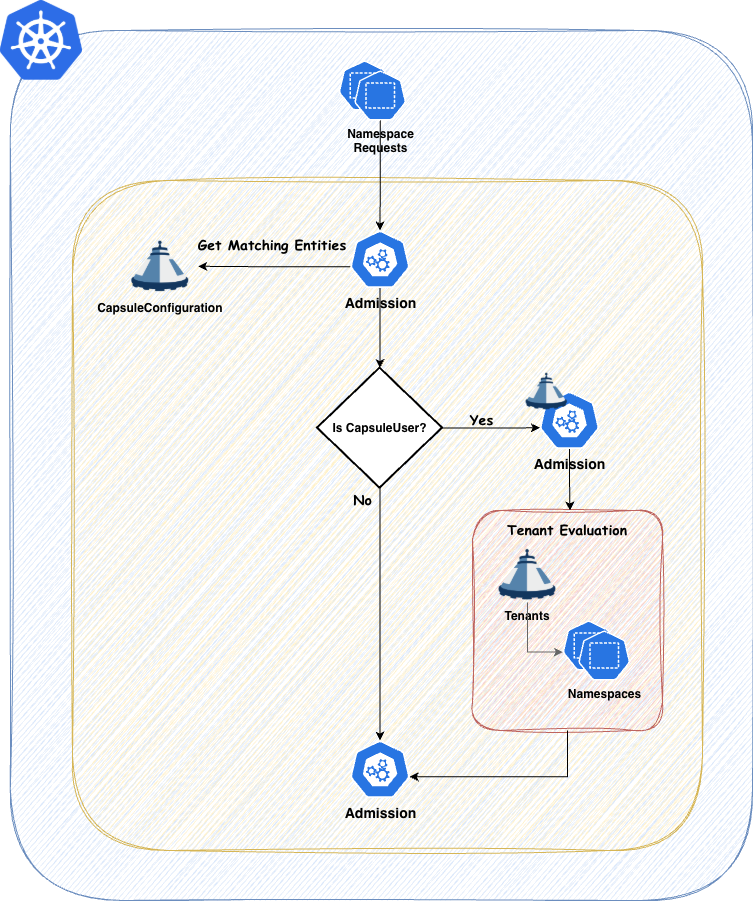
You can always verify the effective Capsule Users by checking the Configuration Status. As this is variable with Tenant Owners, the status will always show the effective users:
kubectl get capsuleconfiguration default -o jsonpath='{.status.users}' | jq

[
  {
    "kind": "Group",
    "name": "oidc:kubernetes:admin"
  },
  {
    "kind": "Group",
    "name": "projectcapsule.dev"
  },
  {
    "kind": "User",
    "name": "test-user"
  }
]
Tenant Owners
Every Tenant Owner must be a Capsule User. By using the TenantOwner CRD this is automatically handeled.
They manage the namespaces within their tenants and perform administrative tasks confined to their tenant boundaries. This delegation allows teams to operate more autonomously while still adhering to organizational policies. Tenant Owners can be used to shift reposnsability of one tenant towards this user group. promoting them to the SPOC of all namespaces within the tenant.
Tenant Owners can:
- Create and manage namespaces within their tenant.
- Delete namespaces within their tenant.
Capsule provides robust tools to strictly enforce tenant boundaries, ensuring that each tenant operates within its defined limits. This separation of duties promotes both security and efficient resource management.
Layouts
Let’s discuss different Tenant Layouts which could be used . These are just approaches we have seen, however you might also find a combination of these which fits your use-case.
Tenant As A Service
With this approach you essentially just provide your Customers with the Tenant on your cluster. The rest is their responsibility. This concludes to a shared responsibility model. This can be achieved when also the Tenant Owners are responsible for everything they are provisiong within their Tenant’s namespaces.
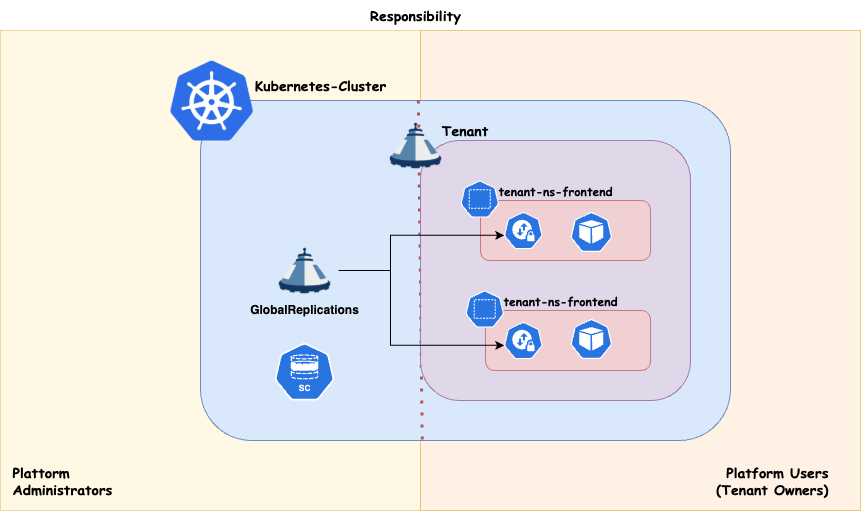
Scheduling
Workload distribution across your compute infrastructure can be approached in various ways, depending on your specific priorities. Regardless of the use case, it’s essential to preserve maximum flexibility for your platform administrators. This means ensuring that:
- Nodes can be drained or deleted at any time.
- Cluster updates can be performed at any time.
- The number of worker nodes can be scaled up or down as needed.
If your cluster architecture prevents any of these capabilities, or if certain applications block the enforcement of these policies, you should reconsider your approach.
Dedicated
Strong tenant isolation, ensuring that any noisy neighbor effects remain confined within individual tenants (tenant responsibility). This approach may involve higher administrative overhead and costs compared to shared compute. It also provides enhanced security by dedicating nodes to a single customer/application. It is recommended, at a minimum, to separate the cluster’s operator workload from customer workloads.
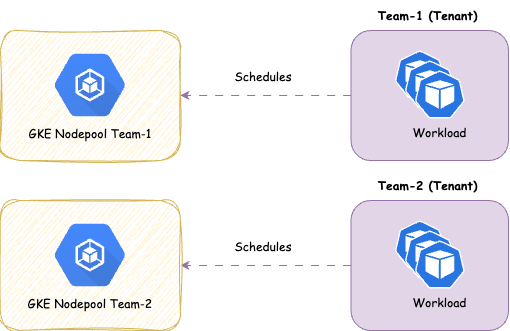
Shared
With this approach you share the nodes amongst all Tenants, therefore giving you more potential for optimizing resources on a node level. It’s a common pattern to separate the controllers needed to power your Distribution (operators) from the actual workload. This ensures smooth operations for the cluster
Overview:
- ✅ Designed for cost efficiency .
- ✅ Suitable for applications that typically experience low resource fluctuations and run with multiple replicas.
- ❌ Not ideal for applications that are not cloud-native ready, as they may adversely affect the operation of other applications or the maintenance of node pools.
- ❌ Not ideal if strong isolation is required
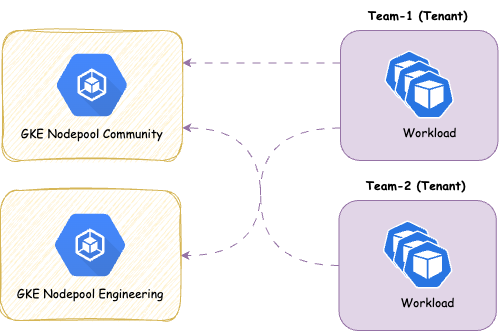
We provide the concept of ResourcePools or CustomQuotas to manage resources cross namespaces. There’s some further aspects you must think about with shared approaches:
4 - Best Practices
This is general advice you should consider before making Kubernetes Distribution consideration. They are partly relevant for Multi-Tenancy with Capsule.
Authentication
User authentication for the platform should be handled via a central OIDC-compatible identity provider system (e.g., Keycloak, Azure AD, Okta, or any other OIDC-compliant provider). The rationale is that other central platform components — such as ArgoCD, Grafana, Headlamp, or Harbor — should also integrate with the same authentication mechanism. This enables a unified login experience and reduces administrative complexity in managing users and permissions.
Capsule relies on native Kubernetes RBAC, so it’s important to consider how the Kubernetes API handles user authentication.
OCI Pull-Cache
By default, Kubernetes clusters pull images directly from upstream registries like docker.io, quay.io, ghcr.io, or gcr.io. In production environments, this can lead to issues — especially because Docker Hub enforces rate limits that may cause image pull failures with just a few nodes or frequent deployments (e.g., when pods are rescheduled).
To ensure availability, performance, and control over container images, it’s essential to provide an on-premise OCI mirror.
This mirror should be configured via the CRI (Container Runtime Interface) by defining it as a mirror endpoint in registries.conf for default registries (e.g., docker.io).
This way, all nodes automatically benefit from caching without requiring developers to change image URLs.
Secrets Management
In more complex environments with multiple clusters and applications, managing secrets manually via YAML or Helm is no longer practical. Instead, a centralized secrets management system should be established — such as Vault, AWS Secrets Manager, Azure Key Vault, or the CNCF project OpenBao (formerly the Vault community fork).
To integrate these external secret stores with Kubernetes, the External Secrets Operator (ESO) is a recommended solution. It automatically syncs defined secrets from external sources as Kubernetes secrets, and supports dynamic rotation, access control, and auditing.
If no external secret store is available, there should at least be a secure way to store sensitive data in Git. In our ecosystem, we provide a solution based on SOPS (Secrets OPerationS) for this use case; called the sops-operator.
4.1 - Workloads
User Namespaces
Info
The FeatureGate UserNamespacesSupport is active by default since Kubernetes 1.33. However every pod must still opt-in
When you are also enabling the FeatureGate UserNamespacesPodSecurityStandards you may relax the Pod Security Standards for your workloads. Read More
A process running as root in a container can run as a different (non-root) user in the host; in other words, the process has full privileges for operations inside the user namespace, but is unprivileged for operations outside the namespace. Read More
Kubelet
On your Kubelet you must use the FeatureGates:
UserNamespacesSupportUserNamespacesPodSecurityStandards(Optional)
Sysctls
user.max_user_namespaces: "11255"
Admission (Kyverno)
To make sure all the workloads are forced to use dedicated User Namespaces, we recommend to mutate pods at admission. See the following examples.
Kyverno
apiVersion: kyverno.io/v1
kind: ClusterPolicy
metadata:
  name: add-hostusers-spec
  annotations:
    policies.kyverno.io/title: Add HostUsers
    policies.kyverno.io/category: Security
    policies.kyverno.io/subject: Pod,User Namespace
    kyverno.io/kubernetes-version: "1.31"
    policies.kyverno.io/description: >-
      Do not use the host's user namespace. A new userns is created for the pod.
      Setting false is useful for mitigating container breakout vulnerabilities even allowing users to run their containers as root
      without actually having root privileges on the host. This field is
      alpha-level and is only honored by servers that enable the
      UserNamespacesSupport feature.
spec:
  rules:
  - name: add-host-users
    match:
      any:
      - resources:
          kinds:
          - Pod
          namespaceSelector:
            matchExpressions:
            - key: capsule.clastix.io/tenant
              operator: Exists
    preconditions:
      all:
      - key: "{{request.operation || 'BACKGROUND'}}"
        operator: AnyIn
        value:
          - CREATE
          - UPDATE
    mutate:
      patchStrategicMerge:
        spec:
          hostUsers: false
Pod Security Standards
In Kubernetes, by default, workloads run with administrative access, which might be acceptable if there is only a single application running in the cluster or a single user accessing it. This is seldom required and you’ll consequently suffer a noisy neighbour effect along with large security blast radiuses.
Many of these concerns were addressed initially by PodSecurityPolicies which have been present in the Kubernetes APIs since the very early days.
The Pod Security Policies are deprecated in Kubernetes 1.21 and removed entirely in 1.25. As replacement, the Pod Security Standards and Pod Security Admission has been introduced. Capsule supports the new standard for tenants under its control as well as the oldest approach.
One of the issues with Pod Security Policies is that it is difficult to apply restrictive permissions on a granular level, increasing security risk. Also the Pod Security Policies get applied when the request is submitted and there is no way of applying them to pods that are already running. For these, and other reasons, the Kubernetes community decided to deprecate the Pod Security Policies.
As the Pod Security Policies get deprecated and removed, the Pod Security Standards is used in place. It defines three different policies to broadly cover the security spectrum. These policies are cumulative and range from highly-permissive to highly-restrictive:
- Privileged: unrestricted policy, providing the widest possible level of permissions.
- Baseline: minimally restrictive policy which prevents known privilege escalations.
- Restricted: heavily restricted policy, following current Pod hardening best practices.
Kubernetes provides a built-in Admission Controller to enforce the Pod Security Standards at either:
- cluster level which applies a standard configuration to all namespaces in a cluster
- namespace level, one namespace at a time
For the first case, the cluster admin has to configure the Admission Controller and pass the configuration to the kube-apiserver by mean of the --admission-control-config-file extra argument, for example:
apiVersion: apiserver.config.k8s.io/v1
kind: AdmissionConfiguration
plugins:
- name: PodSecurity
  configuration:
    apiVersion: pod-security.admission.config.k8s.io/v1beta1
    kind: PodSecurityConfiguration
    defaults:
      enforce: "baseline"
      enforce-version: "latest"
      warn: "restricted"
      warn-version: "latest"
      audit: "restricted"
      audit-version: "latest"
    exemptions:
      usernames: []
      runtimeClasses: []
      namespaces: [kube-system]
For the second case, he can just assign labels to the specific namespace he wants enforce the policy since the Pod Security Admission Controller is enabled by default starting from Kubernetes 1.23+:
apiVersion: v1
kind: Namespace
metadata:
  labels:
    pod-security.kubernetes.io/enforce: baseline
    pod-security.kubernetes.io/warn: restricted
    pod-security.kubernetes.io/audit: restricted
  name: development
Capsule
According to the regular Kubernetes segregation model, the cluster admin has to operate either at cluster level or at namespace level. Since Capsule introduces a further segregation level (the Tenant abstraction), the cluster admin can implement Pod Security Standards at tenant level by simply forcing specific labels on all the namespaces created in the tenant.
You can distribute these profiles via namespace. Here’s how this could look like:
apiVersion: capsule.clastix.io/v1beta2
kind: Tenant
metadata:
  name: solar
spec:
  namespaceOptions:
    additionalMetadataList:
    - namespaceSelector:
        matchExpressions:
          - key: projectcapsule.dev/low_security_profile
            operator: NotIn
            values: ["system"]
      labels:
        pod-security.kubernetes.io/enforce: restricted
        pod-security.kubernetes.io/warn: restricted
        pod-security.kubernetes.io/audit: restricted
    - namespaceSelector:
        matchExpressions:
          - key: company.com/env
            operator: In
            values: ["system"]
      labels:
        pod-security.kubernetes.io/enforce: privileged
        pod-security.kubernetes.io/warn: privileged
        pod-security.kubernetes.io/audit: privileged
All namespaces created by the tenant owner, will inherit the Pod Security labels:
apiVersion: v1
kind: Namespace
metadata:
  labels:
    capsule.clastix.io/tenant: solar
    kubernetes.io/metadata.name: solar-development
    name: solar-development
    pod-security.kubernetes.io/enforce: baseline
    pod-security.kubernetes.io/warn: restricted
    pod-security.kubernetes.io/audit: restricted
  name: solar-development
  ownerReferences:
  - apiVersion: capsule.clastix.io/v1beta2
    blockOwnerDeletion: true
    controller: true
    kind: Tenant
    name: solar
and the regular Pod Security Admission Controller does the magic:
kubectl --kubeconfig alice-oil.kubeconfig apply -f - << EOF
apiVersion: v1
kind: Pod
metadata:
  name: nginx
  namespace: solar-production
spec:
  containers:
  - image: nginx
    name: nginx
    ports:
    - containerPort: 80
    securityContext:
      privileged: true
EOF
The request gets denied:
Error from server (Forbidden): error when creating "STDIN":
pods "nginx" is forbidden: violates PodSecurity "baseline:latest": privileged
(container "nginx" must not set securityContext.privileged=true)
If the tenant owner tries to change or delete the above labels, Capsule will reconcile them to the original tenant manifest set by the cluster admin.
As additional security measure, the cluster admin can also prevent the tenant owner to make an improper usage of the above labels:
kubectl annotate tenant solar \
  capsule.clastix.io/forbidden-namespace-labels-regexp="pod-security.kubernetes.io\/(enforce|warn|audit)"
In that case, the tenant owner gets denied if she tries to use the labels:
kubectl --kubeconfig alice-solar.kubeconfig label ns solar-production \
    pod-security.kubernetes.io/enforce=restricted \
    --overwrite

Error from server (Label pod-security.kubernetes.io/audit is forbidden for namespaces in the current Tenant ...
Pod Security Policies
As stated in the documentation, “PodSecurityPolicies enable fine-grained authorization of pod creation and updates. A Pod Security Policy is a cluster-level resource that controls security sensitive aspects of the pod specification. The PodSecurityPolicy objects define a set of conditions that a pod must run with in order to be accepted into the system, as well as defaults for the related fields.”
Using the Pod Security Policies, the cluster admin can impose limits on pod creation, for example the types of volume that can be consumed, the linux user that the process runs as in order to avoid running things as root, and more. From multi-tenancy point of view, the cluster admin has to control how users run pods in their tenants with a different level of permission on tenant basis.
Assume the Kubernetes cluster has been configured with Pod Security Policy Admission Controller enabled in the APIs server: --enable-admission-plugins=PodSecurityPolicy
The cluster admin creates a PodSecurityPolicy:
apiVersion: policy/v1beta1
kind: PodSecurityPolicy
metadata:
  name: psp:restricted
spec:
  privileged: false
  # Required to prevent escalations to root.
  allowPrivilegeEscalation: false
Then create a ClusterRole using or granting the said item
kind: ClusterRole
apiVersion: rbac.authorization.k8s.io/v1
metadata:
  name: psp:restricted
rules:
- apiGroups: ['policy']
  resources: ['podsecuritypolicies']
  resourceNames: ['psp:restricted']
  verbs: ['use']
He can assign this role to all namespaces in a tenant by setting the tenant manifest:
apiVersion: capsule.clastix.io/v1beta2
kind: Tenant
metadata:
  name: solar
spec:
  owners:
  - name: alice
    kind: User
  additionalRoleBindings:
  - clusterRoleName: psp:privileged
    subjects:
    - kind: "Group"
      apiGroup: "rbac.authorization.k8s.io"
      name: "system:authenticated"
With the given specification, Capsule will ensure that all tenant namespaces will contain a RoleBinding for the specified Cluster Role:
kind: RoleBinding
apiVersion: rbac.authorization.k8s.io/v1
metadata:
  name: 'capsule-solar-psp:privileged'
  namespace: solar-production
  labels:
    capsule.clastix.io/tenant: solar
subjects:
  - kind: Group
    apiGroup: rbac.authorization.k8s.io
    name: 'system:authenticated'
roleRef:
  apiGroup: rbac.authorization.k8s.io
  kind: ClusterRole
  name: 'psp:privileged'
Capsule admission controller forbids the tenant owner to run privileged pods in solar-production namespace and perform privilege escalation as declared by the above Cluster Role psp:privileged.
As tenant owner, creates a namespace:
kubectl --kubeconfig alice-solar.kubeconfig create ns solar-production
and create a pod with privileged permissions:
kubectl --kubeconfig alice-solar.kubeconfig apply -f - << EOF
apiVersion: v1
kind: Pod
metadata:
  name: nginx
  namespace: solar-production
spec:
  containers:
  - image: nginx
    name: nginx
    ports:
    - containerPort: 80
    securityContext:
      privileged: true
EOF
Since the assigned PodSecurityPolicy explicitly disallows privileged containers, the tenant owner will see her request to be rejected by the Pod Security Policy Admission Controller.
4.2 - Networking
Network-Policies
It’s a best practice to not allow any traffic outside of a tenant (or a tenant’s namespace). For this we can use Tenant Replications to ensure we have for every namespace Networkpolicies in place.
The following NetworkPolicy is distributed to all namespaces which belong to a Capsule tenant:
apiVersion: capsule.clastix.io/v1beta2
kind: GlobalTenantResource
metadata:
  name: default-networkpolicies
  namespace: solar-system
spec:
  resyncPeriod: 60s
  resources:
    - rawItems:
        - apiVersion: networking.k8s.io/v1
          kind: NetworkPolicy
          metadata:
            name: default-policy
          spec:
            # Apply to all pods in this namespace
            podSelector: {}
            policyTypes:
              - Ingress
              - Egress
            ingress:
              # Allow traffic from the same namespace (intra-namespace communication)
              - from:
                  - podSelector: {}

              # Allow traffic from all namespaces within the tenant
              - from:
                  - namespaceSelector:
                      matchLabels:
                        capsule.clastix.io/tenant: "{{tenant.name}}"

              # Allow ingress from other namespaces labeled (System Namespaces, eg. Monitoring, Ingress)
              - from:
                  - namespaceSelector:
                      matchLabels:
                        company.com/system: "true"

            egress:
              # Allow DNS to kube-dns service IP (might be different in your setup)
              - to:
                  - ipBlock:
                      cidr: 10.96.0.10/32
                ports:
                  - protocol: UDP
                    port: 53
                  - protocol: TCP
                    port: 53

              # Allow traffic to all namespaces within the tenant
              - to:
                  - namespaceSelector:
                      matchLabels:
                        capsule.clastix.io/tenant: "{{tenant.name}}"
Deny Namespace Metadata
In the above example we allow traffic from namespaces with the label company.com/system: "true". This is meant for Kubernetes Operators to eg. scrape the workloads within a tenant. However without further enforcement any namespace can set this label and therefore gain access to any tenant namespace. To prevent this, we must restrict, who can declare this label on namespaces.
We can deny such labels on tenant basis. So in this scenario every tenant should disallow the use of these labels on namespaces:
apiVersion: capsule.clastix.io/v1beta2
kind: Tenant
metadata:
  name: solar
spec:
  namespaceOptions:
    forbiddenLabels:
      denied:
          - company.com/system
Or you can implement a Kyverno-Policy, which solves this.
Non-Native Network-Policies
The same principle can be applied with alternative CNI solutions. In this example we are using Cilium:
apiVersion: capsule.clastix.io/v1beta2
kind: GlobalTenantResource
metadata:
  name: default-networkpolicies
  namespace: solar-system
spec:
  resyncPeriod: 60s
  resources:
    - rawItems:
        - apiVersion: cilium.io/v2
          kind: CiliumNetworkPolicy
          metadata:
            name: default-policy
          spec:
            endpointSelector: {}  # Apply to all pods in the namespace
            ingress:
              - fromEndpoints:
                  - matchLabels: {}  # Same namespace pods (intra-namespace)
              - fromEntities:
                  - cluster  # For completeness; can be used to allow internal cluster traffic if needed
              - fromEndpoints:
                  - matchLabels:
                      capsule.clastix.io/tenant: "{{tenant.name}}"  # Pods in other namespaces with same tenant
              - fromNamespaces:
                  - matchLabels:
                      company.com/system: "true"  # System namespaces (monitoring, ingress, etc.)

            egress:
              - toCIDR:
                  - 10.96.0.10/32  # kube-dns IP
                toPorts:
                  - ports:
                      - port: "53"
                        protocol: UDP
                      - port: "53"
                        protocol: TCP

              - toNamespaces:
                  - matchLabels:
                      capsule.clastix.io/tenant: "{{tenant.name}}"  # Egress to all tenant namespaces
4.3 - Container Images
it’s recommended to use the ImagePullPolicy Always for private registries on shared nodes. This ensures that no images can be used which are already pulled to the node.
5 - Authentication
Capsule does not care about the authentication strategy used in the cluster and all the Kubernetes methods of authentication are supported. The only requirement to use Capsule is to assign tenant users to the group defined by userGroups option in the CapsuleConfiguration, which defaults to projectcapsule.dev.
OIDC
In the following guide, we’ll use Keycloak an Open Source Identity and Access Management server capable to authenticate users via OIDC and release JWT tokens as proof of authentication.
Configuring OIDC Server
Configure Keycloak as OIDC server:
- Add a realm called caas, or use any existing realm instead
- Add a group
projectcapsule.dev - Add a user alice assigned to group
projectcapsule.dev - Add an OIDC client called
kubernetes(Public) - Add an OIDC client called
kubernetes-auth(Confidential (Client Secret))
For the kubernetes client, create protocol mappers called groups and audience If everything is done correctly, now you should be able to authenticate in Keycloak and see user groups in JWT tokens. Use the following snippet to authenticate in Keycloak as alice user:
$ KEYCLOAK=sso.clastix.io
$ REALM=kubernetes-auth
$ OIDC_ISSUER=${KEYCLOAK}/realms/${REALM}

$ curl -k -s https://${OIDC_ISSUER}/protocol/openid-connect/token \
     -d grant_type=password \
     -d response_type=id_token \
     -d scope=openid \
     -d client_id=${OIDC_CLIENT_ID} \
     -d client_secret=${OIDC_CLIENT_SECRET} \
     -d username=${USERNAME} \
     -d password=${PASSWORD} | jq
The result will include an ACCESS_TOKEN, a REFRESH_TOKEN, and an ID_TOKEN. The access-token can generally be disregarded for Kubernetes. It would be used if the identity provider was managing roles and permissions for the users but that is done in Kubernetes itself with RBAC. The id-token is short lived while the refresh-token has longer expiration. The refresh-token is used to fetch a new id-token when the id-token expires.
{
   "access_token":"ACCESS_TOKEN",
   "refresh_token":"REFRESH_TOKEN",
   "id_token": "ID_TOKEN",
   "token_type":"bearer",
   "scope": "openid groups profile email"
}
To introspect the ID_TOKEN token run:
$ curl -k -s https://${OIDC_ISSUER}/protocol/openid-connect/introspect \
     -d token=${ID_TOKEN} \
     --user kubernetes-auth:${OIDC_CLIENT_SECRET} | jq
The result will be like the following:
{
  "exp": 1601323086,
  "iat": 1601322186,
  "aud": "kubernetes",
  "typ": "ID",
  "azp": "kubernetes",
  "preferred_username": "alice",
  "email_verified": false,
  "acr": "1",
  "groups": [
    "capsule.clastix.io"
  ],
  "client_id": "kubernetes",
  "username": "alice",
  "active": true
}
Configuring Kubernetes API Server
Configuring Kubernetes for OIDC Authentication requires adding several parameters to the API Server. Please, refer to the documentation for details and examples. Most likely, your kube-apiserver.yaml manifest will looks like the following:
Authentication Configuration (Recommended)
The configuration file approach allows you to configure multiple JWT authenticators, each with a unique issuer.url and issuer.discoveryURL. The configuration file even allows you to specify CEL expressions to map claims to user attributes, and to validate claims and user information.
apiVersion: apiserver.config.k8s.io/v1beta1
kind: AuthenticationConfiguration
jwt:
- issuer:
    url: https://${OIDC_ISSUER}
    audiences:
    - kubernetes
    - kubernetes-auth
    audienceMatchPolicy: MatchAny
  claimMappings:
    username:
      claim: 'email'
      prefix: ""
    groups:
      claim: 'groups'
      prefix: ""
  certificateAuthority: <PEM encoded CA certificates>
This file must be present and consistent across all kube-apiserver instances in the cluster. Add the following flag to the kube-apiserver manifest:
spec:
  containers:
  - command:
    - kube-apiserver
    ...
    - --authentication-configuration-file=/etc/kubernetes/authentication/authentication.yaml
OIDC Flags (Legacy)
spec:
  containers:
  - command:
    - kube-apiserver
    ...
    - --oidc-issuer-url=https://${OIDC_ISSUER}
    - --oidc-ca-file=/etc/kubernetes/oidc/ca.crt
    - --oidc-client-id=kubernetes
    - --oidc-username-claim=preferred_username
    - --oidc-groups-claim=groups
    - --oidc-username-prefix=-
KinD
As reference, here is an example of a KinD configuration for OIDC Authentication, which can be useful for local testing:
apiVersion: kind.x-k8s.io/v1alpha4
kind: Cluster
nodes:
  - role: control-plane
    kubeadmConfigPatches:
     - |
       kind: ClusterConfiguration
       apiServer:
           extraArgs:
             oidc-issuer-url: https://${OIDC_ISSUER}
             oidc-username-claim: preferred_username
             oidc-client-id: kubernetes
             oidc-username-prefix: "keycloak:"
             oidc-groups-claim: groups
             oidc-groups-prefix: "keycloak:"
             enable-admission-plugins: PodNodeSelector
Configuring kubectl
There are two options to use kubectl with OIDC:
- OIDC Authenticator
- Use the –token option
Plugin
One way to use OIDC authentication is the use of a kubectl plugin. The Kubelogin Plugin for kubectl simplifies the process of obtaining an OIDC token and configuring kubectl to use it. Follow the link to obtain installation instructions.
kubectl oidc-login setup \
	--oidc-issuer-url=https://${OIDC_ISSUER} \
	--oidc-client-id=kubernetes-auth \
	--oidc-client-secret=${OIDC_CLIENT_SECRET}
Manual
To use the OIDC Authenticator, add an oidc user entry to your kubeconfig file:
$ kubectl config set-credentials oidc \
    --auth-provider=oidc \
    --auth-provider-arg=idp-issuer-url=https://${OIDC_ISSUER} \
    --auth-provider-arg=idp-certificate-authority=/path/to/ca.crt \
    --auth-provider-arg=client-id=kubernetes-auth \
    --auth-provider-arg=client-secret=${OIDC_CLIENT_SECRET} \
    --auth-provider-arg=refresh-token=${REFRESH_TOKEN} \
    --auth-provider-arg=id-token=${ID_TOKEN} \
    --auth-provider-arg=extra-scopes=groups
To use the --token option:
$ kubectl config set-credentials oidc --token=${ID_TOKEN}
Point the kubectl to the URL where the Kubernetes APIs Server is reachable:
$ kubectl config set-cluster mycluster \
    --server=https://kube.projectcapsule.io:6443 \
    --certificate-authority=~/.kube/ca.crt
If your APIs Server is reachable through the capsule-proxy, make sure to use the URL of the capsule-proxy.
Create a new context for the OIDC authenticated users:
$ kubectl config set-context alice-oidc@mycluster \
    --cluster=mycluster \
    --user=oidc
As user alice, you should be able to use kubectl to create some namespaces:
$ kubectl --context alice-oidc@mycluster create namespace oil-production
$ kubectl --context alice-oidc@mycluster create namespace oil-development
$ kubectl --context alice-oidc@mycluster create namespace gas-marketing
Warning: once your ID_TOKEN expires, the kubectl OIDC Authenticator will attempt to refresh automatically your ID_TOKEN using the REFRESH_TOKEN. In case the OIDC uses a self signed CA certificate, make sure to specify it with the idp-certificate-authority option in your kubeconfig file, otherwise you’ll not able to refresh the tokens.
6 - Monitoring
The Capsule dashboard allows you to track the health and performance of Capsule manager and tenants, with particular attention to resources saturation, server responses, and latencies. Prometheus and Grafana are requirements for monitoring Capsule.
OpenTelemetry Tracing
Capsule can export OpenTelemetry traces for admission webhook requests through the OTLP gRPC exporter. Enable tracing with manager.options.tracing.enabled=true and set manager.options.tracing.endpoint to your collector or tracing backend, for example tempo.monitoring-system.svc:4317. The exporter supports insecure transport for local clusters, TLS server name overrides, gzip compression, export timeouts, custom OTLP headers, and basic authentication. For production, prefer manager.options.tracing.basicAuth.existingSecret so credentials are loaded from a Kubernetes Secret instead of being rendered into controller arguments. Use manager.options.tracing.sampleRatio to control trace volume.
Tenants
Instrumentation for Tenants.
Metrics
The following Metrics are exposed and can be used for monitoring:
# HELP capsule_tenant_condition Provides per tenant condition status for each condition
# TYPE capsule_tenant_condition gauge
capsule_tenant_condition{condition="Cordoned",tenant="solar"} 0
capsule_tenant_condition{condition="Ready",tenant="solar"} 1


# HELP capsule_tenant_namespace_condition Provides per namespace within a tenant condition status for each condition
# TYPE capsule_tenant_namespace_condition gauge
capsule_tenant_namespace_condition{condition="Cordoned",target_namespace="earth",tenant="solar"} 0
capsule_tenant_namespace_condition{condition="Cordoned",target_namespace="fire",tenant="solar"} 0
capsule_tenant_namespace_condition{condition="Cordoned",target_namespace="foild",tenant="solar"} 0
capsule_tenant_namespace_condition{condition="Cordoned",target_namespace="green",tenant="solar"} 0
capsule_tenant_namespace_condition{condition="Cordoned",target_namespace="solar",tenant="solar"} 0
capsule_tenant_namespace_condition{condition="Cordoned",target_namespace="wind",tenant="solar"} 0
capsule_tenant_namespace_condition{condition="Ready",target_namespace="earth",tenant="solar"} 1
capsule_tenant_namespace_condition{condition="Ready",target_namespace="fire",tenant="solar"} 1
capsule_tenant_namespace_condition{condition="Ready",target_namespace="foild",tenant="solar"} 1
capsule_tenant_namespace_condition{condition="Ready",target_namespace="green",tenant="solar"} 1
capsule_tenant_namespace_condition{condition="Ready",target_namespace="solar",tenant="solar"} 1
capsule_tenant_namespace_condition{condition="Ready",target_namespace="wind",tenant="solar"} 1

# HELP capsule_tenant_namespace_count Total number of namespaces currently owned by the tenant
# TYPE capsule_tenant_namespace_count gauge
capsule_tenant_namespace_count{tenant="solar"} 6

# HELP capsule_tenant_namespace_relationship Mapping metric showing namespace to tenant relationships
# TYPE capsule_tenant_namespace_relationship gauge
capsule_tenant_namespace_relationship{target_namespace="earth",tenant="solar"} 1
capsule_tenant_namespace_relationship{target_namespace="fire",tenant="solar"} 1
capsule_tenant_namespace_relationship{target_namespace="soil",tenant="solar"} 1
capsule_tenant_namespace_relationship{target_namespace="green",tenant="solar"} 1
capsule_tenant_namespace_relationship{target_namespace="solar",tenant="solar"} 1
capsule_tenant_namespace_relationship{target_namespace="wind",tenant="solar"} 1

# HELP capsule_tenant_resource_limit Current resource limit for a given resource in a tenant
# TYPE capsule_tenant_resource_limit gauge
capsule_tenant_resource_limit{resource="limits.cpu",resourcequotaindex="0",tenant="solar"} 2
capsule_tenant_resource_limit{resource="limits.memory",resourcequotaindex="0",tenant="solar"} 2.147483648e+09
capsule_tenant_resource_limit{resource="pods",resourcequotaindex="1",tenant="solar"} 7
capsule_tenant_resource_limit{resource="requests.cpu",resourcequotaindex="0",tenant="solar"} 2
capsule_tenant_resource_limit{resource="requests.memory",resourcequotaindex="0",tenant="solar"} 2.147483648e+09

# HELP capsule_tenant_resource_usage Current resource usage for a given resource in a tenant
# TYPE capsule_tenant_resource_usage gauge
capsule_tenant_resource_usage{resource="limits.cpu",resourcequotaindex="0",tenant="solar"} 0
capsule_tenant_resource_usage{resource="limits.memory",resourcequotaindex="0",tenant="solar"} 0
capsule_tenant_resource_usage{resource="namespaces",resourcequotaindex="",tenant="solar"} 2
capsule_tenant_resource_usage{resource="pods",resourcequotaindex="1",tenant="solar"} 0
capsule_tenant_resource_usage{resource="requests.cpu",resourcequotaindex="0",tenant="solar"} 0
capsule_tenant_resource_usage{resource="requests.memory",resourcequotaindex="0",tenant="solar"} 0
Custom Metrics
You can gather more information based on the status of the tenants. These can be scrapped via Kube-State-Metrics CustomResourcesState Metrics. With these you have the possibility to create custom metrics based on the status of the tenants.
Here as an example with the kube-prometheus-stack chart, set the following values:
kube-state-metrics:
  rbac:
    extraRules:
      - apiGroups: [ "capsule.clastix.io" ]
        resources: ["tenants"]
        verbs: [ "list", "watch" ]
  customResourceState:
    enabled: true
    config:
      spec:
        resources:
          - groupVersionKind:
              group: capsule.clastix.io
              kind: "Tenant"
              version: "v1beta2"
            labelsFromPath:
              name: [metadata, name]
            metrics:
              - name: "tenant_size"
                help: "Count of namespaces in the tenant"
                each:
                  type: Gauge
                  gauge:
                    path: [status, size]
                commonLabels:
                  custom_metric: "yes"
                labelsFromPath:
                  capsule_tenant: [metadata, name]
                  kind: [ kind ]
              - name: "tenant_state"
                help: "The operational state of the Tenant"
                each:
                  type: StateSet
                  stateSet:
                    labelName: state
                    path: [status, state]
                    list: [Active, Cordoned]
                commonLabels:
                  custom_metric: "yes"
                labelsFromPath:
                  capsule_tenant: [metadata, name]
                  kind: [ kind ]
              - name: "tenant_namespaces_info"
                help: "Namespaces of a Tenant"
                each:
                  type: Info
                  info:
                    path: [status, namespaces]
                    labelsFromPath:
                      tenant_namespace: []
                commonLabels:
                  custom_metric: "yes"
                labelsFromPath:
                  capsule_tenant: [metadata, name]
                  kind: [ kind ]
This example creates three custom metrics:
tenant_sizeis a gauge that counts the number of namespaces in the tenant.tenant_stateis a state set that shows the operational state of the tenant.tenant_namespaces_infois an info metric that shows the namespaces of the tenant.
7 - Backup & Restore
Velero is a backup and restore solution that performs data protection, disaster recovery and migrates Kubernetes cluster from on-premises to the Cloud or between different Clouds.
When coming to backup and restore in Kubernetes, we have two main requirements:
- Configurations backup
- Data backup
The first requirement aims to backup all the resources stored into etcd database, for example: namespaces, pods, services, deployments, etc. The second is about how to backup stateful application data as volumes.
The main limitation of Velero is the multi tenancy. Currently, Velero does not support multi tenancy meaning it can be only used from admin users and so it cannot provided “as a service” to the users. This means that the cluster admin needs to take care of users’ backup.
Assuming you have multiple tenants managed by Capsule, for example oil and gas, as cluster admin, you can to take care of scheduling backups for:
- Tenant cluster resources
- Namespaces belonging to each tenant
Create backup of a tenant
Create a backup of the tenant solar. It consists in two different backups:
- backup of the tenant resource
- backup of all the resources belonging to the tenant
To backup the oil tenant selectively, label the tenant as:
kubectl label tenant oil capsule.clastix.io/tenant=solar
and create the backup
velero create backup solar-tenant \
    --include-cluster-resources=true \
    --include-resources=tenants.capsule.clastix.io \
    --selector capsule.clastix.io/tenant=solar
resulting in the following Velero object:
apiVersion: velero.io/v1
kind: Backup
metadata:
  name: solar-tenant
spec:
  defaultVolumesToRestic: false
  hooks: {}
  includeClusterResources: true
  includedNamespaces:
  - '*'
  includedResources:
  - tenants.capsule.clastix.io
  labelSelector:
    matchLabels:
      capsule.clastix.io/tenant: solar
  metadata: {}
  storageLocation: default
  ttl: 720h0m0s
Create a backup of all the resources belonging to the oil tenant namespaces:
velero create backup solar-namespaces \
    --include-cluster-resources=false \
    --include-namespaces solar-production,solar-development,solar-marketing
resulting in the following Velero object:
apiVersion: velero.io/v1
kind: Backup
metadata:
  name: solar-namespaces
spec:
  defaultVolumesToRestic: false
  hooks: {}
  includeClusterResources: false
  includedNamespaces:
  - solar-production
  - solar-development
  - solar-marketing
  metadata: {}
  storageLocation: default
  ttl: 720h0m0s
Velero requires an Object Storage backend where to store backups, you should take care of this requirement before using Velero.
Restore a tenant from the backup
To recover the tenant after a disaster, or to migrate it to another cluster, create a restore from the previous backups:
velero create restore --from-backup solar-tenant
velero create restore --from-backup solar-namespaces
Using Velero to restore a Capsule tenant can lead to an incomplete recovery of tenant because the namespaces restored with Velero do not have the OwnerReference field used to bind the namespaces to the tenant. For this reason, all restored namespaces are not bound to the tenant:
kubectl get tnt
NAME   STATE    NAMESPACE QUOTA   NAMESPACE COUNT   NODE SELECTOR     AGE
gas    active   9                 5                 {"pool":"gas"}    34m
oil  active   9                 8                 {"pool":"oil"}  33m
solar    active   9                 0 # <<<           {"pool":"solar"}    54m
To avoid this problem you can use the script velero-restore.sh located under the hack/ folder:
./velero-restore.sh --kubeconfing /path/to/your/kubeconfig --tenant "oil" restore
Running this command, we are going to patch the tenant’s namespaces manifests that are actually ownerReferences-less. Once the command has finished its run, you got the tenant back.
kubectl get tnt
NAME   STATE    NAMESPACE QUOTA   NAMESPACE COUNT   NODE SELECTOR     AGE
gas    active   9                 5                 {"pool":"gas"}    44m
solar  active   9                 8                 {"pool":"oil"}  43m
oil    active   9                 3 # <<<           {"pool":"solar"}    12s
8 - Known Metadata
Labels
Labels commonly used in Capsule items are listed below. These labels are applied to the corresponding resources by the Capsule controller and can be used for filtering and selection purposes.
capsule.clastix.io/tenant
| Description | Target Objects | Audience |
|---|---|---|
Established the connection between Object and Tenant. It’s value indicates the owning Tenant | * Namespaces having a relationship to Tenants | Controller |
projectcapsule.dev/tenant
| Description | Target Objects | Audience |
|---|---|---|
Established the connection between Object and Tenant. It’s value indicates the owning Tenant. Long term replacement for capsule.clastix.io/tenant and capsule.clastix.io/managed-by labels. | * All namespaced items within a Tenant Namespace become the corresponding Tenant Label via Mutating Admission. | Controller |
capsule.clastix.io/managed-by
| Description | Target Objects | Audience |
|---|---|---|
Established the connection between Object and Tenant. It’s value indicates the owning Tenant. Long term replacement for capsule.clastix.io/tenant | * All namespaced items within a Tenant Namespace become the corresponding Tenant Label via Mutating Admission. This label is still added to keep compatibility wiht the Capsule Proxy. | User |
projectcapsule.dev/managed-by
| Description | Target Objects | |
|---|---|---|
Indicator which controller of capsule or Custom Resource is responsible for managing the corresponding Object. Mainly used in Replications to establish that objects are at least managed by one Replications. | * Any Object being influenced by Replications | User |
projectcapsule.dev/created-by
| Description | Target Objects | Audience |
|—|—|
| Indicator which controller of capsule or Custom Resource is responsible for managing the corresponding Object. Mainly used in Replications to establish that objects were originally created by a Replication. | * Any Object being influenced by Replications | Controller |
projectcapsule.dev/name
| Description | Target Objects | Audience |
|---|---|---|
| Label for tracking internal name or allowing for faster selects. Mainly used to identify relevant rulestatus | * Tenant Namespaces | Controller |
projectcapsule.dev/cordoned
| Description | Target Objects | Audience |
|---|---|---|
Indicator that a namespace is cordoned (when value equals true) | * Tenant Namespaces | User |
projectcapsule.dev/pool
| Description | Target Objects | Audience |
|---|---|---|
| Allocation of Resourcepool via ResourcePoolClaims | * ResourcePoolClaims | User |
9 - Templating
Fast Templates
For simple template cases we provide a fast templating engine. With this engine, you can use Go templates syntax to reference Tenant and Namespace fields. There are no operators or anything else supported.
Available fields are:
{{tenant.name}}: The Name of the Tenant{{namespace}}: The Name of the namespace within the tenant (current context)
Sprout Templating
Our template library is mainly based on the upstream implementation from Sprout. You can find the all available functions here:
We have removed certain functions which could exploit runtime information. Therefor the following functions are not available:
envexpandEnv
Data
You can provide structured data for each Tenant which can be used in templating:
apiVersion: capsule.clastix.io/v1beta2
kind: Tenant
metadata:
  name: solar
spec:
  data:
    bool: true
    foo: bar
    list:
    - a
    - b
    number: 123
    obj:
      nested: value
Function Library
Custom Functions we provide in our template package.
deterministicUUID
deterministicUUID generates a deterministic, RFC-4122–compliant UUID (version 5 + RFC4122 variant) from a set of input strings. It is designed for use in templates where you need stable, repeatable IDs derived from meaningful inputs (e.g. cluster name, tenant, role name), instead of random UUIDs.
This is especially useful for:
- Crossplane / IaC resources that must not change IDs across reconciles
The function takes any number of strings and turns them into a UUID in a fully deterministic way.
What that means in practice:
- If you call it twice with the same values, you get the same UUID
- If any input changes, the UUID changes too
- There is no randomness involved
- The output is always a valid UUID
So from the outside, it behaves just like a normal UUID — just deterministic.
deterministicUUID(parts ...string) string
Example usage:
{{ deterministicUUID "cluster-a" "app-123" "tenant-x" "some-role" }}
generateAgeKey
generateAgeKey generates a new age X25519 key pair for use with age. It returns both the private identity and the public recipient key.
This is useful in templates where a resource needs to create an age-compatible encryption identity, for example when generating Kubernetes Secrets that are later used for encrypting or decrypting data.
This is especially useful for:
- Bootstrap secrets that need an age identity
- Generating encryption keys during initial provisioning
- Creating age recipient keys for systems that need to encrypt data for a generated identity
The function does not return a plain string. It returns an object with two fields:
Identity— the private age identity, e.g.AGE-SECRET-KEY-1...Recipient— the public age recipient, e.g.age1...
What that means in practice:
- Each call generates a new key pair
- The identity is the private key and must be treated as secret
- The recipient is the public key and can be shared with systems that need to encrypt data
- The output is not deterministic
- Calling this function during every reconcile may rotate the generated key unless the result is persisted
generateAgeKey() any
Example usage:
{{ $key := generateAgeKey }}
apiVersion: v1
kind: Secret
metadata:
  name: age-key
type: Opaque
stringData:
  identity: {{ $key.Identity | quote }}
  recipient: {{ $key.Recipient | quote }}
Output:
apiVersion: v1
kind: Secret
metadata:
  name: age-key
type: Opaque
stringData:
  identity: "AGE-SECRET-KEY-1..."
  recipient: "age1..."
Because this function creates a new random key pair on every call, it should usually only be used when the generated Secret is created once and then reused. For continuously reconciled resources, prefer generating the key in controller logic and persisting it before using it in templates.
generateAgePQKey
generateAgePQKey generates a new age post-quantum hybrid key pair for use with age. It returns both the private identity and the public recipient key.
This is useful in templates where a resource needs to create an age-compatible encryption identity using the newer hybrid recipient format.
This is especially useful for:
- Bootstrap secrets that should use age hybrid keys
- Generating encryption keys during initial provisioning
- Creating public recipient keys for systems that need to encrypt data for a generated hybrid identity
- Future-facing age encryption setups where hybrid keys are preferred
The function does not return a plain string. It returns an object with two fields:
Identity— the private age hybrid identity, e.g.AGE-SECRET-KEY-PQ-1...Recipient— the public age recipient, e.g.age1...
What that means in practice:
- Each call generates a new key pair
- The identity is the private key and must be treated as secret
- The recipient is the public key and can be shared with systems that need to encrypt data
- The output is not deterministic
- Calling this function during every reconcile may rotate the generated key unless the result is persisted
generateAgePQKey() any
Example Usage:
{{ $key := generateAgePQKey }}
apiVersion: v1
kind: Secret
metadata:
  name: age-pq-key
type: Opaque
stringData:
  identity: {{ $key.Identity | quote }}
  recipient: {{ $key.Recipient | quote }}
Output:
apiVersion: v1
kind: Secret
metadata:
  name: age-pq-key
type: Opaque
stringData:
  identity: "AGE-SECRET-KEY-PQ-1..."
  recipient: "age1..."
Because this function creates a new random key pair on every call, it should usually only be used when the generated Secret is created once and then reused. For continuously reconciled resources, prefer generating the key in controller logic and persisting it before using it in templates.