This is the multi-page printable view of this section. Click here to print.
Setup
1 - Installation
Requirements
- Helm 3 is required when installing the Capsule Operator chart. Follow Helm’s official for installing helm on your particular operating system.
- A Kubernetes cluster 1.16+ with following Admission Controllers enabled:
- PodNodeSelector
- LimitRanger
- ResourceQuota
- MutatingAdmissionWebhook
- ValidatingAdmissionWebhook
- A Kubeconfig file accessing the Kubernetes cluster with cluster admin permissions.
- Cert-Manager is recommended but not required
Installation
We officially only support the installation of Capsule using the Helm chart. The chart itself handles the Installation/Upgrade of needed CustomResourceDefinitions. The following Artifacthub repository are official:
Perform the following steps to install the capsule Operator:
Add repository:
helm repo add projectcapsule https://projectcapsule.github.io/chartsInstall Capsule:
helm install capsule projectcapsule/capsule --version 0.12.4 -n capsule-system --create-namespaceor (OCI)
helm install capsule oci://ghcr.io/projectcapsule/charts/capsule --version 0.12.4 -n capsule-system --create-namespaceShow the status:
helm status capsule -n capsule-systemUpgrade the Chart
helm upgrade capsule projectcapsule/capsule -n capsule-systemor (OCI)
helm upgrade capsule oci://ghcr.io/projectcapsule/charts/capsule --version 0.12.4Uninstall the Chart
helm uninstall capsule -n capsule-system
Considerations
Here are some key considerations to keep in mind when installing Capsule. Also check out the Best Practices for more information.
Admission Policies
While Capsule provides a robust framework for managing multi-tenancy in Kubernetes, it does not include built-in admission policies for enforcing specific security or operational standards for all possible aspects of a Kubernetes cluster. We provide additional policy recommendations here.
Certificate Management
We recommend using cert-manager to manage the TLS certificates for Capsule. This will ensure that your Capsule installation is secure and that the certificates are automatically renewed. Capsule requires a valid TLS certificate for it’s Admission Webserver. By default Capsule reconciles it’s own TLS certificate. To use cert-manager, you can set the following values:
certManager:
  generateCertificates: true
tls:
  enableController: false
  create: false
Webhooks
Capsule makes use of webhooks for admission control. Ensure that your cluster supports webhooks and that they are properly configured. The webhooks are automatically created by Capsule during installation. However some of these webhooks will cause problems when capsule is not running (this is especially problematic in single-node clusters). Here are the webhooks you need to watch out for.
Generally we recommend to use matchconditions for all the webhooks to avoid problems when Capsule is not running. You should exclude your system critical components from the Capsule webhooks. For namespaced resources (pods, services, etc.) the webhooks all select only namespaces which are part of a Capsule Tenant. If your system critical components are not part of a Capsule Tenant, they will not be affected by the webhooks. However, if you have system critical components which are part of a Capsule Tenant, you should exclude them from the Capsule webhooks by using matchconditions as well or add more specific namespaceselectors/objectselectors to exclude them. This can also be considered to improve performance.
The Webhooks below are the most important ones to consider.
Nodes
There is a webhook which catches interactions with the Node resource. This Webhook is mainly interesting, when you make use of Node Metadata. In any other case it will just case you problems. By default the webhook is disabled, but you can enabled it by setting the following value:
webhooks:
  hooks:
    nodes:
      enabled: true
Or you could at least consider to set the failure policy to Ignore, if you don’t want to disrupt critical nodes:
webhooks:
  hooks:
    nodes:
      failurePolicy: Ignore
If you still want to use the feature, you could execlude the kube-system namespace (or any other namespace you want to exclude) from the webhook by setting the following value:
webhooks:
  hooks:
    nodes:
      matchConditions:
      - name: 'exclude-kubelet-requests'
        expression: '!("system:nodes" in request.userInfo.groups)'
      - name: 'exclude-kube-system'
        expression: '!("system:serviceaccounts:kube-system" in request.userInfo.groups)'
Namespaces
Namespaces are the most important resource in Capsule. The Namespace Webhook is responsible for enforcing the Capsule Tenant boundaries. It is enabled by default and should not be disabled. However, you may change the matchConditions to execlude certain namespaces from the Capsule Tenant boundaries. For example, you can exclude the kube-system namespace by setting the following value:
webhooks:
  hooks:
    namespaces:
      matchConditions:
      - name: 'exclude-kube-system'
        expression: '!("system:serviceaccounts:kube-system" in request.userInfo.groups)'
GitOps
There are no specific requirements for using Capsule with GitOps tools like ArgoCD or FluxCD. You can manage Capsule resources as you would with any other Kubernetes resource.
ArgoCD
Manifests to get you started with ArgoCD. For ArgoCD you might need to skip the validation of the CapsuleConfiguration resources, otherwise there might be errors on the first install:
Information
TheValidate=false option is required for the CapsuleConfiguration resource, because ArgoCD tries to validate the resource before the Capsule CRDs are installed via our CRD Lifecycle hook. Upstream Issue. This has mainly been observed in ArgoCD Applications using Service-Side Diff/Apply.manager:
options:
annotations:
argocd.argoproj.io/sync-options: "Validate=false,SkipDryRunOnMissingResource=true"
---
apiVersion: argoproj.io/v1alpha1
kind: Application
metadata:
name: capsule
namespace: argocd
finalizers:
- resources-finalizer.argocd.argoproj.io
spec:
project: system
source:
repoURL: ghcr.io/projectcapsule/charts
targetRevision: 0.12.4
chart: capsule
helm:
valuesObject:
crds:
install: true
certManager:
generateCertificates: true
tls:
enableController: false
create: false
manager:
  options:
    annotations:
      argocd.argoproj.io/sync-options: "Validate=false,SkipDryRunOnMissingResource=true"
capsuleConfiguration: default
ignoreUserGroups:
- oidc:administators
capsuleUserGroups:
- oidc:kubernetes-users
- system:serviceaccounts:capsule-argo-addon
monitoring:
dashboards:
enabled: true
serviceMonitor:
enabled: true
annotations:
argocd.argoproj.io/sync-options: SkipDryRunOnMissingResource=true
proxy:
enabled: true
webhooks:
enabled: true
certManager:
generateCertificates: true
options:
generateCertificates: false
oidcUsernameClaim: "email"
extraArgs:
- "--feature-gates=ProxyClusterScoped=true"
- "--feature-gates=ProxyAllNamespaced=true"
serviceMonitor:
enabled: true
annotations:
argocd.argoproj.io/sync-options: SkipDryRunOnMissingResource=true
destination:
server: https://kubernetes.default.svc
namespace: capsule-system
syncPolicy:
automated:
prune: true
selfHeal: true
syncOptions:
- ServerSideApply=true
- CreateNamespace=true
- PrunePropagationPolicy=foreground
- PruneLast=true
- RespectIgnoreDifferences=true
retry:
limit: 5
backoff:
duration: 5s
factor: 2
maxDuration: 3m
---
apiVersion: v1
kind: Secret
metadata:
name: capsule-repo
namespace: argocd
labels:
argocd.argoproj.io/secret-type: repository
stringData:
url: ghcr.io/projectcapsule/charts
name: capsule
project: system
type: helm
enableOCI: "true"
FluxCD
apiVersion: helm.toolkit.fluxcd.io/v2
kind: HelmRelease
metadata:
  name: capsule
  namespace: flux-system
spec:
  serviceAccountName: kustomize-controller
  targetNamespace: "capsule-system"
  interval: 10m
  releaseName: "capsule"
  chart:
    spec:
      chart: capsule
      version: "0.12.4"
      sourceRef:
        kind: HelmRepository
        name: capsule
      interval: 24h
  install:
    createNamespace: true
  upgrade:
    remediation:
      remediateLastFailure: true
  driftDetection:
    mode: enabled
  values:
    crds:
      install: true
    certManager:
      generateCertificates: true
    tls:
      enableController: false
      create: false
    manager:
      options:
        capsuleConfiguration: default
        ignoreUserGroups:
          - oidc:administators
        capsuleUserGroups:
          - oidc:kubernetes-users
          - system:serviceaccounts:capsule-argo-addon
    monitoring:
      dashboards:
        enabled: true
      serviceMonitor:
        enabled: true
    proxy:
      enabled: true
      webhooks:
        enabled: true
      certManager:
        generateCertificates: true
      options:
        generateCertificates: false
        oidcUsernameClaim: "email"
        extraArgs:
        - "--feature-gates=ProxyClusterScoped=true"
        - "--feature-gates=ProxyAllNamespaced=true"
---
apiVersion: source.toolkit.fluxcd.io/v1
kind: HelmRepository
metadata:
  name: capsule
  namespace: flux-system
spec:
  type: "oci"
  interval: 12h0m0s
  url: oci://ghcr.io/projectcapsule/charts
Security
Signature
To verify artifacts you need to have cosign installed. This guide assumes you are using v2.x of cosign. All of the signatures are created using keyless signing. You can set the environment variable COSIGN_REPOSITORY to point to this repository. For example:
# Docker Image
export COSIGN_REPOSITORY=ghcr.io/projectcapsule/capsule

# Helm Chart
export COSIGN_REPOSITORY=ghcr.io/projectcapsule/charts/capsule
To verify the signature of the docker image, run the following command. Replace <release_tag> with an available release tag:
COSIGN_REPOSITORY=ghcr.io/projectcapsule/charts/capsule cosign verify ghcr.io/projectcapsule/capsule:<release_tag> \
  --certificate-identity-regexp="https://github.com/projectcapsule/capsule/.github/workflows/docker-publish.yml@refs/tags/*" \
  --certificate-oidc-issuer="https://token.actions.githubusercontent.com" | jq
To verify the signature of the helm image, run the following command. Replace <release_tag> with an available release tag:
COSIGN_REPOSITORY=ghcr.io/projectcapsule/charts/capsule cosign verify ghcr.io/projectcapsule/charts/capsule:<release_tag> \
  --certificate-identity-regexp="https://github.com/projectcapsule/capsule/.github/workflows/helm-publish.yml@refs/tags/*" \
  --certificate-oidc-issuer="https://token.actions.githubusercontent.com" | jq
Provenance
Capsule creates and attests to the provenance of its builds using the SLSA standard and meets the SLSA Level 3 specification. The attested provenance may be verified using the cosign tool.
Verify the provenance of the docker image. Replace <release_tag> with an available release tag
cosign verify-attestation --type slsaprovenance \
  --certificate-identity-regexp="https://github.com/slsa-framework/slsa-github-generator/.github/workflows/generator_container_slsa3.yml@refs/tags/*" \
  --certificate-oidc-issuer="https://token.actions.githubusercontent.com" \
  ghcr.io/projectcapsule/capsule:<release_tag> | jq .payload -r | base64 --decode | jq
Verify the provenance of the helm image. Replace <release_tag> with an available release tag
cosign verify-attestation --type slsaprovenance \
  --certificate-identity-regexp="https://github.com/slsa-framework/slsa-github-generator/.github/workflows/generator_container_slsa3.yml@refs/tags/*" \
  --certificate-oidc-issuer="https://token.actions.githubusercontent.com" \
  ghcr.io/projectcapsule/charts/capsule:<release_tag> | jq .payload -r | base64 --decode | jq
Software Bill of Materials (SBOM)
An SBOM (Software Bill of Materials) in CycloneDX JSON format is published for each release, including pre-releases. You can set the environment variable COSIGN_REPOSITORY to point to this repository. For example:
# Docker Image
export COSIGN_REPOSITORY=ghcr.io/projectcapsule/capsule

# Helm Chart
export COSIGN_REPOSITORY=ghcr.io/projectcapsule/charts/capsule
To inspect the SBOM of the docker image, run the following command. Replace <release_tag> with an available release tag:
COSIGN_REPOSITORY=ghcr.io/projectcapsule/capsule cosign download sbom ghcr.io/projectcapsule/capsule:<release_tag>
To inspect the SBOM of the helm image, run the following command. Replace <release_tag> with an available release tag:
COSIGN_REPOSITORY=ghcr.io/projectcapsule/charts/capsule cosign download sbom ghcr.io/projectcapsule/charts/capsule:<release_tag>
Compatibility
The Kubernetes compatibility is announced for each Release. Generally we are up to date with the latest upstream Kubernetes Version. Note that the Capsule project offers support only for the latest minor version of Kubernetes. Backwards compatibility with older versions of Kubernetes and OpenShift is offered by vendors.
2 - OpenShift
Introduction
Capsule is a Kubernetes multi-tenancy operator that enables secure namespace-as-a-service in Kubernetes clusters. When combined with OpenShift’s robust security model, it provides an excellent platform for multi-tenant environments.
This guide demonstrates how to deploy Capsule and Capsule Proxy on OpenShift using the nonroot-v2 and restricted-v2 SecurityContextConstraint (SCC), ensuring tenant owners operate within OpenShift’s security boundaries.
Why Capsule on OpenShift
While OpenShift can be already configured to be quite multi-tenant (together with for example Kyverno), Capsule takes it a step further and easier to manage.
When people say a multitenant kubernetes cluster, they often think they will get one or two namespaces inside a cluster, with not that much privileges. But: Capsule is different. As a tenant owner, you can create as many namespaces as you want. RBAC is much easier, since Capsule is handling it, making it less error-prone. And resource quota is not set per namespace, but it’s spread across a whole tenant, making management easy. Not to mention RBAC issues while listing clusterwide resources that are solved by the Capsule Proxy. Also, even some operators are able to be installed inside a tenant because of the Capsule Proxy. Add the service account as a tenant owner, and set the env variable KUBERNETES_SERVICE_HOST of the operator deployment to the capsule proxy url. Now your operator thinks it is admin, but it lives completely inside the tenant.
Prerequisites
Before starting, ensure you have:
- OpenShift cluster with cluster-admin privileges
kubectlCLI configured- Helm 3.x installed
- cert-manager installed
Limitations
There are a few limitations that are currently known of using OpenShift with Capsule:
- A tenant owner can not create a namespace/project in the OpenShift GUI. This must be done with
kubectl. - When copying the
login tokenfrom the OpenShift GUI, there will always be the server address of the kubernetes api instead of the Capsule Proxy. There is a RFE created at Red Hat to make this url configurable (RFE-7592). If you have a support contract at Red Hat, it would be great to create a SR and ask that you would also like to have this feature to be implemented. The more requests there are, the more likely it will be implemented.
Capsule Installation
Remove selfprovisioners rolebinding
By default, OpenShift comes with a selfprovisioner role and rolebinding. This role lets all users always create namespaces. For the use case of Capsule, this should be removed. The Red Hat documentation can be found here. Remove the subjects from the rolebinding:
kubectl patch clusterrolebinding.rbac self-provisioners -p '{"subjects": null}'
Also set the autoupdate to false, so the rolebinding doesn’t get reverted by Openshift.
kubectl patch clusterrolebinding.rbac self-provisioners -p '{ "metadata": { "annotations": { "rbac.authorization.kubernetes.io/autoupdate": "false" } } }'
Extend the admin role
In this example, we will add the default kubernetes admin role to the tenant owner, so it gets admin privileges on the namespaces that are in their tenant. This role should be extended.
- Add the finalizers so users can create/edit resources that are managed by capsule
- Add the SCC’s that tenant owners can use. In this example, it is will be
restricted-v2andnonroot-v2.
kind: ClusterRole
apiVersion: rbac.authorization.k8s.io/v1
metadata:
  name: extend-admin-role
  labels:
    rbac.authorization.k8s.io/aggregate-to-admin: 'true'
rules:
  - verbs:
      - update
    apiGroups:
      - capsule.clastix.io
    resources:
      - '*/finalizers'
  - apiGroups:
      - security.openshift.io
    resources:
      - securitycontextconstraints
    resourceNames:
      - restricted-v2
      - nonroot-v2
    verbs:
      - 'use'
Helm Chart values
The jobs that Capsule uses can be runned with the restricted-v2 SCC. For this, the securityContext and podSecurityContexts of the job must be disabled. For Capsule it self, we leave it to enabled. This is because capsule runs as nonroot-v2, which is still a very secure SCC. Also, always add the pullPolicy: Always on a multitenant cluster, to make sure you are working with the correct images you intended to.
The following chart values can be used:
  podSecurityContext:
    enabled: true
  securityContext:
    enabled: true
  jobs:
    podSecurityContext:
      enabled: false
    securityContext:
      enabled: false
    image:
      pullPolicy: Always
  manager:
    image:
      pullPolicy: Always
Deploy the Capsule Helm chart with (at least) these values.
Example tenant
A minimal example tenant can look as the following:
apiVersion: capsule.clastix.io/v1beta2
kind: Tenant
metadata:
  name: sun
spec:
  imagePullPolicies:
    - Always
  owners:
    - clusterRoles:
        - admin
        - capsule-namespace-deleter
      kind: Group
      name: sun-admin-group
  priorityClasses:
    allowed:
      - openshift-user-critical
Capsule Proxy
The same principles for Capsule are also for Capsule Proxy. That means, that all (pod)SecurityContexts should be disabled for the job.
In this example we enable the ProxyAllNamespaced feature, because that is one of the things where the Proxy really shines in its power.
The following helm values can be used as a template:
  securityContext:
    enabled: true
  podSecurityContext:
    enabled: true
  options:
    generateCertificates: false #set to false, since we are using cert-manager in .Values.certManager.generateCertificates
    enableSSL: true
    extraArgs:
      - '--feature-gates=ProxyAllNamespaced=true'
      - '--feature-gates=ProxyClusterScoped=false'
  image:
    pullPolicy: Always
  global:
    jobs:
      kubectl:
        securityContext:
          enabled: true
  webhooks:
    enabled: true
  certManager:
    generateCertificates: true
  ingress:
    enabled: true
    annotations:
      route.openshift.io/termination: "reencrypt"
      route.openshift.io/destination-ca-certificate-secret: capsule-proxy-root-secret
    hosts:
    - host: "capsule-proxy.example.com"
      paths: ["/"]
That is basically all the configuration needed for the Capsule Proxy.
Console Customization
The OpenShift console can be customized. For example, the capsule-proxy can be added as a shortcut on the top right application menu with the ConsoleLink CR:
apiVersion: console.openshift.io/v1
kind: ConsoleLink
metadata:
  name: capsule-proxy-consolelink
spec:
  applicationMenu:
    imageURL: 'https://github.com/projectcapsule/capsule/raw/main/assets/logo/capsule.svg'
    section: 'Capsule'
  href: 'capsule-proxy.example.com'
  location: ApplicationMenu
  text: 'Capsule Proxy Kubernetes API'
It’s also possible to add links specific for certain namespaces, which are shown on the Namespace/Project overview. These can also be tenant specific by adding a NamespaceSelector:
apiVersion: console.openshift.io/v1
kind: ConsoleLink
metadata:
  name: namespaced-consolelink-sun
spec:
  text: "Sun Docs"
  href: "https://linktothesundocs.com"
  location: "NamespaceDashboard"
  namespaceDashboard:
    namespaceSelector:
      matchExpressions:
        - key: capsule.clastix.io/tenant
          operator: In
          values:
            - sun
Also a custom logo can be provided, for example by adding the Capsule logo.
Add these config lines to the existing cluster CR Console.
kubectl create configmap console-capsule-logo --from-file capsule-logo.png -n openshift-config
apiVersion: operator.openshift.io/v1
kind: Console
metadata:
  name: cluster
spec:
  customization:
    customLogoFile:
      key: capsule-logo.png
      name: console-capsule-logo
    customProductName: Capsule OpenShift Cluster
Conclusion
After this section, you have a ready to go Capsule and Capsule-Proxy setup configured on OpenShift with some nice customizations in the OpenShift console. All ready to go and to ship to the development teams!
3 - Rancher
The integration between Rancher and Capsule, aims to provide a multi-tenant Kubernetes service to users, enabling:
- a self-service approach
- access to cluster-wide resources
to end-users.
Tenant users will have the ability to access Kubernetes resources through:
- Rancher UI
- Rancher Shell
- Kubernetes CLI
On the other side, administrators need to manage the Kubernetes clusters through Rancher.
Rancher provides a feature called Projects to segregate resources inside a common domain. At the same time Projects doesn’t provide way to segregate Kubernetes cluster-scope resources.
Capsule as a project born for creating a framework for multi-tenant platforms, integrates with Rancher Projects enhancing the experience with Tenants.
Capsule allows tenants isolation and resources control in a declarative way, while enabling a self-service experience to tenants. With Capsule Proxy users can also access cluster-wide resources, as configured by administrators at Tenant custom resource-level.
You can read in detail how the integration works and how to configure it, in the following guides.
- How to integrate Rancher Projects with Capsule Tenants How to enable cluster-wide resources and Rancher shell access.
Tenants and Projects
This guide explains how to setup the integration between Capsule and Rancher Projects.
It then explains how for the tenant user, the access to Kubernetes resources is transparent.
Pre-requisites
- An authentication provider in Rancher, e.g. an OIDC identity provider
- A Tenant Member
Cluster Rolein Rancher
Configure an identity provider for Kubernetes
You can follow this general guide to configure an OIDC authentication for Kubernetes.
For a Keycloak specific setup yon can check this resources list.
Known issues
Keycloak new URLs without /auth makes Rancher crash
Create the Tenant Member Cluster Role
A custom Rancher Cluster Role is needed to allow Tenant users, to read cluster-scope resources and Rancher doesn’t provide e built-in Cluster Role with this tailored set of privileges.
When logged-in to the Rancher UI as administrator, from the Users & Authentication page, create a Cluster Role named Tenant Member with the following privileges:
get,list,watchoperations overIngressClassesresources.get,list,watchoperations overStorageClassesresources.get,list,watchoperations overPriorityClassesresources.get,list,watchoperations overNodesresources.get,list,watchoperations overRuntimeClassesresources.
Configuration (administration)
Tenant onboarding
When onboarding tenants, the administrator needs to create the following, in order to bind the Project with the Tenant:
In Rancher, create a
Project.In the target Kubernetes cluster, create a
Tenant, with the following specification:kind: Tenant ... spec: namespaceOptions: additionalMetadata: annotations: field.cattle.io/projectId: ${CLUSTER_ID}:${PROJECT_ID} labels: field.cattle.io/projectId: ${PROJECT_ID}where
$CLUSTER_IDand$PROEJCT_IDcan be retrieved, assuming a valid$CLUSTER_NAME, as:CLUSTER_NAME=foo CLUSTER_ID=$(kubectl get cluster -n fleet-default ${CLUSTER_NAME} -o jsonpath='{.status.clusterName}') PROJECT_IDS=$(kubectl get projects -n $CLUSTER_ID -o jsonpath="{.items[*].metadata.name}") for project_id in $PROJECT_IDS; do echo "${project_id}"; doneMore on declarative
Projects here.In the identity provider, create a user with correct OIDC claim of the Tenant.
In Rancher, add the new user to the
Projectwith the Read-onlyRole.In Rancher, add the new user to the
Clusterwith the Tenant MemberCluster Role.
Create the Tenant Member Project Role
A custom Project Role is needed to allow Tenant users, with minimum set of privileges and create and delete Namespaces.
Create a Project Role named Tenant Member that inherits the privileges from the following Roles:
- read-only
- create-ns
Usage
When the configuration administrative tasks have been completed, the tenant users are ready to use the Kubernetes cluster transparently.
For example can create Namespaces in a self-service mode, that would be otherwise impossible with the sole use of Rancher Projects.
Namespace creation
From the tenant user perspective both CLI and the UI are valid interfaces to communicate with.
From CLI
- Tenants
kubectl-logs in to the OIDC provider - Tenant creates a Namespace, as a valid OIDC-discoverable user.
the Namespace is now part of both the Tenant and the Project.
As administrator, you can verify with:
kubectl get tenant ${TENANT_NAME} -o jsonpath='{.status}'
kubectl get namespace -l field.cattle.io/projectId=${PROJECT_ID}
From UI
- Tenants logs in to Rancher, with a valid OIDC-discoverable user (in a valid Tenant group).
- Tenant user create a valid Namespace
the Namespace is now part of both the Tenant and the Project.
As administrator, you can verify with:
kubectl get tenant ${TENANT_NAME} -o jsonpath='{.status}'
kubectl get namespace -l field.cattle.io/projectId=${PROJECT_ID}
Additional administration
Project monitoring
Before proceeding is recommended to read the official Rancher documentation about Project Monitors.
In summary, the setup is composed by a cluster-level Prometheus, Prometheus Federator via which single Project-level Prometheus federate to.
Network isolation
Before proceeding is recommended to read the official Capsule documentation about NetworkPolicy at Tenant-level`.
Network isolation and Project Monitor
As Rancher’s Project Monitor deploys the Prometheus stack in a Namespace that is not part of neither the Project nor the Tenant Namespaces, is important to apply the label selectors in the NetworkPolicy ingress rules to the Namespace created by Project Monitor.
That Project monitoring Namespace will be named as cattle-project-<PROJECT_ID>-monitoring.
For example, if the NetworkPolicy is configured to allow all ingress traffic from Namespace with label capsule.clastix.io/tenant=foo, this label is to be applied to the Project monitoring Namespace too.
Then, a NetworkPolicy can be applied at Tenant-level with Capsule GlobalTenantResources. For example it can be applied a minimal policy for the oil Tenant:
apiVersion: capsule.clastix.io/v1beta2
kind: GlobalTenantResource
metadata:
  name: oil-networkpolicies
spec:
  tenantSelector:
    matchLabels:
      capsule.clastix.io/tenant: oil
  resyncPeriod: 360s
  pruningOnDelete: true
  resources:
    - namespaceSelector:
        matchLabels:
          capsule.clastix.io/tenant: oil
      rawItems:
      - apiVersion: networking.k8s.io/v1
        kind: NetworkPolicy
        metadata:
          name: oil-minimal
        spec:
          podSelector: {}
          policyTypes:
            - Ingress
            - Egress
          ingress:
            # Intra-Tenant
            - from:
              - namespaceSelector:
                  matchLabels:
                    capsule.clastix.io/tenant: oil
            # Rancher Project Monitor stack
            - from:
              - namespaceSelector:
                  matchLabels:
                    role: monitoring
            # Kubernetes nodes
            - from:
              - ipBlock:
                  cidr: 192.168.1.0/24
          egress:
            # Kubernetes DNS server
            - to:
              - namespaceSelector: {}
                podSelector:
                  matchLabels:
                    k8s-app: kube-dns
                ports:
                  - port: 53
                    protocol: UDP
            # Intra-Tenant
            - to:
              - namespaceSelector:
                  matchLabels:
                    capsule.clastix.io/tenant: oil
            # Kubernetes API server
            - to:
              - ipBlock:
                  cidr: 10.43.0.1/32
                ports:
                  - port: 443
Capsule Proxy and Rancher Projects
This guide explains how to setup the integration between Capsule Proxy and Rancher Projects.
It then explains how for the tenant user, the access to Kubernetes cluster-wide resources is transparent.
Rancher Shell and Capsule
In order to integrate the Rancher Shell with Capsule it’s needed to route the Kubernetes API requests made from the shell, via Capsule Proxy.
The capsule-rancher-addon allows the integration transparently.
Install the Capsule addon
Add the Clastix Helm repository https://clastix.github.io/charts.
By updating the cache with Clastix’s Helm repository a Helm chart named capsule-rancher-addon is available.
Install keeping attention to the following Helm values:
proxy.caSecretKey: theSecretkey that contains the CA certificate used to sign the Capsule Proxy TLS certificate (it should be"ca.crt"when Capsule Proxy has been configured with certificates generated with Cert Manager).proxy.servicePort: the port configured for the Capsule Proxy KubernetesService(443in this setup).proxy.serviceURL: the name of the Capsule ProxyService(by default"capsule-proxy.capsule-system.svc"hen installed in the capsule-systemNamespace).
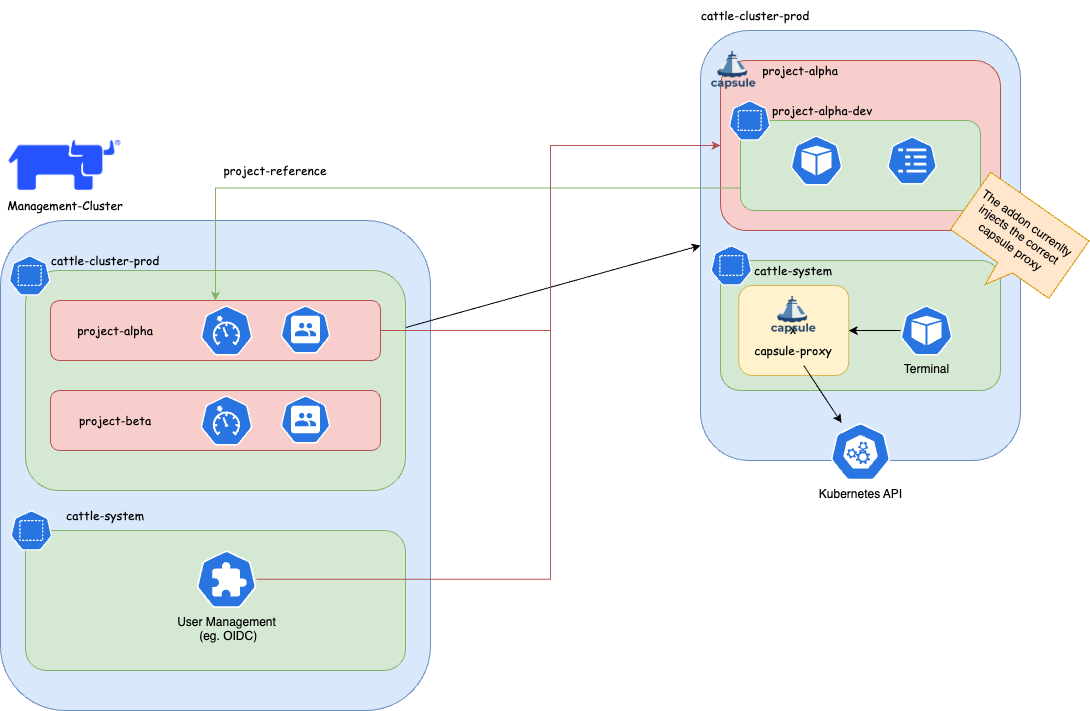
Rancher Cluster Agent
In both CLI and dashboard use cases, the Cluster Agent is responsible for the two-way communication between Rancher and the downstream cluster.
In a standard setup, the Cluster Agents communicates to the API server. In this setup it will communicate with Capsule Proxy to ensure filtering of cluster-scope resources, for Tenants.
Cluster Agents accepts as arguments:
KUBERNETES_SERVICE_HOSTenvironment variableKUBERNETES_SERVICE_PORTenvironment variable
which will be set, at cluster import-time, to the values of the Capsule Proxy Service. For example:
KUBERNETES_SERVICE_HOST=capsule-proxy.capsule-system.svc- (optional)
KUBERNETES_SERVICE_PORT=9001. You can skip it by installing Capsule Proxy with Helm valueservice.port=443.
The expected CA is the one for which the certificate is inside the kube-root-ca ConfigMap in the same Namespace of the Cluster Agent (cattle-system).
Capsule Proxy
Capsule Proxy needs to provide a x509 certificate for which the root CA is trusted by the Cluster Agent. The goal can be achieved by, either using the Kubernetes CA to sign its certificate, or by using a dedicated root CA.
With the Kubernetes root CA
Note: this can be achieved when the Kubernetes root CA keypair is accessible. For example is likely to be possibile with on-premise setup, but not with managed Kubernetes services.
With this approach Cert Manager will sign certificates with the Kubernetes root CA for which it’s needed to be provided a Secret.
kubectl create secret tls -n capsule-system kubernetes-ca-key-pair --cert=/path/to/ca.crt --key=/path/to/ca.key
When installing Capsule Proxy with Helm chart, it’s needed to specify to generate Capsule Proxy Certificates with Cert Manager with an external ClusterIssuer:
certManager.externalCA.enabled=truecertManager.externalCA.secretName=kubernetes-ca-key-paircertManager.generateCertificates=true
and disable the job for generating the certificates without Cert Manager:
options.generateCertificates=false
Enable tenant users access cluster resources
In order to allow tenant users to list cluster-scope resources, like Nodes, Tenants need to be configured with proper proxySettings, for example:
apiVersion: capsule.clastix.io/v1beta2
kind: Tenant
metadata:
  name: oil
spec:
  owners:
  - kind: User
    name: alice
    proxySettings:
    - kind: Nodes
      operations:
      - List
[...]
Also, in order to assign or filter nodes per Tenant, it’s needed labels on node in order to be selected:
kubectl label node worker-01 capsule.clastix.io/tenant=oil
and a node selector at Tenant level:
apiVersion: capsule.clastix.io/v1beta2
kind: Tenant
metadata:
  name: oil
spec:
  nodeSelector:
    capsule.clastix.io/tenant: oil
[...]
The final manifest is:
apiVersion: capsule.clastix.io/v1beta2
kind: Tenant
metadata:
  name: oil
spec:
  owners:
  - kind: User
    name: alice
    proxySettings:
    - kind: Node
      operations:
      - List
  nodeSelector:
    capsule.clastix.io/tenant: oil
The same appplies for:
NodesStorageClassesIngressClassesPriorityClasses
More on this in the official documentation.
Configure OIDC authentication with Keycloak
Pre-requisites
- Keycloak realm for Rancher
- Rancher OIDC authentication provider
Keycloak realm for Rancher
These instructions is specific to a setup made with Keycloak as an OIDC identity provider.
Mappers
- Add to userinfo Group Membership type, claim name
groups - Add to userinfo Audience type, claim name
client audience - Add to userinfo, full group path, Group Membership type, claim name
full_group_path
More on this on the official guide.
Rancher OIDC authentication provider
Configure an OIDC authentication provider, with Client with issuer, return URLs specific to the Keycloak setup.
Use old and Rancher-standard paths with
/authsubpath (see issues below).Add custom paths, remove
/authsubpath in return and issuer URLs.
Configuration
Configure Tenant users
- In Rancher, configure OIDC authentication with Keycloak to use with Rancher.
- In Keycloak, Create a Group in the rancher Realm: capsule.clastix.io.
- In Keycloak, Create a User in the rancher Realm, member of capsule.clastix.io Group.
- In the Kubernetes target cluster, update the
CapsuleConfigurationby adding the"keycloakoidc_group://capsule.clastix.io"KubernetesGroup. - Login to Rancher with Keycloak with the new user.
- In Rancher as an administrator, set the user custom role with
getof Cluster. - In Rancher as an administrator, add the Rancher user ID of the just-logged in user as Owner of a
Tenant. - (optional) configure
proxySettingsfor theTenantto enable tenant users to access cluster-wide resources.
4 - Managed Kubernetes
Capsule Operator can be easily installed on a Managed Kubernetes Service. Since you do not have access to the Kubernetes APIs Server, you should check with the provider of the service:
the default cluster-admin ClusterRole is accessible the following Admission Webhooks are enabled on the APIs Server:
PodNodeSelectorLimitRangerResourceQuotaMutatingAdmissionWebhookValidatingAdmissionWebhook
AWS EKS
This is an example of how to install AWS EKS cluster and one user manged by Capsule. It is based on Using IAM Groups to manage Kubernetes access
Create EKS cluster:
export AWS_DEFAULT_REGION="eu-west-1"
export AWS_ACCESS_KEY_ID="xxxxx"
export AWS_SECRET_ACCESS_KEY="xxxxx"

eksctl create cluster \
--name=test-k8s \
--managed \
--node-type=t3.small \
--node-volume-size=20 \
--kubeconfig=kubeconfig.conf
Create AWS User alice using CloudFormation, create AWS access files and kubeconfig for such user:
cat > cf.yml << EOF
Parameters:
  ClusterName:
    Type: String
Resources:
  UserAlice:
    Type: AWS::IAM::User
    Properties:
      UserName: !Sub "alice-${ClusterName}"
      Policies:
      - PolicyName: !Sub "alice-${ClusterName}-policy"
        PolicyDocument:
          Version: "2012-10-17"
          Statement:
          - Sid: AllowAssumeOrganizationAccountRole
            Effect: Allow
            Action: sts:AssumeRole
            Resource: !GetAtt RoleAlice.Arn
  AccessKeyAlice:
    Type: AWS::IAM::AccessKey
    Properties:
      UserName: !Ref UserAlice
  RoleAlice:
    Type: AWS::IAM::Role
    Properties:
      Description: !Sub "IAM role for the alice-${ClusterName} user"
      RoleName: !Sub "alice-${ClusterName}"
      AssumeRolePolicyDocument:
        Version: 2012-10-17
        Statement:
        - Effect: Allow
          Principal:
            AWS: !Sub "arn:aws:iam::${AWS::AccountId}:root"
          Action: sts:AssumeRole
Outputs:
  RoleAliceArn:
    Description: The ARN of the Alice IAM Role
    Value: !GetAtt RoleAlice.Arn
    Export:
      Name:
        Fn::Sub: "${AWS::StackName}-RoleAliceArn"
  AccessKeyAlice:
    Description: The AccessKey for Alice user
    Value: !Ref AccessKeyAlice
    Export:
      Name:
        Fn::Sub: "${AWS::StackName}-AccessKeyAlice"
  SecretAccessKeyAlice:
    Description: The SecretAccessKey for Alice user
    Value: !GetAtt AccessKeyAlice.SecretAccessKey
    Export:
      Name:
        Fn::Sub: "${AWS::StackName}-SecretAccessKeyAlice"
EOF

eval aws cloudformation deploy --capabilities CAPABILITY_NAMED_IAM \
  --parameter-overrides "ClusterName=test-k8s" \
  --stack-name "test-k8s-users" --template-file cf.yml

AWS_CLOUDFORMATION_DETAILS=$(aws cloudformation describe-stacks --stack-name "test-k8s-users")
ALICE_ROLE_ARN=$(echo "${AWS_CLOUDFORMATION_DETAILS}" | jq -r ".Stacks[0].Outputs[] | select(.OutputKey==\"RoleAliceArn\") .OutputValue")
ALICE_USER_ACCESSKEY=$(echo "${AWS_CLOUDFORMATION_DETAILS}" | jq -r ".Stacks[0].Outputs[] | select(.OutputKey==\"AccessKeyAlice\") .OutputValue")
ALICE_USER_SECRETACCESSKEY=$(echo "${AWS_CLOUDFORMATION_DETAILS}" | jq -r ".Stacks[0].Outputs[] | select(.OutputKey==\"SecretAccessKeyAlice\") .OutputValue")

eksctl create iamidentitymapping --cluster="test-k8s" --arn="${ALICE_ROLE_ARN}" --username alice --group capsule.clastix.io

cat > aws_config << EOF
[profile alice]
role_arn=${ALICE_ROLE_ARN}
source_profile=alice
EOF

cat > aws_credentials << EOF
[alice]
aws_access_key_id=${ALICE_USER_ACCESSKEY}
aws_secret_access_key=${ALICE_USER_SECRETACCESSKEY}
EOF

eksctl utils write-kubeconfig --cluster=test-k8s --kubeconfig="kubeconfig-alice.conf"
cat >> kubeconfig-alice.conf << EOF
      - name: AWS_PROFILE
        value: alice
      - name: AWS_CONFIG_FILE
        value: aws_config
      - name: AWS_SHARED_CREDENTIALS_FILE
        value: aws_credentials
EOF
Export “admin” kubeconfig to be able to install Capsule:
export KUBECONFIG=kubeconfig.conf
Install Capsule and create a tenant where alice has ownership. Use the default Tenant example:
kubectl apply -f https://raw.githubusercontent.com/clastix/capsule/master/config/samples/capsule_v1beta1_tenant.yaml
Based on the tenant configuration above the user alice should be able to create namespace. Switch to a new terminal and try to create a namespace as user alice:
# Unset AWS_ACCESS_KEY_ID and AWS_SECRET_ACCESS_KEY if defined
unset AWS_ACCESS_KEY_ID
unset AWS_SECRET_ACCESS_KEY
kubectl create namespace test --kubeconfig="kubeconfig-alice.conf"
Azure AKS
This reference implementation introduces the recommended starting (baseline) infrastructure architecture for implementing a multi-tenancy Azure AKS cluster using Capsule. See CoAKS.
Charmed Kubernetes
Canonical Charmed Kubernetes is a Kubernetes distribution coming with out-of-the-box tools that support deployments and operational management and make microservice development easier. Combined with Capsule, Charmed Kubernetes allows users to further reduce the operational overhead of Kubernetes setup and management.
The Charm package for Capsule is available to Charmed Kubernetes users via Charmhub.io.
5 - Controller Options
The configuration for the capsule controller is done via it’s dedicated configration Custom Resource. You can explain the configuration options and how to use them:
CapsuleConfiguration
The configuration for Capsule is done via it’s dedicated configration Custom Resource. You can explain the configuration options and how to use them:
kubectl explain capsuleConfiguration.spec
administrators
These entities are automatically owners for all existing tenants. Meaning they can add namespaces to any tenant. However they must be specific by using the capsule label for interacting with namespaces. Because if that label is not defined, it’s assumed that namespace interaction was not targeted towards a tenant and will therefor be ignored by capsule. May also be handy in GitOps scenarios where certain service accounts need to be able to manage namespaces for all tenants.
manager:
  options:
    administrators:
      - kind: User
        name: admin-user
users
These entities are automatically owners for all existing tenants. Meaning they can add namespaces to any tenant. However they must be specific by using the capsule label for interacting with namespaces. Because if that label is not defined, it’s assumed that namespace interaction was not targeted towards a tenant and will therefor be ignored by capsule. May also be handy in GitOps scenarios where certain service accounts need to be able to manage namespaces for all tenants.
manager:
  options:
    users:
      - kind: User
        name: owner-user
      - kind: Group
        name: projectcapsule.dev
ignoreUserWithGroups
Define groups which when found in the request of a user will be ignored by the Capsule. This might be useful if you have one group where all the users are in, but you want to separate administrators from normal users with additional groups.
manager:
  options:
    ignoreUserWithGroups:
      - company:org:administrators
enableTLSReconciler
Toggles the TLS reconciler, the controller that is able to generate CA and certificates for the webhooks when not using an already provided CA and certificate, or when these are managed externally with Vault, or cert-manager.
tls:
  enableController: true
forceTenantPrefix
Enforces the Tenant owner, during Namespace creation, to name it using the selected Tenant name as prefix, separated by a dash. This is useful to avoid Namespace name collision in a public CaaS environment.
manager:
  options:
    forceTenantPrefix: true
nodeMetadata
Allows to set the forbidden metadata for the worker nodes that could be patched by a Tenant. This applies only if the Tenant has an active NodeSelector, and the Owner have right to patch their nodes.
manager:
  options:
    nodeMetadata:
      forbiddenLabels:
        denied:
          - "node-role.kubernetes.io/*"
        deniedRegex: ""
      forbiddenAnnotations:
        denied:
          - "node.alpha.kubernetes.io/*"
        deniedRegex: ""
overrides
Allows to set different name rather than the canonical one for the Capsule configuration objects, such as webhook secret or configurations.
protectedNamespaceRegex
Disallow creation of namespaces, whose name matches this regexp
manager:
  options:
    protectedNamespaceRegex: "^(kube|default|capsule|admin|system|com|org|local|localhost|io)$"
allowServiceAccountPromotion
ServiceAccounts within tenant namespaces can be promoted to owners of the given tenant this can be achieved by labeling the serviceaccount and then they are considered owners. This can only be done by other owners of the tenant. However ServiceAccounts which have been promoted to owner can not promote further serviceAccounts.
manager:
  options:
    allowServiceAccountPromotion: true
userGroups
Information
Deprecated: This option is deprecated and will be removed in future releases. Please use theusers option to specify both user and group owners for Capsule tenancy.Names of the groups for Capsule users. Users must have this group to be considered for the Capsule tenancy. If a user does not have any group mentioned here, they are not recognized as a Capsule user.
manager:
  options:
    capsuleUserGroups:
      - system:serviceaccounts:tenants-gitops
      - company:org:users
userNames
Information
Deprecated: This option is deprecated and will be removed in future releases. Please use theusers option to specify both user and group owners for Capsule tenancy.Names of the users for Capsule users. Users must have this name to be considered for the Capsule tenancy. If userGroups are set, the properties are ORed, meaning that a user can be recognized as a Capsule user if they have one of the groups or one of the names.
manager:
  options:
    userNames:
      - system:serviceaccount:crossplane-system:crossplane-k8s-provider
Controller Options
Depending on the version of the Capsule Controller, the configuration options may vary. You can view the options for the latest version of the Capsule Controller or by executing the controller locally:
$ go run ./cmd/. --zap-log-level 7 -h
2025/09/13 23:50:30 maxprocs: Leaving GOMAXPROCS=8: CPU quota undefined
Usage of /var/folders/ts/43yg7sk56ls3r3xjf66npgpm0000gn/T/go-build2624543463/b001/exe/cmd:
      --configuration-name string         The CapsuleConfiguration resource name to use (default "default")
      --enable-leader-election            Enable leader election for controller manager. Enabling this will ensure there is only one active controller manager.
      --enable-pprof                      Enables Pprof endpoint for profiling (not recommend in production)
      --metrics-addr string               The address the metric endpoint binds to. (default ":8080")
      --version                           Print the Capsule version and exit
      --webhook-port int                  The port the webhook server binds to. (default 9443)
      --workers int                       MaxConcurrentReconciles is the maximum number of concurrent Reconciles which can be run. (default 1)
      --zap-devel                         Development Mode defaults(encoder=consoleEncoder,logLevel=Debug,stackTraceLevel=Warn). Production Mode defaults(encoder=jsonEncoder,logLevel=Info,stackTraceLevel=Error)
      --zap-encoder encoder               Zap log encoding (one of 'json' or 'console')
      --zap-log-level level               Zap Level to configure the verbosity of logging. Can be one of 'debug', 'info', 'error', 'panic'or any integer value > 0 which corresponds to custom debug levels of increasing verbosity
      --zap-stacktrace-level level        Zap Level at and above which stacktraces are captured (one of 'info', 'error', 'panic').
      --zap-time-encoding time-encoding   Zap time encoding (one of 'epoch', 'millis', 'nano', 'iso8601', 'rfc3339' or 'rfc3339nano'). Defaults to 'epoch'.
Define additional options in the values.yaml when installing via Helm:
manager:
  extraArgs:
  - "--enable-leader-election=true"