Ecosystem
All entries on this page were added by people who worked on these and thus self-identified as being part of the Project Capsule Ecosystem.
Integrations
Capsule works well with other CNCF kubernetes based solutions. Below you can see the ones we have documented. In the end it can work with any solution, due to Capsule’s kubernetes native approach:
Addons
Addons are seperate projects which interact with the core Capsule Project. Since our commitment is, to have a stable core API we decided to push towards an addon based ecosystem. If you have a new addon, which interacts with the capsule core project, consider adding the addon.
Proxy
core
ux
Enhance the user experience by allowing users to query the Kubernetes API and only getting the results, they are supposed to get.
Rancher
community
ux
Integrate Capsule with Rancher to manage Capsule Tenants and their resources with Rancher Projects.
ArgoCD
vendor
gitops
This addon is designed for kubernetes administrators, to automatically translate their existing Capsule Tenants into Argo Appprojects.
Sops Operator
core
secrets
gitops
Handle SOPS Secrets in a multi-tenant and kubernetes-native way.
FluxCD
core
gitops
In particular enables Tenants to manage their resources, including creating Namespaces.
Cortex Proxy
core
observability
Route metrics to cortex organizations based on the relational of namespace metrics to capsule tenants.
1 - Integrations
Integrate Capsule with other platforms and solutions
1.1 - ArgoCD
Capsule Integration with ArgoCD
Integration
Resource Actions
You may provide Custom Resource Actions for Capsule specific resources and interactions.
Namespace Resource Actions
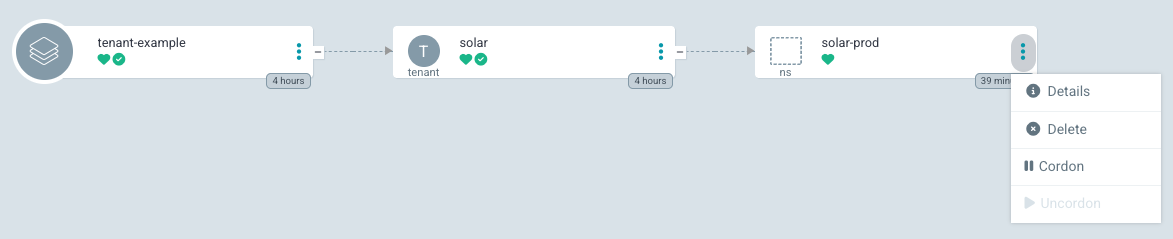
With the following configuration, ArgoCD will show Cordon and Resume actions for the Namespace resource. The Cordon action will set the projectcapsule.dev/cordoned label to true, while the Resume action will set it to false. This is only for Namespaces part of a Capsule Tenant.
resource.customizations.actions.Namespace: |
  mergeBuiltinActions: true
  discovery.lua: |
    actions = {
      cordon = {
        iconClass = "fa fa-solid fa-pause",
        disabled = true,
      },
      uncordon = {
        iconClass = "fa fa-solid fa-play",
        disabled = true,
      },
    }

    local function has_managed_ownerref()
      if obj.metadata == nil or obj.metadata.ownerReferences == nil then
        return false
      end

      for _, ref in ipairs(obj.metadata.ownerReferences) do
        if ref.kind == "Tenant" and ref.apiVersion == "capsule.clastix.io/v1beta2" then
          return true
        end
      end

      return false
    end
    if not has_managed_ownerref() then
      return {}
    end
    local labels = {}
    if obj.metadata ~= nil and obj.metadata.labels ~= nil then
      labels = obj.metadata.labels
    end

    local cordoned = labels["projectcapsule.dev/cordoned"] == "true"

    if cordoned then
      actions["uncordon"].disabled = false
    else
      actions["cordon"].disabled = false
    end

    return actions

  definitions:
    - name: cordon
      action.lua: |
        if obj.metadata == nil then
          obj.metadata = {}
        end
        if obj.metadata.labels == nil then
          obj.metadata.labels = {}
        end

        obj.metadata.labels["projectcapsule.dev/cordoned"] = "true"
        return obj

    - name: uncordon
      action.lua: |
        if obj.metadata ~= nil and obj.metadata.labels ~= nil then
          obj.metadata.labels["projectcapsule.dev/cordoned"] = "false"
        end
        return obj
Tenant Resource Actions
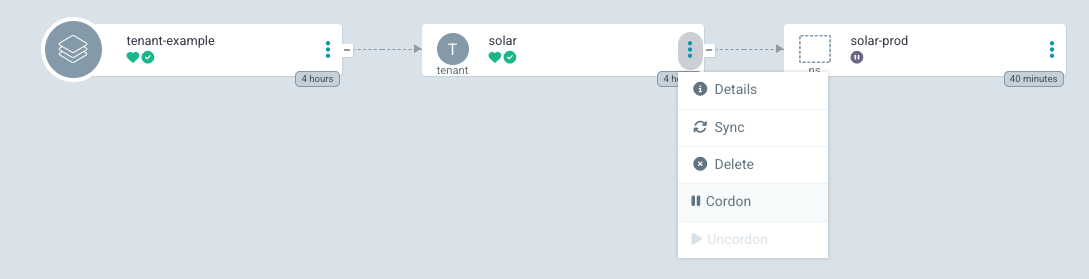
With the following configuration, ArgoCD will show Cordon and Resume actions for the Tenant resource. The Cordon action will set the spec.cordon field to true, while the Resume action will set it to false.
resource.customizations.actions.capsule.clastix.io_Tenant: |
  mergeBuiltinActions: true
  discovery.lua: |
    actions = {}
    actions["cordon"] = {
      ["iconClass"] = "fa fa-solid fa-pause",
      ["disabled"] = true,
    }
    actions["uncordon"] = {
      ["iconClass"] = "fa fa-solid fa-play",
      ["disabled"] = true,
    }

    local suspend = false
    if obj.spec ~= nil and obj.spec.cordoned ~= nil then
      suspend = obj.spec.cordoned
    end

    if suspend then
      actions["uncordon"]["disabled"] = false
    else
      actions["cordon"]["disabled"] = false
    end

    return actions

  definitions:
    - name: cordon
      action.lua: |
        if obj.spec == nil then
          obj.spec = {}
        end
        obj.spec.cordoned = true
        return obj

    - name: uncordon
      action.lua: |
        if obj.spec ~= nil and obj.spec.cordoned ~= nil and obj.spec.cordoned then
          obj.spec.cordoned = false
        end
        return obj
Resource Health
You may provide Custom Resource Health for Capsule specific resources and interactions.
Tenant Resource Health

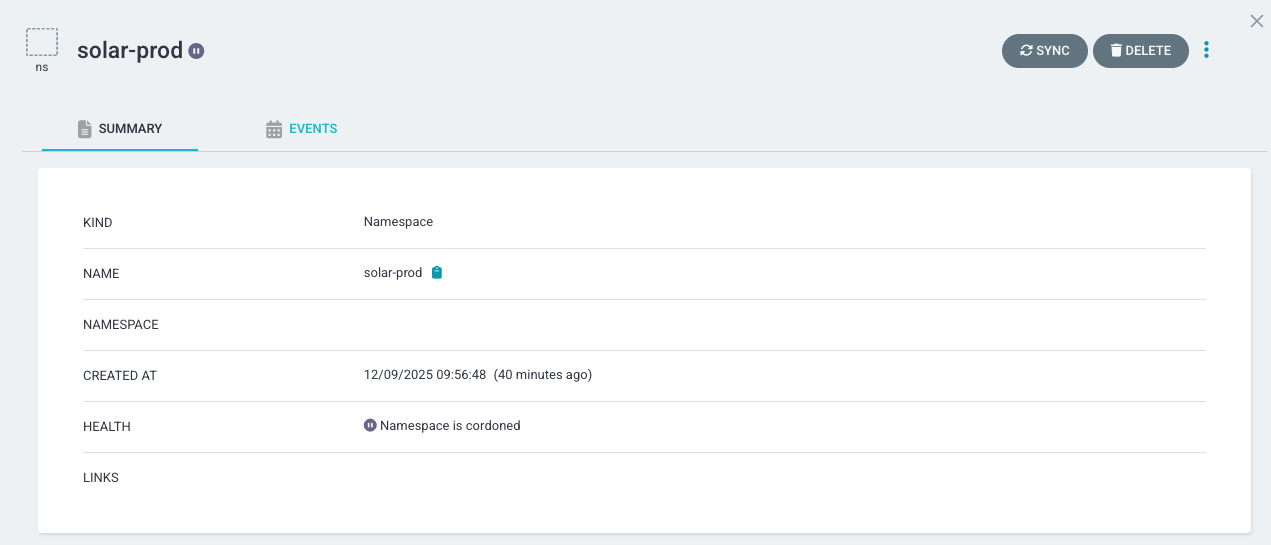
Suspends a Tenant when it’s Cordoned. Cordoning a Tenant will Cordon/Uncordon all it’s Namespaces.
resource.customizations.health.capsule.clastix.io_Tenant: |
  hs = {}
  if obj.status ~= nil then
    if obj.status.conditions ~= nil then
      for i, condition in ipairs(obj.status.conditions) do
        if condition.type == "Cordoned" and condition.status == "True" then
          hs.status = "Suspended"
          hs.message = condition.message
          return hs
        end
      end
      for i, condition in ipairs(obj.status.conditions) do
        if condition.type == "Ready" and condition.status == "False" then
          hs.status = "Degraded"
          hs.message = condition.message
          return hs
        end
        if condition.type == "Ready" and condition.status == "True" then
          hs.status = "Healthy"
          hs.message = condition.message
          return hs
        end
      end
    end
  end

  hs.status = "Progressing"
  hs.message = "Waiting for Status"
  return hs
Namespace Resource Health
Suspends a Namespace when it’s Cordoned. This is only for Namespaces part of a Capsule Tenant.
resource.customizations.health.Namespace: |
  hs = {}
  local function has_managed_ownerref()
    if obj.metadata == nil or obj.metadata.ownerReferences == nil then
      return false
    end

    for _, ref in ipairs(obj.metadata.ownerReferences) do
      if ref.kind == "Tenant" and ref.apiVersion == "capsule.clastix.io/v1beta2" then
        return true
      end
    end

    return false
  end

  local labels = {}
  if obj.metadata ~= nil and obj.metadata.labels ~= nil then
    labels = obj.metadata.labels
  end

  local cordoned = labels["projectcapsule.dev/cordoned"] == "true"

  if cordoned and has_managed_ownerref() then
    hs.status = "Suspended"
    hs.message = "Namespace is cordoned (tenant-managed)"
    return hs
  end

  if obj.status ~= nil and obj.status.phase ~= nil then
    if obj.status.phase == "Active" then
      hs.status = "Healthy"
      hs.message = "Namespace is Active"
      return hs
    else
      hs.status = "Progressing"
      hs.message = "Namespace phase is " .. obj.status.phase
      return hs
    end
  end

  hs.status = "Progressing"
  hs.message = "Waiting for Namespace status"
  return hs
1.2 - Crossplane
Capsule Integration with Crossplane
1.3 - Dashboard
Capsule Integration with Kubernetes Dashboard
This guide works with the kubernetes dashboard v2.0.0 (Chart 6.0.8). It has not yet been tested successfully with with v3.x version of the dashboard.
We recommend to use Headlamp as a more modern alternative to the Kubernetes Dashboard.
This guide describes how to integrate the Kubernetes Dashboard and Capsule Proxy with OIDC authorization.
OIDC Authentication
Your cluster must also be configured to use OIDC Authentication for seemless Kubernetes RBAC integration. In a such scenario, you should have in the kube-apiserver.yaml manifest the following content:
spec:
  containers:
  - command:
    - kube-apiserver
    ...
    - --oidc-issuer-url=https://${OIDC_ISSUER}
    - --oidc-ca-file=/etc/kubernetes/oidc/ca.crt
    - --oidc-client-id=${OIDC_CLIENT_ID}
    - --oidc-username-claim=preferred_username
    - --oidc-groups-claim=groups
    - --oidc-username-prefix=-
Where ${OIDC_CLIENT_ID} refers to the client ID that all tokens must be issued.
For this client we need: 1. Check Valid Redirect URIs: in the oauth2-proxy configuration we set redirect-url: “https://${DASHBOARD_URL}/oauth2/callback”, it needs to add this path to the Valid Redirect URIs 2. Create a mapper with Mapper Type ‘Group Membership’ and Token Claim Name ‘groups’. 3. Create a mapper with Mapper Type ‘Audience’ and Included Client Audience and Included Custom Audience set to your client name (${OIDC_CLIENT_ID}).
OAuth2 Proxy
To enable the proxy authorization from the Kubernetes dashboard to Keycloak, we need to use an OAuth proxy. In this article, we will use oauth2-proxy and install it as a pod in the Kubernetes Dashboard namespace. Alternatively, we can install oauth2-proxy in a different namespace or use it as a sidecar container in the Kubernetes Dashboard deployment.
Prepare the values for oauth2-proxy:
cat > values-oauth2-proxy.yaml <<EOF
config:
  clientID: "${OIDC_CLIENT_ID}"
  clientSecret: ${OIDC_CLIENT_SECRET}

extraArgs:
  provider: "keycloak-oidc"
  redirect-url: "https://${DASHBOARD_URL}/oauth2/callback"
  oidc-issuer-url: "https://${KEYCLOAK_URL}/auth/realms/${OIDC_CLIENT_ID}"
  pass-access-token: true
  set-authorization-header: true
  pass-user-headers: true

ingress:
  enabled: true
  path: "/oauth2"
  hosts:
    - ${DASHBOARD_URL}
  tls:
    - hosts:
      - ${DASHBOARD_URL}
EOF
More information about the keycloak-oidc provider can be found on the oauth2-proxy documentation. We’re ready to install the oauth2-proxy:
helm repo add oauth2-proxy https://oauth2-proxy.github.io/manifests
helm install oauth2-proxy oauth2-proxy/oauth2-proxy -n ${KUBERNETES_DASHBOARD_NAMESPACE} -f values-oauth2-proxy.yaml
Configuring Keycloak
The Kubernetes cluster must be configured with a valid OIDC provider: for our guide, we’re giving for granted that Keycloak is used, if you need more info please follow the OIDC Authentication section.
In a such scenario, you should have in the kube-apiserver.yaml manifest the following content:
spec:
  containers:
  - command:
    - kube-apiserver
    ...
    - --oidc-issuer-url=https://${OIDC_ISSUER}
    - --oidc-ca-file=/etc/kubernetes/oidc/ca.crt
    - --oidc-client-id=${OIDC_CLIENT_ID}
    - --oidc-username-claim=preferred_username
    - --oidc-groups-claim=groups
    - --oidc-username-prefix=-
Where ${OIDC_CLIENT_ID} refers to the client ID that all tokens must be issued.
For this client we need:
- Check
Valid Redirect URIs: in the oauth2-proxy configuration we set redirect-url: "https://${DASHBOARD_URL}/oauth2/callback", it needs to add this path to the Valid Redirect URIs - Create a mapper with Mapper Type ‘Group Membership’ and Token Claim Name ‘groups’.
- Create a mapper with Mapper Type ‘Audience’ and Included Client Audience and Included Custom Audience set to your client name(OIDC_CLIENT_ID).
Configuring Kubernetes Dashboard
If your Capsule Proxy uses HTTPS and the CA certificate is not the Kubernetes CA, you need to add a secret with the CA for the Capsule Proxy URL.
cat > ca.crt<< EOF
-----BEGIN CERTIFICATE-----
...
...
...
-----END CERTIFICATE-----
EOF

kubectl create secret generic certificate --from-file=ca.crt=ca.crt -n ${KUBERNETES_DASHBOARD_NAMESPACE}
Prepare the values for the Kubernetes Dashboard:
cat > values-kubernetes-dashboard.yaml <<EOF
extraVolumes:
  - name: token-ca
    projected:
      sources:
        - serviceAccountToken:
            expirationSeconds: 86400
            path: token
        - secret:
            name: certificate
            items:
              - key: ca.crt
                path: ca.crt
extraVolumeMounts:
  - mountPath: /var/run/secrets/kubernetes.io/serviceaccount
    name: token-ca

ingress:
  enabled: true
  annotations:
    nginx.ingress.kubernetes.io/auth-signin: https://${DASHBOARD_URL}/oauth2/start?rd=$escaped_request_uri
    nginx.ingress.kubernetes.io/auth-url: https://${DASHBOARD_URL}/oauth2/auth
    nginx.ingress.kubernetes.io/auth-response-headers: "authorization"
  hosts:
    - ${DASHBOARD_URL}
  tls:
    - hosts:
      - ${DASHBOARD_URL}

extraEnv:
  - name: KUBERNETES_SERVICE_HOST
    value: '${CAPSULE_PROXY_URL}'
  - name: KUBERNETES_SERVICE_PORT
    value: '${CAPSULE_PROXY_PORT}'
EOF
To add the Certificate Authority for the Capsule Proxy URL, we use the volume token-ca to mount the ca.crt file. Additionally, we set the environment variables KUBERNETES_SERVICE_HOST and KUBERNETES_SERVICE_PORT to route requests to the Capsule Proxy.
Now you can install the Kubernetes Dashboard:
helm repo add kubernetes-dashboard https://kubernetes.github.io/dashboard/
helm install kubernetes-dashboard kubernetes-dashboard/kubernetes-dashboard -n ${KUBERNETES_DASHBOARD_NAMESPACE} -f values-kubernetes-dashboard.yaml
1.4 - Envoy-Gateway
Capsule Integration with Envoy (Gateway API)
There’s different ways to use Gateway API in a multi-tenant setup. This guide suggested a strong isolated implementation using the Envoy Gateway Project. The Architecture suggested looks something like this:
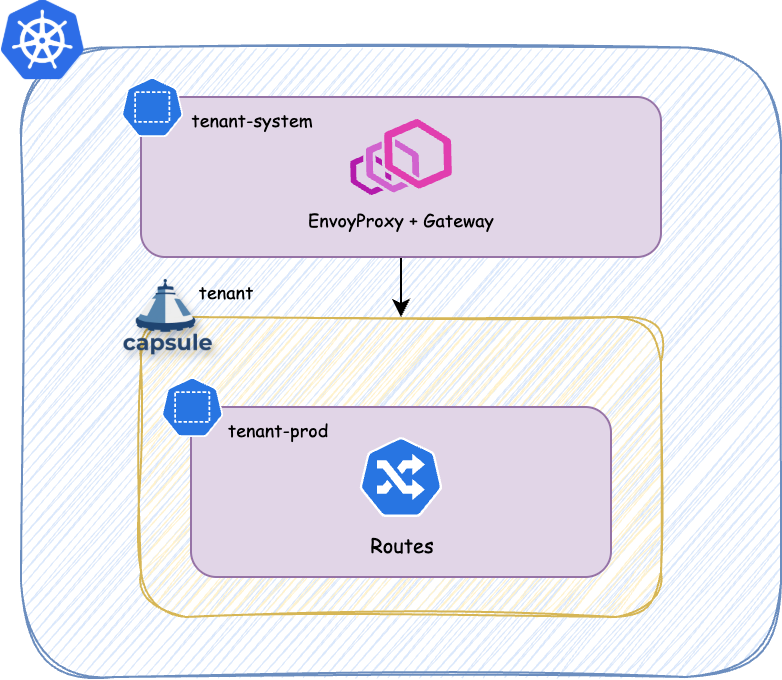
Each tenant will get it’s own -system Namespace. However that namespace is not managed by the Tenant nor part of it. It’s the namespace where the platform deploys managed services for each Tenant, which are out of bound for TenantOwners.
Example
Implementation of the above architecture looks something like this.
Managed Gateway
With this GlobalTenantResource we generate the managed gateway for each tenant. The EnvoyProxy is the custom resource used by the Envoy Gateway project to manage the lifecycle of the Envoy instances. The Gateway is the standard resource defined by the Gateway API, which references the EnvoyProxy as infrastructure and defines the listeners and allowed routes.
---
apiVersion: capsule.clastix.io/v1beta2
kind: GlobalTenantResource
metadata:
  name: managed-envoy-gateway
spec:
  scope: Tenant
  resyncPeriod: 30s
  resources:
    - context:
        resources:
          - apiVersion: gateway.networking.k8s.io/v1
            kind: HTTPRoute
            index: https
            selector:
              matchLabels:
                projectcapsule.dev/tenant: "{{tenant.name}}"
      generators:
        - missingKey: zero
          template: |
            {{- $ingressBandwidth := dig "spec" "data" "networking" "ingress" "bandwidth" "" $.tenant }}
            {{- $egressBandwidth := dig "spec" "data" "networking" "egress" "bandwidth" "" $.tenant }}
            {{- $loadBalancerIP := dig "spec" "data" "networking" "ingress" "loadbalancer" "" $.tenant }}
            ---
            apiVersion: gateway.envoyproxy.io/v1alpha1
            kind: EnvoyProxy
            metadata:
              name: tenant-{{ $.tenant.metadata.name }}-gateway
              namespace: tenant-{{ $.tenant.metadata.name }}-system
            spec:
              logging:
                level:
                  default: info
              provider:
                type: Kubernetes
                kubernetes:
                  envoyDeployment:
                    replicas: 2
                    pod:
                      priorityClassName: tenant-critical
                      {{- if or $ingressBandwidth $egressBandwidth }}
                      annotations:
                        {{- with $ingressBandwidth }}
                        kubernetes.io/ingress-bandwidth: {{ . }}
                        {{- end }}
                        {{- with $egressBandwidth }}
                        kubernetes.io/egress-bandwidth: {{ . }}
                        {{- end }}
                      {{- end }}
                  {{- with $loadBalancerIP }}
                  envoyService:
                    loadBalancerIP: {{ . }}
                  {{- end }}

        - missingKey: zero
          template: |
            ---
            apiVersion: gateway.networking.k8s.io/v1
            kind: Gateway
            metadata:
              name: tenant-{{ $.tenant.metadata.name }}-gateway
              namespace: tenant-{{ $.tenant.metadata.name }}-system
              annotations:
                cert-manager.io/cluster-issuer: managed-cluster-issuer
                cert-manager.io/private-key-size: "4096"
                cert-manager.io/private-key-algorithm: RSA
            spec:
              gatewayClassName: tenants
              infrastructure:
                parametersRef:
                  group: gateway.envoyproxy.io
                  kind: EnvoyProxy
                  name: tenant-{{ $.tenant.metadata.name }}-gateway
              listeners:
                - name: http-challenge
                  port: 80
                  protocol: HTTP
                  allowedRoutes:
                    namespaces:
                      from: Selector
                      selector:
                        matchLabels:
                          capsule.clastix.io/tenant: "{{ $.tenant.metadata.name }}"
                {{- range $_, $http := $.https }}
                  {{- range $i, $hostname := $http.spec.hostnames }}
                - name: {{ $http.metadata.namespace }}-{{ $http.metadata.name }}-{{ $i }}
                  port: 443
                  protocol: HTTPS
                  hostname: {{ $hostname}}
                  tls:
                    mode: Terminate
                    certificateRefs:
                      - group: ''
                        kind: Secret
                        name: {{ $http.metadata.namespace }}-{{ $http.metadata.name }}-{{ $i }}-tls
                  allowedRoutes:
                    namespaces:
                      from: Selector
                      selector:
                        matchLabels:
                           kubernetes.io/metadata.name: "{{ $http.metadata.namespace }}"
                  {{- end }}
                {{- end }}
Certificate Management
If we additionally would like to do Certificate Management via cert-manager in combination with ACME HTTP-01 challenges we probably want to provide the users with a ClusterIssuer per Tenant:
apiVersion: capsule.clastix.io/v1beta2
kind: GlobalTenantResource
metadata:
  name: tenant-acme-issuer
spec:
  scope: Tenant
  resources:
    - rawItems:
      - apiVersion: cert-manager.io/v1
        kind: Issuer
        metadata:
          name: {{tenant.name}}-acme-http
          namespace: {{tenant.name}}-system
        spec:
          acme:
            email: platform@email.com
            server: https://acme-staging-v02.api.letsencrypt.org/directory
            privateKeySecretRef:
              name: cert-letsencrypt-staging
            solvers:
              - http01:
                  gatewayHTTPRoute:
                    parentRefs:
                      - group: gateway.networking.k8s.io
                        kind: Gateway
                        name: {{tenant.name}}-gateway
                        namespace: {{tenant.name}}-system
                        sectionName: http-challenge
1.5 - External Secrets Operator
Capsule Integration with External Secrets Operator
With External Secrets Operator it’s possible to delegate Secrets Management to an external system while keeping the actual management of the secrets within Kubernetes. This guide provides a simple automation example with External Secrets Operator. Before starting, you might want to explore the existing documentation regarding multi-tenancy:
Secure ClusterSecretStores
If you have any ClusterSecretStores, which are not intended to be used by Tenants, you must make sure Tenants can not reference the ClusterSecretStore. You can achieve this by unselecting all Tenant Namespaces like so:
---
apiVersion: external-secrets.io/v1
kind: ClusterSecretStore
metadata:
  name: platform-vault
spec:
  conditions:
    - namespaceSelector:
        matchExpressions:
          - key: capsule.clastix.io/tenant  # Forbid the use of this platform keyvault by tenants
            operator: DoesNotExist
  provider:
    azurekv:
      tenantId: {TENANT}
      vaultUrl: {VAULT}
      authSecretRef:
        clientId:
          name: external-secrets-secret
          key: azure.clientID
          namespace: external-secrets
        clientSecret:
          name: external-secrets-secret
          key: azure.clientSecret
          namespace: external-secrets
ClusterSecretStores
One possible approach is to generate a ClusterSecretStore scoping it only to the Namespaces of one Tenant:
1.6 - Headlamp
Capsule Integration with Headlamp
Headlamp is an easy-to-use and extensible Kubernetes web UI.
Headlamp was created to blend the traditional feature set of other web UIs/dashboards (i.e., to list and view resources) with added functionality.
Prerequisites
- You will need a running Capsule Proxy instance.
- For Authentication you will need a Confidential OIDC client configured in your OIDC provider, such as Keycloak, Dex, or Google Cloud Identity. By default the Kubernetes API only validates tokens against a Public OIDC client, so you will need to configure your OIDC provider to allow the Headlamp client to issue tokens. You must make use of the Kubernetes Authentication Configuration, which allows to define multiple audiences (clients). This way we can issue tokens for a headlamp client, which is Confidential (Client Secret), and a kubernetes client, which is Public. The Kubernetes API will validate the tokens against both clients. The Config might look like this:
apiVersion: apiserver.config.k8s.io/v1beta1
kind: AuthenticationConfiguration
jwt:
- issuer:
    url: https://keycloak/realms/realm-name
    audiences:
    - kubernetes
    - headlamp
    audienceMatchPolicy: MatchAny # This one is important
  claimMappings:
    username:
      claim: 'email'
      prefix: ""
    groups:
      claim: 'groups'
      prefix: ""
Read More
Integration
To install Headlamp, you can use the Helm chart provided in the Headlamp repository. It’s a bit special how Headlamp handles Certificate Authorities. We need to inject the capsule-proxy CA into the trust store for Headlamp. In the below example we are using the CA Bundle from alpine (because we also need to trust the CA of the OIDC Issuer, in this case it uses Let’s Encrypt). See the issues #3707 and #127. Essentially Golang uses some environment variables to allow specifying cert files/dirs overriding the system defaults. By Default this is under /etc/ssl/. You can change this behavior by defining the environment variables SSL_CERT_FILE or/and SSL_CERT_DIR.
It’s recommended to install headlamp in the capsule-system namespace. Otherwise you need to somehow replicate the internal ca secret to the namespace, where headlamp is deployed to. For this case Cert-Manager Trust-Bundles might be useful.
With the following values we got it to work:
config:
  inCluster: true
  extraArgs:
  - -insecure-ssl
env:
  - name: KUBERNETES_SERVICE_HOST
    value: "capsule-proxy.capsule-system.svc"
  - name: KUBERNETES_SERVICE_PORT
    value: "9001"
  - name: "OIDC_ISSUER_URL"
    value: "https://keycloak/realms/realm-name"
  - name: "OIDC_CLIENT_ID"
    value: "headlamp"
  - name: "OIDC_CLIENT_SECRET"
    value: "<SECRET>"
  - name: "OIDC_USE_ACCESS_TOKEN"
    value: "false"
  - name: "OIDC_SCOPES"
    value: "openid profile email groups offline_access"
volumeMounts:
  - mountPath: /var/run/secrets/kubernetes.io/serviceaccount
    name: token-ca
  - name: ca-store
    mountPath: /etc/ssl/
volumes:
  - name: ca-store
    emptyDir: {}
  - name: capsule-proxy
    secret:
      secretName: capsule-proxy
  - name: token-ca
    projected:
      sources:
        - serviceAccountToken:
            path: token
        - secret:
            items:
              - key: ca.crt
                path: ca.crt
            name: capsule-proxy
        - downwardAPI:
            items:
              - fieldRef:
                  apiVersion: v1
                  fieldPath: metadata.namespace
                path: namespace
initContainers:
- name: add-ca
  image: alpine:3
  command: ["/bin/sh","-c"]
  args:
  - |
    set -e
    cp -R /etc/ssl/* /work/
    cat /ca/ca.crt >> /work/certs/ca-certificates.crt
  volumeMounts:
  - name: ca-store
    mountPath: /work
  - name: capsule-proxy
    mountPath: /ca
  securityContext:
    runAsNonRoot: true
    capabilities:
      drop:
      - ALL
    readOnlyRootFilesystem: false
    allowPrivilegeEscalation: false
    privileged: false
    runAsUser: 65534
    runAsGroup: 65534
podSecurityContext:
  runAsNonRoot: true
  seccompProfile:
    type: RuntimeDefault
securityContext:
  capabilities:
    drop:
    - ALL
  readOnlyRootFilesystem: false
  allowPrivilegeEscalation: false
  privileged: false
  runAsUser: 100
  runAsGroup: 101
  fsGroup: 101
  fsGroupChangePolicy: "Always"
Note: The secret capsule-proxy refers to the secret which is being used by the capsule-proxy instance directly, not the self-signed-ca secret.
Plugins
We are commitet to provide a set of plugins to enhance the user experience with Capsule and Headlamp. Any community contribution is welcome, so feel free to open a PR with your plugin.
1.7 - Kyverno
Kyverno is a policy engine designed for Kubernetes. It provides the ability to validate, mutate, and generate Kubernetes resources using admission control. Kyverno policies are managed as Kubernetes resources and can be applied to a cluster using kubectl. Capsule integrates with Kyverno to provide a set of policies that can be used to improve the security and governance of the Kubernetes cluster.
Permissions
Some policies are attempting to query Capsule specific information, such as the tenant name based on the namespace. Therefore, we need to ensure that Kyverno has the necessary permissions to read Capsule resources. This can be achieved by extending the Kyverno ClusterRole to include Capsule resources:
admissionController:
  rbac:
    clusterRole:
      extraResources:
       - apiGroups: ["capsule.clastix.io"]
         resources: ["*"]
         verbs: ["get", "list"]
Recommended Policies
Not all relevant settings are covered by Capsule. We recommend to use Kyverno to enforce additional policies, as their policy implementation is of a very high standard. Here are some policies you might want to consider in multi-tenant environments:
Moved to new page
References
Here are some policies for reference. We do not provide a complete list of policies, but we provide some examples to get you started. This policies are not meant to be used in production. You may adopt principles shown here to create your own policies.
To get the tenant name based on the namespace, you can use a context. With this context we resolve the tenant, based on the {{request.namespace}} for the requested resource. The context calls /api/v1/namespaces/ API with the {{request.namespace}}. The jmesPath is used to check if the tenant label is present. You could assign a default if nothing was found, in this case it’s empty string:
    context:
      - name: tenant_name
        apiCall:
          method: GET
          urlPath: "/api/v1/namespaces/{{request.namespace}}"
          jmesPath: "not_null(metadata.labels.\"capsule.clastix.io/tenant\" || '')"
Select namespaces with label capsule.clastix.io/tenant
When you are performing a policy on namespaced objects, you can select the objects, which are within a tenant namespace by using the namespaceSelector. In this example we select all Kustomization and HelmRelease resources which are within a tenant namespace:
apiVersion: kyverno.io/v1
kind: ClusterPolicy
metadata:
  name: flux-policies
spec:
  validationFailureAction: Enforce
  rules:
    # Enforcement (Mutate to Default)
    - name: Defaults Kustomizations/HelmReleases
      match:
        any:
        - resources:
            kinds:
              - Kustomization
              - HelmRelease
            operations:
              - CREATE
              - UPDATE
            namespaceSelector:
              matchExpressions:
                - key: "capsule.clastix.io/tenant"
                  operator: Exists
      mutate:
        patchStrategicMerge:
          spec:
            +(targetNamespace): "{{ request.object.metadata.namespace }}"
            +(serviceAccountName): "default"
Compare Source and Destination Tenant
With this policy we try to enforce, that helmreleases within a tenant can only use targetNamespaces, which are within the same tenant or the same namespace the resource is deployed in:
apiVersion: kyverno.io/v1
kind: ClusterPolicy
metadata:
  name: tenant-compare
spec:
  validationFailureAction: Enforce
  background: true
  rules:
    - name: Validate HelmRelease/Kustomization Target Namespace
      context:

        # Get tenant based on target namespace
        - name: destination_tenant
          apiCall:
            urlPath: "/api/v1/namespaces/{{request.object.spec.targetNamespace}}"
            jmesPath: "metadata.labels.\"capsule.clastix.io/tenant\""

        # Get tenant based on resource namespace
        - name: source_tenant
          apiCall:
            urlPath: "/api/v1/namespaces/{{request.object.metadata.namespace}}"
            jmesPath: "metadata.labels.\"capsule.clastix.io/tenant\""
      match:
        any:
        - resources:
            kinds:
              - HelmRelease
              - Kustomization
            operations:
              - CREATE
              - UPDATE
            namespaceSelector:
              matchExpressions:
                - key: "capsule.clastix.io/tenant"
                  operator: Exists
      preconditions:
        all:
          - key: "{{request.object.spec.targetNamespace}}"
            operator: NotIn
            values: [ "{{request.object.metadata.namespace}}" ]
      validate:
        message: "spec.targetNamespace must be in the same tenant ({{source_tenant}})"
        deny:
          conditions:
            - key: "{{source_tenant}}"
              operator: NotEquals
              value:  "{{destination_tenant}}"
Using Global Configuration
When creating a a lot of policies, you might want to abstract your configuration into a global configuration. This is a good practice to avoid duplication and to have a single source of truth. Also if we introduce breaking changes (like changing the label name), we only have to change it in one place. Here is an example of a global configuration:
apiVersion: v1
kind: ConfigMap
metadata:
  name: kyverno-global-config
  namespace: kyverno-system
data:
  # Label for public namespaces
  public_identifier_label: "company.com/public"
  # Value for Label for public namespaces
  public_identifier_value: "yeet"
  # Label which is used to select the tenant name
  tenant_identifier_label: "capsule.clastix.io/tenant"
This configuration can be referenced via context in your policies. Let’s extend the above policy with the global configuration. Additionally we would like to allow the usage of public namespaces:
apiVersion: kyverno.io/v1
kind: ClusterPolicy
metadata:
  name: tenant-compare
spec:
  validationFailureAction: Enforce
  background: true
  rules:
    - name: Validate HelmRelease/Kustomization Target Namespace
      context:

        # Load Gloabl Configuration
        - name: global
          configMap:
            name: kyverno-global-config
            namespace: kyverno-system

        # Get All Public Namespaces based on the label and it's value from the global configuration
        - name: public_namespaces
          apiCall:
            urlPath: "/api/v1/namespaces"
            jmesPath: "items[?metadata.labels.\"{{global.data.public_identifier_label}}\" == '{{global.data.public_identifier_value}}'].metadata.name | []"

        # Get Tenant information from source namespace
        # Defaults to a character, which can't be a label value
        - name: source_tenant
          apiCall:
            urlPath: "/api/v1/namespaces/{{request.object.metadata.namespace}}"
            jmesPath: "metadata.labels.\"{{global.data.tenant_identifier_label}}\" | '?'"

        # Get Tenant information from destination namespace
        # Returns Array with Tenant Name or Empty
        - name: destination_tenant
          apiCall:
            urlPath: "/api/v1/namespaces"
            jmesPath: "items[?metadata.name == '{{request.object.spec.targetNamespace}}'].metadata.labels.\"{{global.data.tenant_identifier_label}}\""

      preconditions:
        all:
          - key: "{{request.object.spec.targetNamespace}}"
            operator: NotIn
            values: [ "{{request.object.metadata.namespace}}" ]
        any:
          # Source is not Self-Reference
          - key: "{{request.object.spec.targetNamespace}}"
            operator: NotEquals
            value: "{{request.object.metadata.namespace}}"

          # Source not in Public Namespaces
          - key: "{{request.object.spec.targetNamespace}}"
            operator: NotIn
            value: "{{public_namespaces}}"

          # Source not in Destination
          - key: "{{request.object.spec.targetNamespace}}"
            operator: NotIn
            value: "{{destination_tenant}}"
      match:
        any:
        - resources:
            kinds:
              - HelmRelease
              - Kustomization
            operations:
              - CREATE
              - UPDATE
            namespaceSelector:
              matchExpressions:
                - key: "capsule.clastix.io/tenant"
                  operator: Exists
      validate:
        message: "Can not use namespace {{request.object.spec.chart.spec.sourceRef.namespace}} as source reference!"
        deny: {}
Extended Validation and Defaulting
Here’s extended examples for using validation and defaulting. The first policy is used to validate the tenant name. The second policy is used to default the tenant properties, you as cluster-administrator would like to enforce for each tenant.
apiVersion: kyverno.io/v1
kind: ClusterPolicy
metadata:
  name: tenant-core
spec:
  validationFailureAction: Enforce
  rules:
  - name: tenant-name
    match:
      all:
      - resources:
          kinds:
          - "capsule.clastix.io/v1beta2/Tenant"
          operations:
          - CREATE
          - UPDATE
    validate:
      message: "Using this tenant name is not allowed."
      deny:
        conditions:
          - key: "{{ request.object.metadata.name }}"
            operator: In
            value: ["default", "cluster-system" ]

  - name: tenant-properties
    match:
      any:
      - resources:
          kinds:
          - "capsule.clastix.io/v1beta2/Tenant"
          operations:
          - CREATE
          - UPDATE
    mutate:
      patchesJson6902: |-
        - op: add
          path: "/spec/namespaceOptions/forbiddenLabels/deniedRegex"
          value: ".*company.ch"
        - op: add
          path: "/spec/priorityClasses/matchLabels"
          value:
            consumer: "customer"
        - op: add
          path: "/spec/serviceOptions/allowedServices/nodePort"
          value: false
        - op: add
          path: "/spec/ingressOptions/allowedClasses/matchLabels"
          value:
            consumer: "customer"
        - op: add
          path: "/spec/storageClasses/matchLabels"
          value:
            consumer: "customer"
        - op: add
          path: "/spec/nodeSelector"
          value:
            nodepool: "workers"
Adding Default Owners/Permissions to Tenant
Since the Owners Spec is a list, it’s a bit more trickier to add a default owner without causing recursions. You must make sure, to validate if the value you are setting is already present. Otherwise you will create a loop. Here is an example of a policy, which adds the cluster:admin as owner to a tenant:
apiVersion: kyverno.io/v1
kind: ClusterPolicy
metadata:
  name: tenant-policy
spec:
  validationFailureAction: Enforce
  background: true
  rules:

  # With this policy for each tenant cluster:admin is added as owner.
  # Only Append these on CREATE, otherwise they will be added per reconciliation and create a loop.
  - name: tenant-owner
    preconditions:
      all:
      - key: "cluster:admin"
        operator: NotIn
        value: "{{ request.object.spec.owners[?kind == 'Group'].name }}"
    match:
      all:
      - resources:
          kinds:
          - "capsule.clastix.io/v1beta2/Tenant"
          operations:
          - CREATE
          - UPDATE
    mutate:
      patchesJson6902: |-
        - op: add
          path: "/spec/owners/-"
          value:
            name: "cluster:admin"
            kind: "Group"

  # With this policy for each tenant a default ProxySettings are added.
  # Completely overwrites the ProxySettings, if they are already present.
  - name: tenant-proxy-settings
    match:
      any:
      - resources:
          kinds:
          - "capsule.clastix.io/v1beta2/Tenant"
          operations:
          - CREATE
          - UPDATE
    mutate:
      foreach:
      - list: "request.object.spec.owners"
        patchesJson6902: |-
          - path: /spec/owners/{{elementIndex}}/proxySettings
            op: add
            value:
              - kind: IngressClasses
                operations:
                - List
              - kind: StorageClasses
                operations:
                - List
              - kind: PriorityClasses
                operations:
                - List
              - kind: Nodes
                operations:
                - List
1.8 - Lens
With Capsule extension for Lens, a cluster administrator can easily manage from a single pane of glass all resources of a Kubernetes cluster, including all the Tenants created through the Capsule Operator.
Features
Capsule extension for Lens provides these capabilities:
- List all tenants
- See tenant details and change through the embedded Lens editor
- Check Resources Quota and Budget at both the tenant and namespace level
Please, see the README for details about the installation of the Capsule Lens Extension.
1.9 - Monitoring
While we can not provide a full list of all the monitoring solutions available, we can provide some guidance on how to integrate Capsule with some of the most popular ones. Also this is dependent on how you have set up your monitoring solution. We will just explore the options available to you.
Logging
Loki
Promtail
config:
  clients:
    - url: "https://loki.company.com/loki/api/v1/push"
      # Maximum wait period before sending batch
      batchwait: 1s
      # Maximum batch size to accrue before sending, unit is byte
      batchsize: 102400
      # Maximum time to wait for server to respond to a request
      timeout: 10s
      backoff_config:
        # Initial backoff time between retries
        min_period: 100ms
        # Maximum backoff time between retries
        max_period: 5s
        # Maximum number of retries when sending batches, 0 means infinite retries
        max_retries: 20
      tenant_id: "tenant"
      external_labels:
        cluster: "${cluster_name}"
  serverPort: 3101
  positions:
    filename: /run/promtail/positions.yaml
  target_config:
    # Period to resync directories being watched and files being tailed
    sync_period: 10s
  snippets:
    pipelineStages:
      - docker: {}
      # Drop health logs
      - drop:
          expression: "(.*/health-check.*)|(.*/health.*)|(.*kube-probe.*)"
      - static_labels:
          cluster: ${cluster}
      - tenant:
          source: tenant
    # This wont work if pods on the cluster are not labeled with tenant
    extraRelabelConfigs:
      - action: replace
        source_labels:
          - __meta_kubernetes_pod_label_capsule_clastix_io_tenant
        target_label: tenant
...
As mentioned, the above configuration will not work if the pods on the cluster are not labeled with tenant. You can use the following Kyverno policy to ensure that all pods are labeled with tenant. If the pod does not belong to any tenant, it will be labeled with management (assuming you have a central management tenant)
apiVersion: kyverno.io/v1
kind: ClusterPolicy
metadata:
  name: capsule-pod-labels
spec:
  background: false
  rules:
  - name: add-pod-label
    context:
      - name: tenant
        apiCall:
          method: GET
          urlPath: "/api/v1/namespaces/{{request.namespace}}"
          jmesPath: "not_null(metadata.labels.\"capsule.clastix.io/tenant\" || 'management')"
    match:
      all:
      - resources:
          kinds:
            - Pod
          operations:
            - CREATE
            - UPDATE
    mutate:
      patchStrategicMerge:
        metadata:
          labels:
            +(capsule.clastix.io/tenant): "{{ tenant_name }}"
Grafana
1.10 - OpenCost
OpenCost Integration for Tenants
This guide explains how to integrate OpenCost with Capsule to provide cost visibility and chargeback/showback per tenant.
You can group workloads into tenants by annotating namespaces (for example, opencost.projectcapsule.dev/tenant: {{ tenant.name }}).
OpenCost can use this annotation to aggregate costs, enabling accurate cost allocation across clusters, nodes, namespaces, controller kinds, controllers, services, pods, and containers for each tenant.
Prerequisites
Installation
Capsule
- Create a tenant with spec.namespaceOptions.additionalMetadataList:
kubectl create -f - << EOF
apiVersion: capsule.clastix.io/v1beta2
kind: Tenant
metadata:
  name: solar
spec:
  namespaceOptions:
    additionalMetadataList:
    - annotations:
        opencost.projectcapsule.dev/tenant: "{{ tenant.name }}"
  owners:
  - name: alice
    kind: User
EOF
OpenCost
- Create a basic OpenCost values file. Set emitNamespaceAnnotations: true because aggregation is based on the Capsule annotation.
opencost:
  prometheus:
    internal:
      namespaceName: prometheus-system
      serviceName: prometheus-server
      port: 80

  dataRetention:
    dailyResolutionDays: 30  # default: 15

  exporter:
    defaultClusterId: kind-opencost-capsule
    replicas: 1
    resources:
      requests:
        cpu: "10m"
        memory: "55Mi"
      limits:
        memory: "1Gi"
    persistence:
      enabled: false

  metrics:
    kubeStateMetrics:
      emitNamespaceAnnotations: true
      emitPodAnnotations: true
      emitKsmV1Metrics: false
      emitKsmV1MetricsOnly: false
    serviceMonitor:
      enabled: true
      additionalLabels:
        release: prometheus
- Install OpenCost with the values above:
helm install opencost opencost-charts/opencost --namespace opencost --create-namespace -f values.yaml
Fetch data from OpenCost
Note!
Aggregation is only possible via the API. There is no option to aggregate using the UI.- Port-forward:
kubectl -n opencost port-forward deployment/opencost 9003:9003 9090:9090
- Query the API:
- Aggregate by namespace:
curl -G http://localhost:9003/allocation \
  -d window=1h \
  -d aggregate=namespace,annotation:opencost_projectcapsule_dev_tenant \
  -d resolution=1h
- Aggregate by pod:
curl -G http://localhost:9003/allocation \
  -d window=1h \
  -d aggregate=pod,annotation:opencost_projectcapsule_dev_tenant \
  -d resolution=1h
- Aggregate by deployment:
curl -G http://localhost:9003/allocation \
  -d window=1h \
  -d aggregate=deployment,annotation:opencost_projectcapsule_dev_tenant \
  -d resolution=1h
1.11 - Openshift
1.12 - Rancher
1.13 - Tekton
With Capsule extension for Lens, a cluster administrator can easily manage from a single pane of glass all resources of a Kubernetes cluster, including all the Tenants created through the Capsule Operator.
Prerequisites
Tekton must be already installed on your cluster, if that’s not the case consult the documentation here:
Cluster Scoped Permissions
Tekton Dashboard
Now for the enduser experience we are going to deploy the tekton dashboard. When using oauth2-proxy we can deploy one single dashboard, which can be used for all tenants. Refer to the following guide to setup the dashboard with the oauth2-proxy:
Once that is done, we need to make small adjustments to the tekton-dashboard service account.
kustomization.yaml
apiVersion: kustomize.config.k8s.io/v1beta1
kind: Kustomization
resources:
  - https://storage.googleapis.com/tekton-releases/dashboard/latest/release.yaml
patches:
  # Adjust the service for the capsule-proxy according to your installation
  # The used values are compatbile with the default installation values
  - target:
      version: v1
      kind: Deployment
      name: tekton-dashboard
    patch: |-
      - op: add
        path: /spec/template/spec/containers/0/env/-
        value:
          name: KUBERNETES_SERVICE_HOST
          value: "capsule-proxy.capsule-system.svc"
      - op: add
        path: /spec/template/spec/containers/0/env/-
        value:
          name: KUBERNETES_SERVICE_PORT
          value: "9001"

  # Adjust the CA certificate for the capsule-proxy according to your installation
  - target:
      version: v1
      kind: Deployment
      name: tekton-dashboard
    patch: |-
      - op: add
        path: /spec/template/spec/containers/0/volumeMounts
        value: []
      - op: add
        path: /spec/template/spec/containers/0/volumeMounts/-
        value:
          mountPath: "/var/run/secrets/kubernetes.io/serviceaccount"
          name: token-ca
      - op: add
        path: /spec/template/spec/volumes
        value: []
      - op: add
        path: /spec/template/spec/volumes/-
        value:
          name: token-ca
          projected:
            sources:
              - serviceAccountToken:
                  expirationSeconds: 86400
                  path: token
              - secret:
                  name: capsule-proxy
                  items:
                    - key: ca
                      path: ca.crt
This patch assumes there’s a secret called capsule-proxy with the CA certificate for the Capsule Proxy URL.
Apply the given kustomization:
extraEnv:
- name: KUBERNETES_SERVICE_HOST
value: ‘${CAPSULE_PROXY_URL}’
- name: KUBERNETES_SERVICE_PORT
value: ‘${CAPSULE_PROXY_PORT}’
Tekton Operator
When using the Tekton Operator, you need to add the following to the TektonConfig:
apiVersion: operator.tekton.dev/v1alpha1
kind: TektonConfig
metadata:
  name: config
spec:
  dashboard:
    readonly: false
    options:
      disabled: false
      deployments:
        tekton-dashboard:
          spec:
            template:
              spec:
                volumes:
                  - name: token-ca
                    projected:
                      sources:
                        - serviceAccountToken:
                            expirationSeconds: 86400
                            path: token
                        - secret:
                            name: capsule-proxy
                            items:
                              - key: ca
                                path: ca.crt
                containers:
                  - name: tekton-dashboard
                    volumeMounts:
                      - mountPath: "/var/run/secrets/kubernetes.io/serviceaccount"
                        name: token-ca
                    env:
                      - name: KUBERNETES_SERVICE_HOST
                        value: "capsule-proxy.capsule-system.svc"
                      - name: KUBERNETES_SERVICE_PORT
                        value: "9001"
See for reference the options spec
1.14 - Teleport
Teleport is an open-source tool that provides zero trust access to servers and cloud applications using SSH, Kubernetes, Database, Remote Desktop Protocol and HTTPS. It can eliminate the need for VPNs by providing a single gateway to access computing infrastructure via SSH, Kubernetes clusters, and cloud applications via a built-in proxy.
If you want to pass requests from teleport users through the capsule-proxy for users to be able to do things like listing namespaces scoped to their own tenants, this integration is for you.
Prerequisites
- Capsule
- Capsule Proxy
- Teleport Cluster
- teleport-kube-agent
Integration
It’s recommended to install teleport-kube-agent in the capsule-system namespace. Otherwise you need to somehow replicate the internal ca secret to the namespace, where teleport-kube-agent is deployed to. For this case Cert-Manager Trust-Bundles might be useful.
Add the following values to the teleport-kube-agent helm chart and you’re already done:
extraEnv:
  - name: KUBERNETES_SERVICE_HOST
    value: capsule-proxy.capsule-system.svc
  - name: KUBERNETES_SERVICE_PORT
    value: "9001"
extraVolumes:
  - name: kube-api-access-capsule
    projected:
      sources:
        - serviceAccountToken:
            path: token
        - secret:
            items:
              - key: ca
                path: ca.crt
            name: capsule-proxy
        - downwardAPI:
            items:
              - fieldRef:
                  apiVersion: v1
                  fieldPath: metadata.namespace
                path: namespace
extraVolumeMounts:
  - mountPath: /var/run/secrets/kubernetes.io/serviceaccount
    name: kube-api-access-capsule
    readOnly: true
Note: The secret capsule-proxy refers to the secret which is being used by the capsule-proxy instance directly, not the self-signed-ca secret.
Local Demo
If you want to test this integration locally, follow these steps.
References
The following tools have to be installed on your machine:
- docker
- kind
- kubectl
- helm
- mkcert
Docker Network
Create docker network teleport:
docker network create teleport
Self-signed certificates
Create certificates for teleport.demo:
mkdir teleport-tls
cd teleport-tls
mkcert teleport.demo "*.teleport.demo"
cp "$(mkcert -CAROOT)/rootCA.pem" .
Teleport installation
Run Ubuntu docker image in the teleport network using teleport.demo alias on port 443:
docker run -it -v .:/etc/teleport-tls --name teleport --network teleport --network-alias teleport.demo -p 443:443 ubuntu:22.04
Run the following commands inside docker container:
apt-get update && apt-get install -y curl
cp /etc/teleport-tls/rootCA.pem /etc/ssl/certs/mkcertCA.pem
curl https://cdn.teleport.dev/install.sh | bash -s 18.2.1
teleport configure -o file \
  --cluster-name=teleport.demo \
  --public-addr=teleport.demo:443 \
  --cert-file=/etc/teleport-tls/teleport.demo+1.pem \
  --key-file=/etc/teleport-tls/teleport.demo+1-key.pem
teleport start --config="/etc/teleport.yaml"
Open new shell
Note down IP of docker container:
docker inspect -f '{{range .NetworkSettings.Networks}}{{.IPAddress}}{{end}}' teleport
Kubernetes Cluster setup
- Create kind cluster:
kind create cluster --name capsule
CoreDNS
To allow pods to easily connect to the teleport service running in the other Docker container:
Connect to docker network: docker network connect teleport capsule-control-plane
Edit ConfigMap of coredns to set up dns resolution of teleport.demo: kubectl edit cm -n kube-system coredns
hosts {
    <Paste IP from docker inspect command here> teleport.demo
    fallthrough
}
Restart coredns Deployment: kubectl rollout restart deployment -n kube-system coredns
Capsule
capsule-values.yaml:
manager:
  options:
    capsuleUserGroups: ["tenant-oil"]
    forceTenantPrefix: true
tenant.yaml:
apiVersion: capsule.clastix.io/v1beta2
kind: Tenant
metadata:
  name: oil
spec:
  owners:
  - name: alice
    kind: User
Install capsule with tenant-oil as a capsule user group via helm chart:
helm repo add projectcapsule https://projectcapsule.github.io/chartshelm upgrade --install capsule -n capsule-system --create-namespace projectcapsule/capsule --version 0.10.9 -f capsule-values.yaml- Create tenant named
oil: kubectl apply -f tenant.yaml
Capsule Proxy
Install default capsule-proxy via helm chart:
helm repo add projectcapsule https://projectcapsule.github.io/chartshelm upgrade --install capsule-proxy -n capsule-system projectcapsule/capsule-proxy --version 0.9.12
Teleport
Create teleport role for kubernetes cluster access which adds tenant-oil group to user auth token.
Create and set up user alice with kube-access teleport role:
tctl users add alice --roles=access,kube-access- Add
127.0.0.1 teleport.demo to etc/hosts of your computer - Set password and second factor for user
alice in browser
Create join token for teleport-kube-agent:
- Note down
authToken from command: tctl tokens add --type=kube --ttl=24h
Teleport Agent
teleport-agent-values.yaml:
proxyAddr: "teleport.demo:443"
kubeClusterName: "teleport.demo"
insecureSkipProxyTLSVerify: true
authToken: "<Paste authToken from tctl tokens add command here>"
labels:
  capsule: "true"
extraEnv:
  - name: KUBERNETES_SERVICE_HOST
    value: capsule-proxy.capsule-system.svc
  - name: KUBERNETES_SERVICE_PORT
    value: "9001"
extraVolumes:
  - name: kube-api-access-capsule
    projected:
      sources:
        - serviceAccountToken:
            path: token
        - secret:
            items:
              - key: ca
                path: ca.crt
            name: capsule-proxy
        - downwardAPI:
            items:
              - fieldRef:
                  apiVersion: v1
                  fieldPath: metadata.namespace
                path: namespace
extraVolumeMounts:
  - mountPath: /var/run/secrets/kubernetes.io/serviceaccount
    name: kube-api-access-capsule
    readOnly: true
- Update
authToken in teleport-agent-values.yaml from output of tctl tokens add command helm repo add teleport https://charts.releases.teleport.devhelm upgrade --install teleport-agent -n capsule-system teleport/teleport-kube-agent --version 18.2.0 -f teleport-agent-values.yaml
Test it out
tsh login --proxy=teleport.demo:443 --auth=local --user=alice teleport.demotsh kube login teleport.demokubectl get tenantkubectl get namespace (only works because teleport is connected to capsule-proxy instead of kubernetes api)kubectl create ns foo-bar (should fail, since not owner)kubectl create ns oil-bar (should succeed)
From here you could enable ProxyClusterScoped feature gate to allow listing of cluster scoped resources via ProxySettings.
Cleanup
kind delete clusters capsulerm -rf teleport-tlstsh logout --proxy=teleport.demo --user alicedocker rm teleport
1.15 - Velero